Tag: keto breakfast

  • Egg-Stuffed Bell Peppers (The Cutest Low-Carb Breakfast You’ll Ever Eat)

    Egg-Stuffed Bell Peppers (The Cutest Low-Carb Breakfast You’ll Ever Eat)

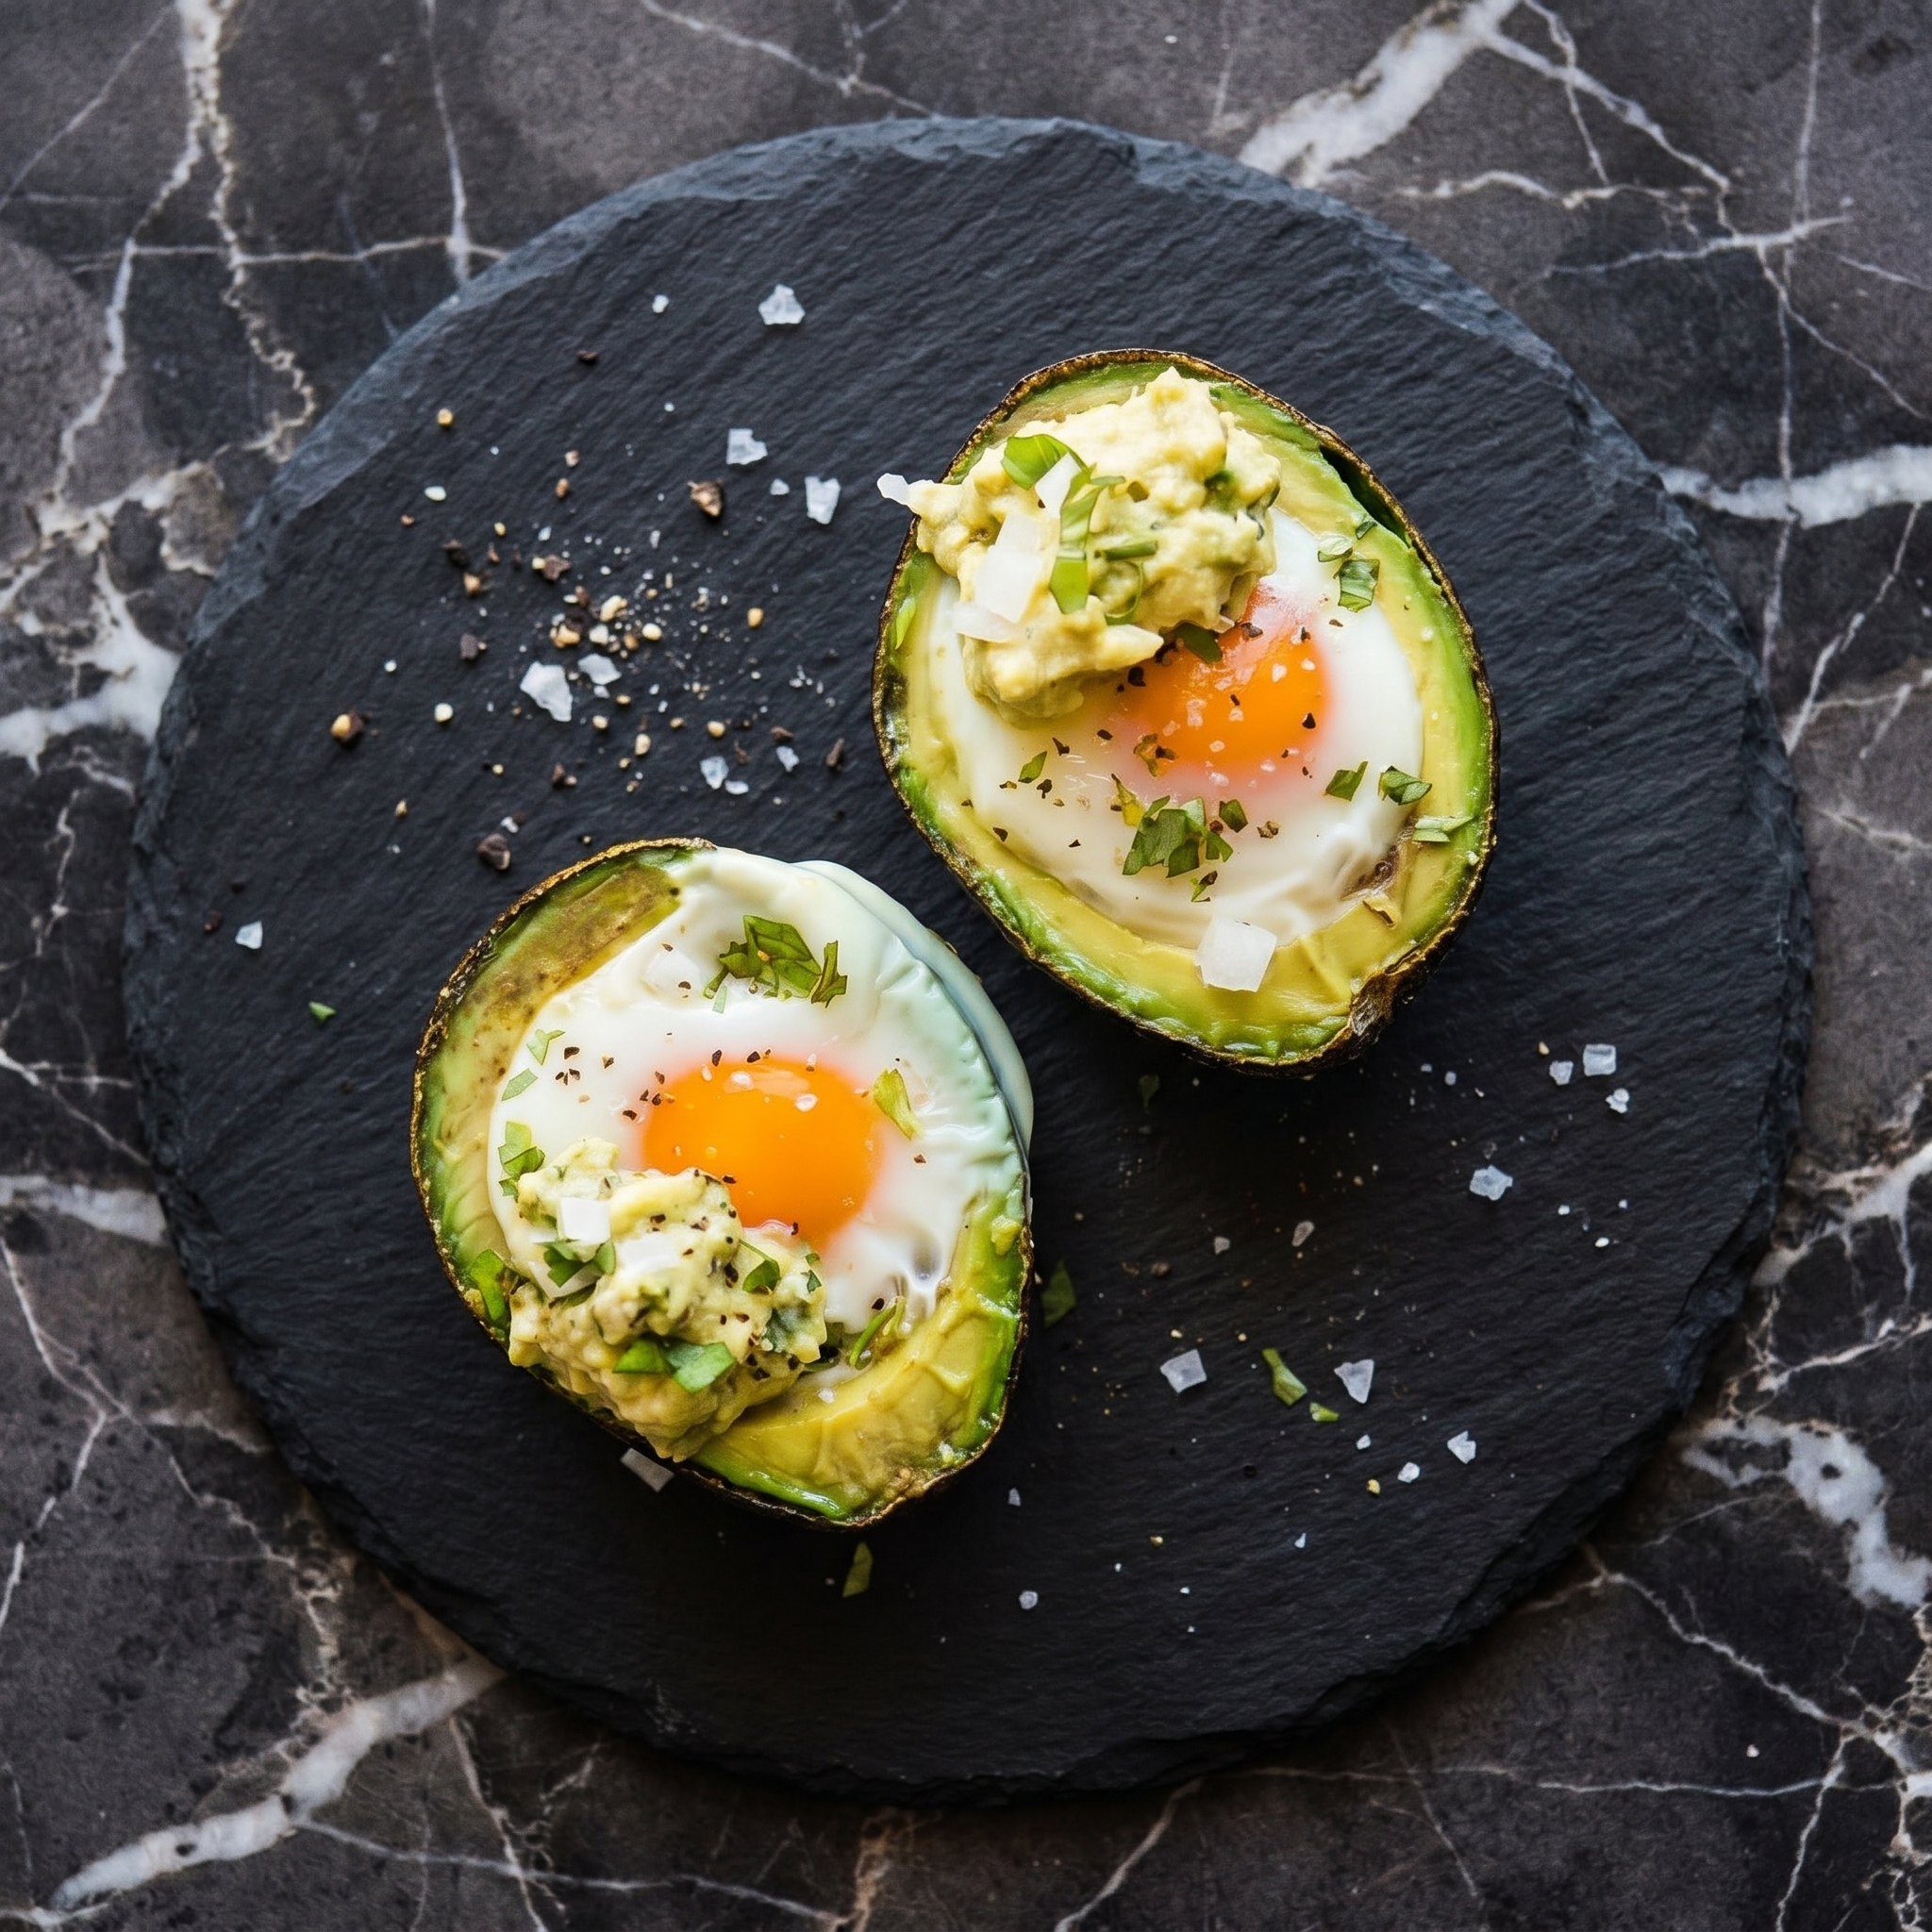
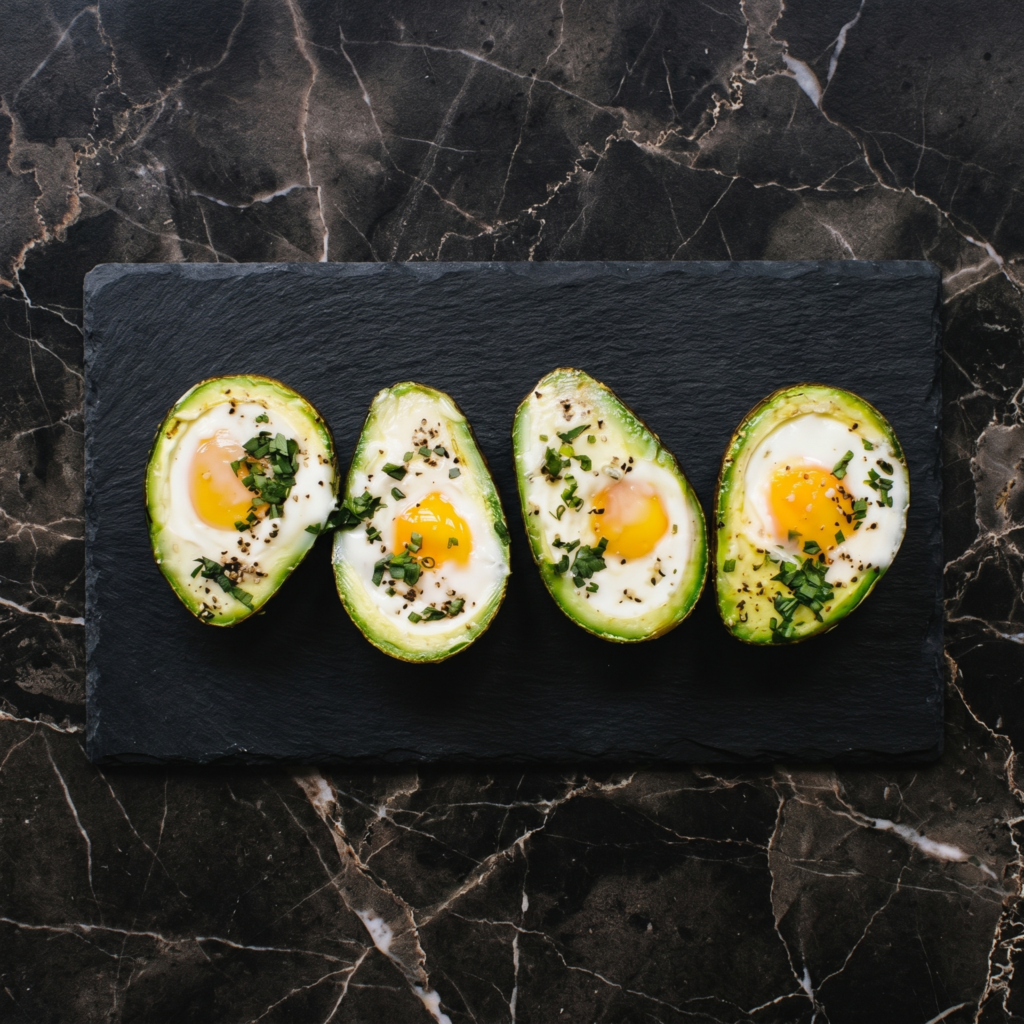
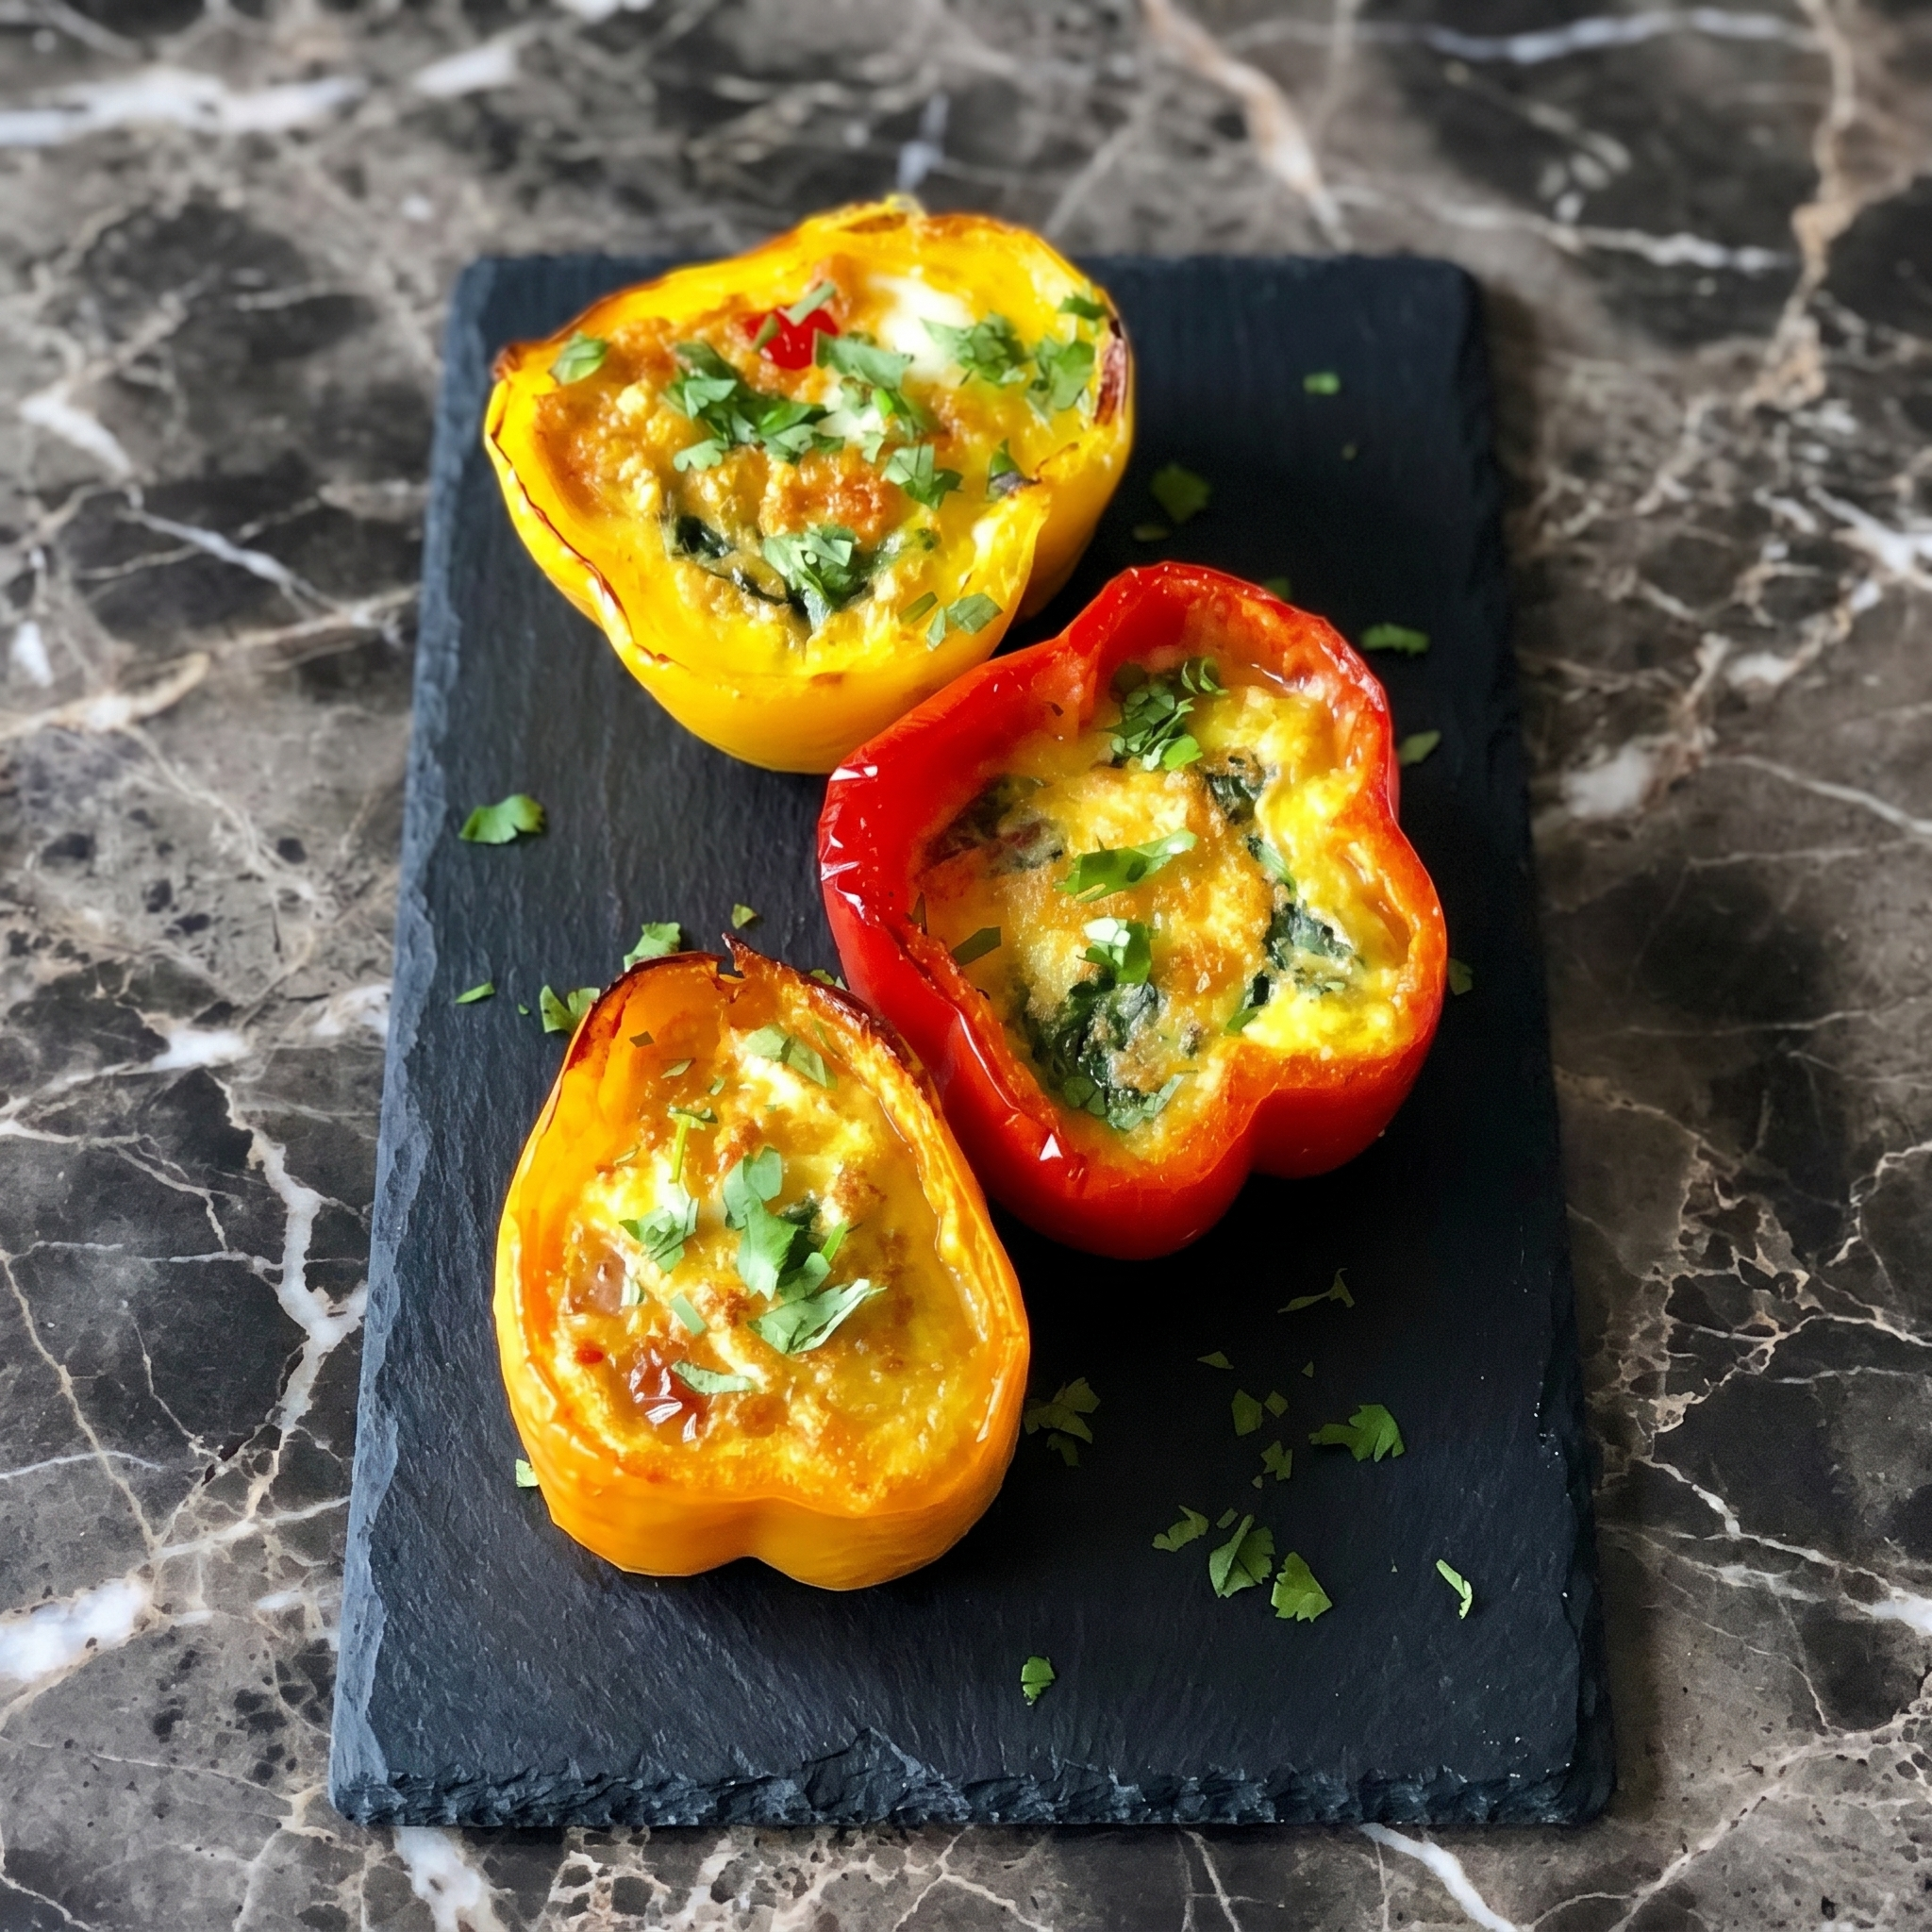
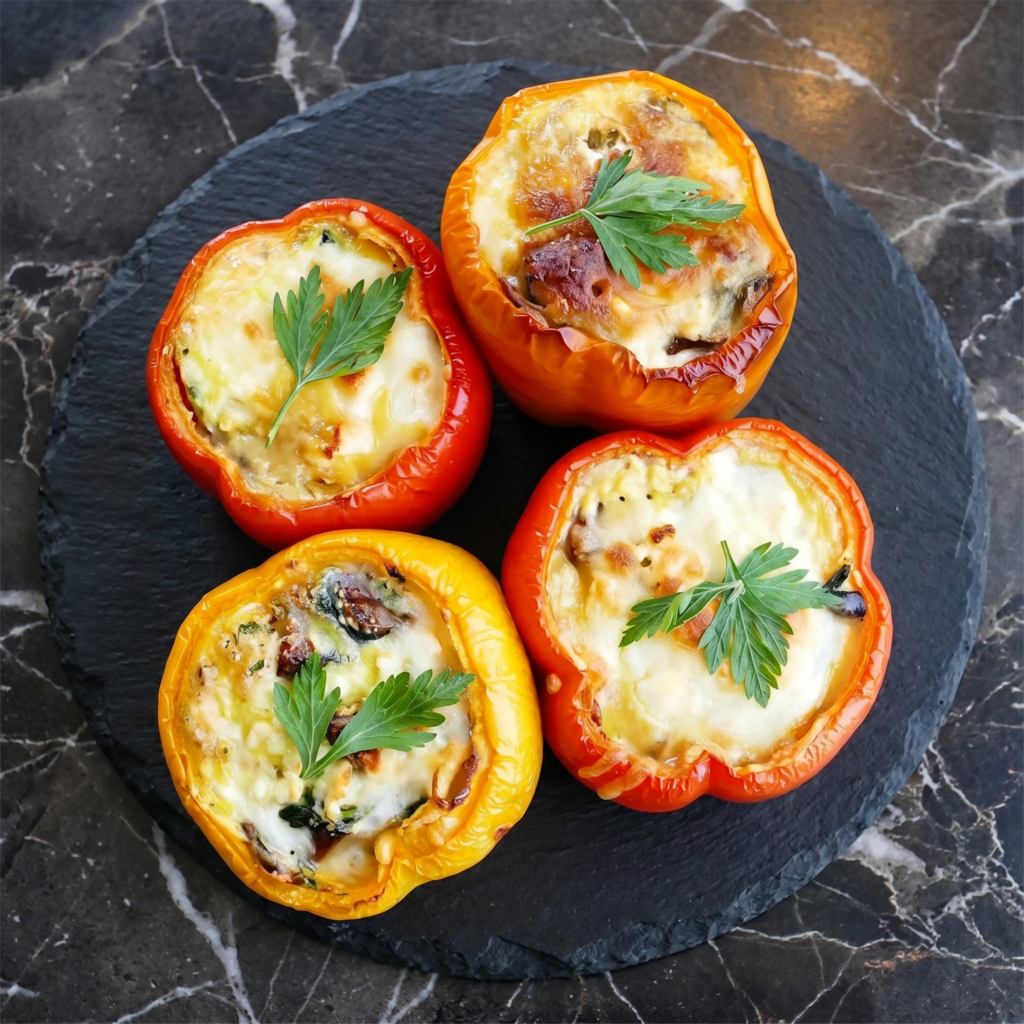
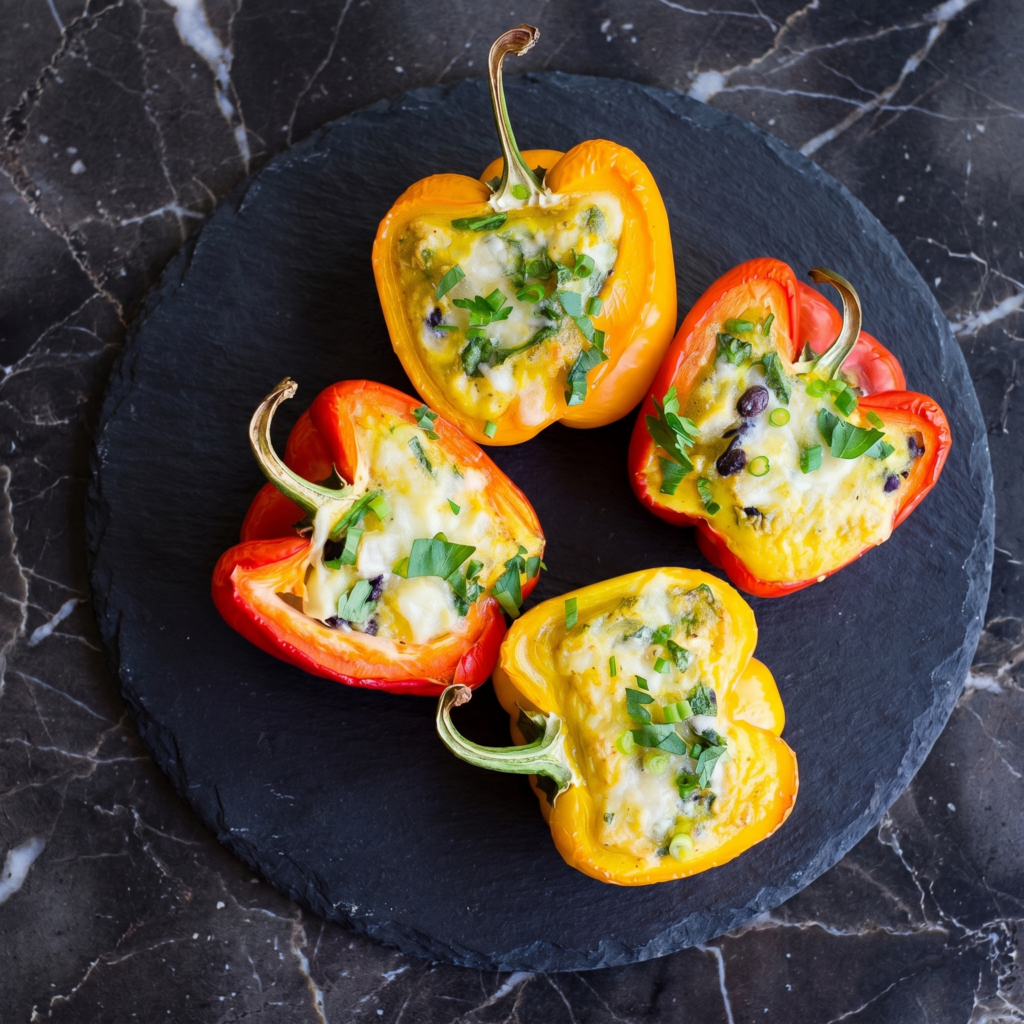
    Muffin tins are boring. Bell peppers are not.

    Slice them into rings. Crack an egg inside. Bake. What comes out is a colorful, cheese-topped, protein-packed breakfast that looks like you tried way harder than you did. Plus, you can hold it like a tiny breakfast donut.

    Ingredients

    Serves 2–4.

    • 2 large bell peppers (any color)
    • 4 large eggs
    • ¼ cup shredded cheddar, feta, or Mexican blend cheese
    • Salt and black pepper to taste
    • ¼ teaspoon garlic powder or smoked paprika (optional)
    • Fresh parsley or chives, for garnish
    • Hot sauce or salsa, for serving

    Step-by-Step Instructions

    Step 1: Preheat and Slice

    1. Preheat oven to 375°F (190°C). Line a baking sheet with parchment paper.
    2. Slice bell peppers into ½-inch thick rings. Remove seeds and membranes.
    3. You’ll get about 2–3 rings per pepper. Save the tops and bottoms for another use.

    Step 2: Arrange

    1. Place pepper rings on the baking sheet in a single layer.
    2. Lightly spray or brush inside of each ring with oil to prevent sticking.

    Step 3: Add the Eggs

    1. Crack one egg into each pepper ring. Try not to break the yolk.
    2. If egg white spills under the pepper, that’s fine—crispy edges are delicious.

    Step 4: Season and Bake

    1. Sprinkle with salt, pepper, and garlic powder or paprika.
    2. Top each with shredded cheese.
    3. Bake for 12–15 minutes until egg whites are set and yolks are to your liking.

    Step 5: Serve

    1. Let cool 2 minutes. Garnish with fresh herbs.
    2. Serve with hot sauce, salsa, or just eat them with your hands like the breakfast genius you are.

    Summary

    Prep Time: 5 minutes | Cook Time: 12–15 minutes | Total Time: 17–20 minutes

    Yield: 4 egg-stuffed rings | Difficulty: Easy

    Storage Notes

    Fridge: Store in an airtight container for up to 3 days. Reheat in air fryer at 350°F for 3 minutes or toaster oven.

    Microwave warning: It works, but the pepper gets soft. Acceptable for work lunches, not for brunch flexing.

    Meal prep: Slice pepper rings ahead and store in the fridge. Crack eggs fresh the morning of.

    Pro tip: Buy peppers with flat bottoms so the rings stand stable. Crooked peppers = spilled eggs.

  • Baked Egg Avocado Boats: The 15-Minute Breakfast That Went Viral

    Baked Egg Avocado Boats: The 15-Minute Breakfast That Went Viral

    Six ingredients. One sheet pan. Zero regrets.

    Halved avocados get cradled with an egg, sprinkled with cheese, and baked until the whites are set and the yolks are runny. It’s breakfast, lunch, or a snack that looks impressive but takes zero skill.

    Ingredients

    Serves 2.

    • 2 ripe but firm avocados
    • 4 small eggs (or 2 large if your avocados are huge)
    • ¼ cup shredded cheddar, parmesan, or feta
    • Salt and black pepper
    • Red pepper flakes or paprika (optional)
    • Fresh chives or parsley, for garnish

    Step-by-Step Instructions

    Step 1: Preheat & Prep

    1. Heat oven to 425°F (220°C). Line a baking sheet with parchment paper.
    2. Cut avocados in half and remove pits. Scoop out a little extra flesh to make room for the egg (about 1 tablespoon per half).

    Step 2: Crack the Eggs

    1. Place avocado halves cut-side up on the baking sheet. Crack one egg into each well. Some white may spill over – that’s fine.
    2. Season with salt and pepper.

    Step 3: Bake

    1. Bake for 12–15 minutes. For runny yolks, pull at 12 minutes. For firm yolks, go longer.
    2. In the last 2 minutes, sprinkle cheese on top.

    Step 4: Finish & Devour

    1. Garnish with red pepper flakes and fresh chives. Eat immediately with a spoon or fork.

    Summary

    Prep Time: 5 minutes | Cook Time: 12–15 minutes | Total Time: 15–20 minutes

    Yield: 2 servings (4 boats) | Difficulty: Foolproof

    Storage Notes

    Don’t store these. Avocados turn brown, eggs get rubbery. Make fresh and eat immediately.

    But you can prep: scoop avocado wells ahead and refrigerate. Crack eggs right before baking. That’s it.

  • Baked Eggs in Ham Cups: Breakfast in Crispy Pork Bowls

    Baked Eggs in Ham Cups: Breakfast in Crispy Pork Bowls

    Muffin tins aren’t just for muffins anymore.

    Press sliced ham into each cup. Crack in an egg. Bake. That’s it. The ham gets crispy like bacon. The egg cooks perfectly. You get a handheld breakfast cup that requires zero forks and makes you feel like a genius.

    Ingredients

    Serves 4 (makes 4 cups).

    • 4 slices deli ham (black forest or honey ham work great—not too thick)
    • 4 large eggs
    • Salt and black pepper
    • Optional toppings: shredded cheddar, chives, hot sauce, or paprika
    • Nonstick spray or butter for muffin tin

    Step-by-Step Instructions

    Step 1: Preheat and Prep

    1. Preheat oven to 375°F (190°C). Generously grease a standard 12-cup muffin tin (you’ll use 4 cups).

    Step 2: Make the Ham Cups

    1. Press one slice of ham into each greased muffin cup, gently molding it to form a cup shape. The edges will ruffle—that’s the crispy part.

    Step 3: Add the Egg

    1. Crack one egg into each ham cup. Season with salt and pepper. Add cheese or other toppings now if using.

    Step 4: Bake

    1. Bake for 12–15 minutes. For runny yolk: 12 minutes. For set yolk: 15–17 minutes. The ham edges should be dark and crispy.

    Step 5: Remove and Serve

    1. Run a knife around each cup to loosen. Lift out with a fork. Sprinkle with chives or hot sauce. Eat immediately.

    Summary

    Prep Time: 5 minutes | Cook Time: 12–15 minutes | Total Time: 20 minutes

    Yield: 4 servings (1 egg cup each)

    Difficulty: Easy (almost embarrassingly easy)

    Storage Notes

    Best Fresh, But Okay Leftover

    Ham cups are best straight from the oven when the ham is crispy. Leftovers? Store in the fridge for 2 days. Reheat in a toaster oven or air fryer at 350°F for 3–4 minutes. Microwave makes the ham sad and floppy.

    Meal Prep Move

    Bake a batch on Sunday. Reheat all week. Great for busy mornings.

  • Baked Egg in Zucchini Boats: Low-Carb Breakfast Magic

    Baked Egg in Zucchini Boats: Low-Carb Breakfast Magic

    Zucchini boats are the veggie vessel you didn’t know you needed. Hollow out a zucchini, crack an egg inside, bake, and suddenly breakfast feels fancy.

    This is low-carb, high-protein, and endlessly customizable. The zucchini gets tender, the egg bakes up perfectly runny or set (your call), and the cheese on top gets golden and bubbly.

    Ingredients

    Serves 2.

    • 2 medium zucchini (firm, straight ones work best)
    • 2 large eggs
    • ¼ cup shredded Parmesan or mozzarella cheese
    • 1 tablespoon olive oil
    • ¼ teaspoon salt
    • ¼ teaspoon black pepper
    • ¼ teaspoon garlic powder
    • Fresh parsley or chives for garnish
    • Optional: red pepper flakes, crumbled bacon, or diced tomato

    Step-by-Step Instructions

    Step 1: Prep the Zucchini Boats

    1. Preheat oven to 400°F (200°C). Line a baking dish with parchment paper.
    2. Cut each zucchini in half lengthwise.
    3. Scoop out the center seeds and some flesh to create a canoe-like boat. Leave about ¼-inch walls.
    4. Chop the scooped-out flesh and save for another use (or add to eggs).

    Step 2: Season and Bake First

    1. Brush zucchini boats with olive oil. Sprinkle with salt, pepper, and garlic powder.
    2. Place in baking dish and bake for 10 minutes (this prevents soggy bottoms).

    Step 3: Add the Egg

    1. Remove from oven. Carefully crack one egg into each zucchini boat.
    2. If egg white spills over, just trim it off or let it bake into a crispy edge.

    Step 4: Top and Finish Baking

    1. Sprinkle cheese over the eggs.
    2. Bake for 12-15 minutes until egg whites are set and yolks reach your desired doneness.

    Step 5: Garnish and Serve

    1. Top with fresh herbs and red pepper flakes. Eat with a fork right out of the boat.

    Summary

    Prep Time: 10 minutes | Cook Time: 25 minutes | Total Time: 35 minutes

    Yield: 2 servings (4 boats)

    Difficulty: Easy

    Storage Notes

    Leftovers:

    These are best fresh. The zucchini releases water as it sits. Store in the fridge for up to 2 days, but expect softer boats.

    Reheating:

    Reheat in a 350°F oven for 5-7 minutes or in an air fryer at 325°F for 4 minutes. Microwave makes them watery.

    Make-Ahead Prep:

    Scoop and season the zucchini boats up to 2 days ahead. Store covered in the fridge. Add eggs and bake when ready.