Tag: Date Night Recipe

  • Crispy, Golden, and Loaded: The Ultimate Chicken Chimichangas You Can Make at Home

    Crispy, Golden, and Loaded: The Ultimate Chicken Chimichangas You Can Make at Home

    If you love burritos but crave something crispy, indulgent, and packed with bold flavor, Chicken Chimichangas are about to become your new obsession.

    These deep-fried (or baked!) burritos are stuffed with seasoned shredded chicken, melty cheese, and savory fillings, then cooked until perfectly golden and crunchy on the outside.

    Every bite delivers a satisfying crunch followed by warm, flavorful filling that’s pure comfort food.

    The best part?

    They’re surprisingly easy to make at home. Follow this step-by-step guide and you’ll have restaurant-style chimichangas fresh from your own kitchen.


    Ingredients You’ll Need

    For the Chicken Filling:

    • 2 cups cooked shredded chicken (rotisserie works great)
    • 1 tablespoon olive oil
    • ½ small onion, finely diced
    • 2 cloves garlic, minced
    • 1 teaspoon chili powder
    • 1 teaspoon ground cumin
    • ½ teaspoon smoked paprika
    • ½ teaspoon salt
    • ¼ teaspoon black pepper
    • ½ cup salsa
    • 1 cup shredded Mexican blend or cheddar cheese

    For Assembling:

    • 4 large flour tortillas
    • Vegetable oil (for frying)

    Optional Toppings:

    • Sour cream
    • Guacamole
    • Shredded lettuce
    • Diced tomatoes
    • Chopped cilantro
    • Salsa

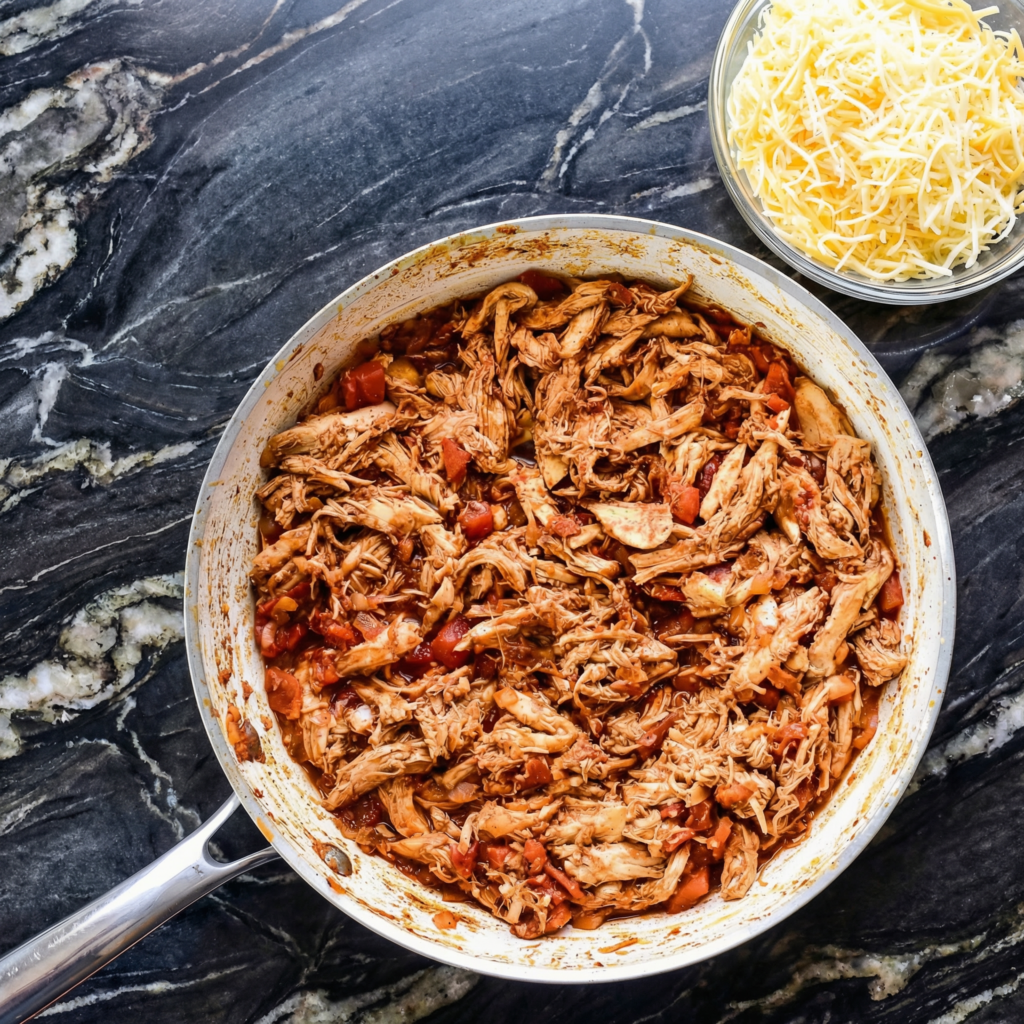
    Step 1: Prepare the Chicken Filling

    Heat olive oil in a skillet over medium heat. Add the diced onion and cook for 3–4 minutes until softened. Stir in the minced garlic and cook for another 30 seconds until fragrant.

    Add the shredded chicken to the skillet. Sprinkle in the chili powder, cumin, smoked paprika, salt, and black pepper. Stir well to coat the chicken evenly with the spices.

    Pour in the salsa and cook for 2–3 minutes, allowing everything to heat through and the flavors to blend. Remove from heat and stir in the shredded cheese while the mixture is still warm. The cheese should begin to melt slightly, creating a creamy filling.


    Step 2: Warm the Tortillas

    Warm the flour tortillas in the microwave for about 20–30 seconds. This makes them more pliable and less likely to tear when folding.

    Lay them flat on a clean surface, ready for assembly.


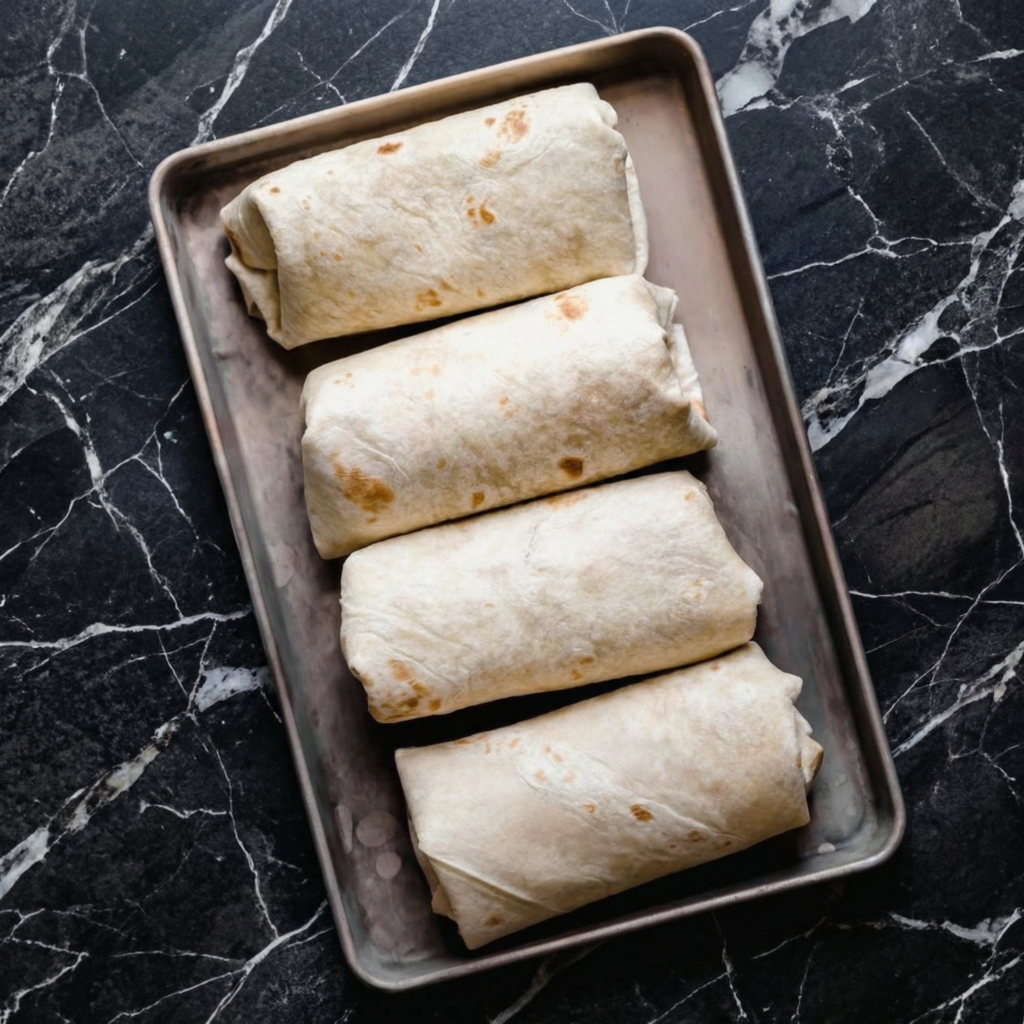
    Step 3: Assemble the Chimichangas

    Spoon about ½ to ¾ cup of the chicken mixture into the center of each tortilla. Be careful not to overfill, as this can make rolling difficult.

    Fold the sides inward first, then roll the tortilla tightly from the bottom up, burrito-style. The filling should be fully enclosed.

    Place each rolled chimichanga seam-side down on a plate while you finish assembling the rest.


    Step 4: Heat the Oil

    Pour about 1–2 inches of vegetable oil into a deep skillet or heavy-bottomed pot.

    Heat over medium heat until the oil reaches about 350°F (175°C). If you don’t have a thermometer, drop in a small piece of tortilla—if it sizzles immediately, the oil is ready.


    Step 5: Fry Until Golden

    Carefully place one or two chimichangas seam-side down into the hot oil. Do not overcrowd the pan.

    Fry for 2–3 minutes per side, turning carefully with tongs, until golden brown and crispy all over.

    Remove and place on a plate lined with paper towels to drain excess oil. Repeat with remaining chimichangas.


    Step 6: Alternative Baking Method

    If you prefer a lighter option, brush each chimichanga lightly with oil and place seam-side down on a baking sheet.

    Bake at 400°F (200°C) for 20–25 minutes, flipping halfway through, until crispy and golden.

    While not as deeply crispy as fried, the baked version is still delicious and satisfying.


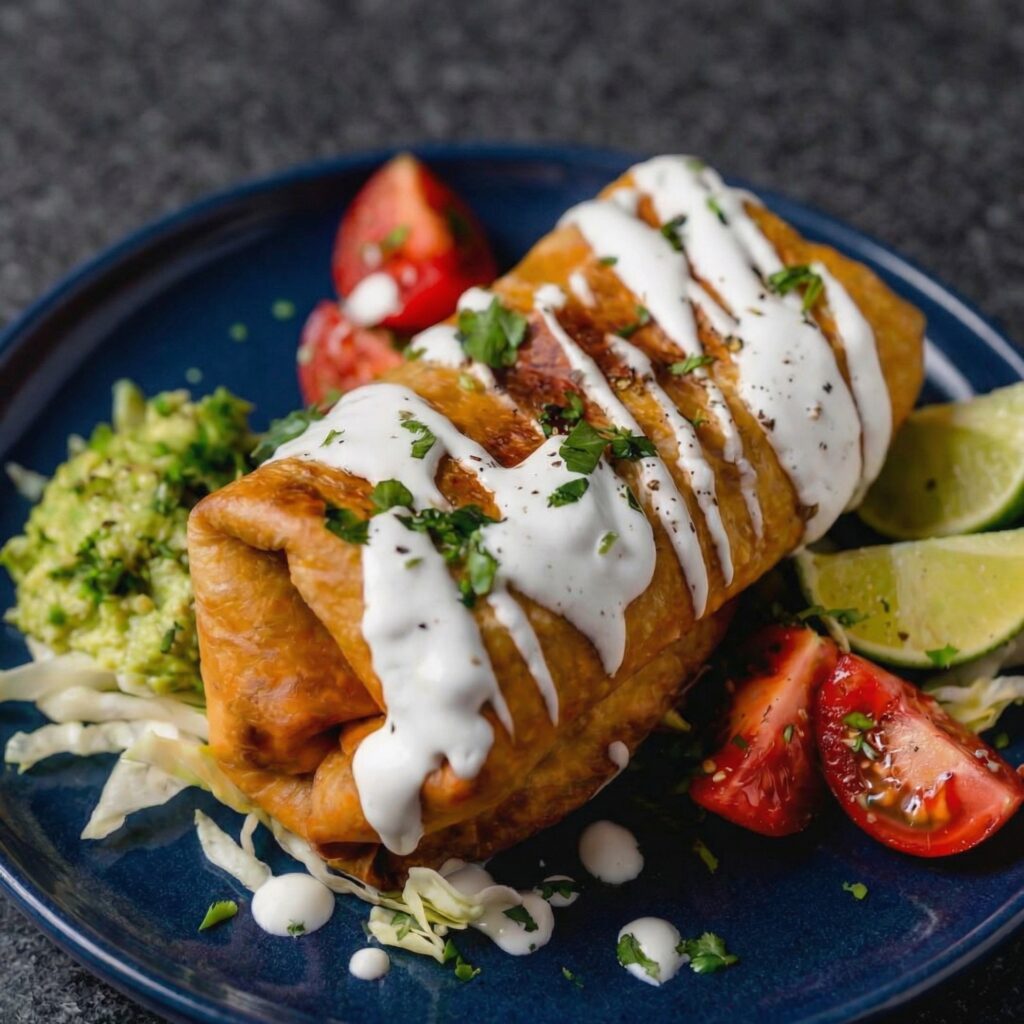
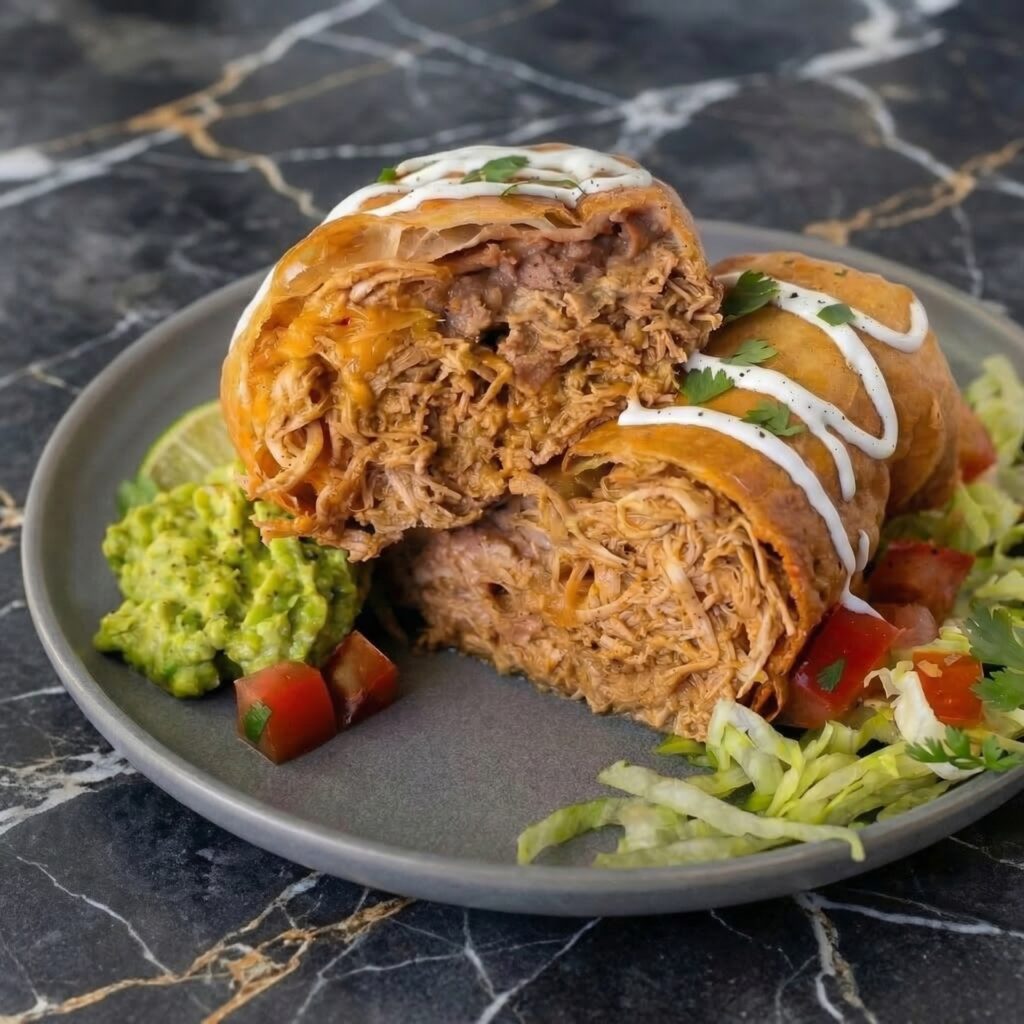
    Step 7: Add Toppings and Serve

    Place the hot chimichangas on serving plates. Top with sour cream, guacamole, shredded lettuce, diced tomatoes, or extra salsa.

    For an extra indulgent touch, drizzle with warm queso or enchilada sauce before serving.

    Serve immediately while crispy and hot.


    Pro Tips for Perfect Chimichangas

    • Don’t overfill the tortillas to prevent bursting during frying.
    • Secure tightly when rolling to keep everything sealed.
    • Maintain oil temperature for even browning and crispiness.
    • Drain properly on paper towels to avoid sogginess.
    • Use rotisserie chicken for quick prep and extra flavor.

    Flavor Variations

    Once you master the classic chicken version, try these creative ideas:

    • Spicy Jalapeño Chicken: Add diced jalapeños to the filling.
    • Creamy Version: Stir in a few tablespoons of cream cheese for extra richness.
    • Bean & Rice Add-In: Add seasoned rice or refried beans for a heartier filling.
    • Buffalo Chicken Twist: Mix shredded chicken with buffalo sauce and mozzarella.

    Make-Ahead and Storage

    Chimichangas can be assembled ahead of time and stored in the refrigerator for up to 24 hours before cooking.

    Cooked chimichangas can be stored in an airtight container for up to 3 days. Reheat in the oven at 375°F until warmed through and crispy again.

    They also freeze well—wrap tightly in foil and freeze for up to 2 months.


    Why This Recipe Works

    Chicken chimichangas combine contrasting textures and bold flavors.

    The seasoned chicken filling is savory and slightly saucy, while the melted cheese binds everything together. Frying creates that irresistible crispy shell that makes chimichangas stand apart from regular burritos.

    They’re customizable, crowd-pleasing, and perfect for weeknight dinners or festive gatherings.


    Final Thoughts

    Chicken Chimichangas are comfort food at its finest—crispy on the outside, cheesy and flavorful on the inside.

    With just a handful of ingredients and simple techniques, you can recreate this restaurant favorite in your own kitchen.

    Whether you fry them for maximum crunch or bake them for a lighter option, these chimichangas deliver big flavor and satisfying texture every time.

    Serve them with your favorite toppings, gather around the table, and enjoy every golden, crunchy bite.

  • Crispy-Seared Scallops with Bread-Crumb Salsa Verde: A Restaurant-Worthy Dinner at Home

    Crispy-Seared Scallops with Bread-Crumb Salsa Verde: A Restaurant-Worthy Dinner at Home

    If you’ve ever ordered perfectly golden scallops at a restaurant and wondered how they achieved that caramelized crust and buttery center, you’re in for a treat.

    Scallops are surprisingly simple to cook at home, and when paired with a vibrant bread-crumb salsa verde, they transform into a dish that feels elegant yet approachable. This recipe walks you through every step, from selecting the scallops to plating like a pro.

    Let’s get started.


    Ingredients

    For the scallops:

    • 1 pound large sea scallops (about 12–16), side muscle removed
    • Salt and freshly ground black pepper
    • 2 tablespoons neutral oil (such as avocado or vegetable oil)
    • 1 tablespoon unsalted butter

    For the bread-crumb salsa verde:

    • 1 cup fresh parsley leaves, finely chopped
    • 2 tablespoons capers, drained and finely chopped
    • 1 small garlic clove, minced
    • Zest of 1 lemon
    • 2 tablespoons fresh lemon juice
    • ½ teaspoon red pepper flakes (optional)
    • ½ cup toasted fresh bread crumbs
    • ⅓ cup extra virgin olive oil
    • Salt and black pepper to taste

    Step 1: Prep the Scallops Properly

    Start by patting your scallops completely dry with paper towels. This is one of the most important steps. Moisture is the enemy of a golden crust, and any excess water will cause the scallops to steam rather than sear.

    If the small, tough side muscle is still attached, gently peel it off and discard. Season both sides of the scallops generously with salt and freshly ground black pepper. Let them sit at room temperature for about 10–15 minutes while you prepare the salsa verde.


    Step 2: Toast the Bread Crumbs

    For maximum flavor and texture, use fresh bread crumbs rather than store-bought dry ones. Pulse a slice or two of day-old crusty bread in a food processor until coarse.

    Heat a small skillet over medium heat. Add a drizzle of olive oil and toss in the bread crumbs. Stir constantly for 3–5 minutes, until they are golden brown and crisp. Transfer to a bowl and let cool completely. This step adds a nutty crunch that makes the salsa verde truly special.


    Step 3: Make the Bread-Crumb Salsa Verde

    In a medium bowl, combine the chopped parsley, capers, minced garlic, lemon zest, lemon juice, and red pepper flakes. Stir to combine.

    Add the cooled toasted bread crumbs and pour in the extra virgin olive oil. Mix until everything is evenly coated and vibrant. Taste and adjust seasoning with salt and black pepper as needed. The mixture should be bright, slightly tangy, and richly herbaceous, with a pleasant crunch from the crumbs.

    Set aside while you cook the scallops.


    Step 4: Heat the Pan Until Very Hot

    Place a large stainless steel or cast-iron skillet over medium-high heat. Let it heat for several minutes until very hot. Add the neutral oil and swirl to coat the bottom.

    You’ll know the pan is ready when the oil shimmers and just begins to smoke lightly. This high heat is essential for achieving that golden-brown crust.


    Step 5: Sear the Scallops

    Carefully place the scallops in the hot pan, flat-side down, leaving space between each one. Do not overcrowd the pan. If necessary, cook in batches.

    Resist the urge to move them. Let the scallops sear undisturbed for about 2–3 minutes. They should develop a deep golden crust.

    Once the bottom is beautifully browned, add the tablespoon of butter to the pan. Flip the scallops and spoon the melted butter over them as they cook for another 1–2 minutes. The centers should be just opaque and slightly translucent in the very middle.

    Remove immediately from the pan. Overcooked scallops become rubbery, so timing is key.


    Step 6: Plate Like a Pro

    Arrange the scallops on a serving platter or individual plates. Spoon a generous amount of bread-crumb salsa verde over the top or alongside each scallop.

    For an elegant touch, finish with an extra squeeze of fresh lemon juice and a drizzle of olive oil. A sprinkle of flaky sea salt can elevate the flavor even more.


    Serving Suggestions

    These scallops pair beautifully with creamy risotto, mashed potatoes, or a simple bed of lemony arugula. You can also serve them over a light pasta or alongside roasted vegetables for a complete meal.

    If you’re entertaining, consider serving them as an appetizer with small forks and a crisp white wine. The bright herbal salsa verde complements the sweet, delicate scallops perfectly.


    Pro Tips for Perfect Scallops

    • Always buy “dry” scallops rather than “wet” ones treated with preservatives. Dry scallops caramelize better.
    • Make sure the pan is hot before adding scallops.
    • Do not overcrowd the pan, as this lowers the temperature and prevents browning.
    • Let the scallops form a crust before flipping. If they stick, they’re not ready yet.

    Why This Dish Works

    The magic of this recipe lies in contrast. The scallops are tender and buttery with a crisp exterior, while the bread-crumb salsa verde is fresh, bright, and slightly crunchy. The acidity from the lemon and capers cuts through the richness of the scallops, creating a perfectly balanced bite.

    This dish feels sophisticated but relies on straightforward techniques. With just a handful of quality ingredients and attention to timing, you can create a meal that rivals your favorite seafood restaurant.

    Once you master this method, you’ll find yourself returning to it again and again for special occasions—or simply when you want to treat yourself to something extraordinary.

  • Bright, Buttery & Bold: The Ultimate Homemade Chicken Piccata

    Bright, Buttery & Bold: The Ultimate Homemade Chicken Piccata

    If you’re craving something comforting yet elegant, Chicken Piccata is the answer.

    This Italian-American classic delivers golden pan-seared chicken cutlets bathed in a silky lemon-butter sauce dotted with briny capers. It’s simple enough for a weeknight dinner, yet impressive enough for guests.

    The magic lies in balancing bright citrus with rich butter and savory chicken—creating a dish that tastes far more complex than the effort required.

    Let’s walk step by step through how to make perfect Chicken Piccata at home.


    Ingredients

    For the chicken:

    • 2 large boneless, skinless chicken breasts
    • Salt and freshly ground black pepper
    • ½ cup all-purpose flour
    • 3 tablespoons olive oil
    • 2 tablespoons unsalted butter

    For the sauce:

    • ¾ cup chicken broth
    • ⅓ cup freshly squeezed lemon juice (about 2 lemons)
    • 2 tablespoons capers, drained
    • 3 tablespoons unsalted butter, cut into pieces
    • 2 tablespoons fresh parsley, finely chopped
    • Lemon slices, for garnish (optional)

    Step 1: Prepare the Chicken Cutlets

    Place the chicken breasts on a cutting board. Carefully slice each one in half horizontally to create four thinner cutlets. If needed, gently pound them between sheets of plastic wrap to an even thickness—about ½ inch thick. Even thickness ensures they cook quickly and evenly.

    Pat the chicken dry with paper towels. Season both sides generously with salt and freshly ground black pepper.


    Step 2: Dredge in Flour

    Spread the flour on a shallow plate. Lightly dredge each chicken cutlet in flour, shaking off any excess. The flour creates a delicate crust and helps thicken the sauce later.

    Set the coated cutlets aside on a plate while you heat the pan.


    Step 3: Sear the Chicken

    Heat a large skillet over medium-high heat. Add the olive oil and 2 tablespoons of butter. Once the butter is melted and foamy, carefully place the chicken cutlets in the pan in a single layer. Avoid overcrowding; cook in batches if necessary.

    Cook for about 3–4 minutes on the first side without moving them. You’re looking for a golden-brown crust. Flip and cook for another 2–3 minutes until fully cooked through and no longer pink in the center.

    Transfer the cooked chicken to a plate and tent loosely with foil to keep warm.


    Step 4: Build the Lemon-Caper Sauce

    With the pan still over medium heat, pour in the chicken broth to deglaze. Use a wooden spoon to scrape up the browned bits from the bottom of the pan—this is pure flavor.

    Let the broth simmer for 2–3 minutes, allowing it to reduce slightly. Stir in the freshly squeezed lemon juice and capers. Continue simmering for another 2–3 minutes until the sauce reduces and thickens slightly.


    Step 5: Finish with Butter

    Reduce the heat to low. Add the remaining 3 tablespoons of butter, one piece at a time, stirring continuously until melted and incorporated. This technique—called “mounting with butter”—creates a silky, glossy sauce.

    Taste and adjust seasoning if needed. If the sauce is too tart, a small pinch of salt can help balance it. If you prefer more brightness, add an extra squeeze of lemon.


    Step 6: Return the Chicken to the Pan

    Place the chicken cutlets back into the skillet, spooning the sauce over the top. Let everything simmer together for 2–3 minutes so the chicken absorbs the flavors.

    The sauce should lightly coat the chicken without being too thick or too watery.


    Step 7: Garnish and Serve

    Sprinkle freshly chopped parsley over the chicken. Garnish with thin lemon slices if desired. Serve immediately while the sauce is glossy and warm.


    Serving Suggestions

    Chicken Piccata pairs beautifully with angel hair pasta, mashed potatoes, or fluffy rice to soak up the luscious sauce. For a lighter option, serve it alongside sautéed spinach or roasted asparagus. A simple green salad with a light vinaigrette complements the rich, buttery flavors.

    If entertaining, consider serving with crusty bread for dipping into the lemony sauce.


    Pro Tips for Success

    • Use fresh lemon juice for the brightest flavor. Bottled juice won’t give the same fresh zing.
    • Keep the heat steady when making the sauce. Too high, and it may reduce too quickly; too low, and it won’t thicken properly.
    • Don’t skip scraping up the browned bits after searing. They add incredible depth.
    • Thin, evenly pounded chicken cooks faster and stays tender.

    Why This Recipe Works

    Chicken Piccata is a masterclass in balance. The flour creates a light crust and helps thicken the sauce naturally. The lemon juice cuts through the richness of the butter, while capers bring salty bursts of flavor that keep every bite interesting.

    The key is restraint—just enough lemon to brighten, just enough butter to enrich. When done correctly, the sauce clings gently to the chicken without overpowering it.


    Make It Your Own

    You can add a splash of dry white wine before the broth for extra depth. Some cooks like to incorporate a bit of cream for a richer sauce, though traditional versions keep it light and lemon-forward. You can even substitute thin veal cutlets for a classic variation.


    Chicken Piccata proves that a handful of simple ingredients can create something extraordinary. With crisp golden chicken and a vibrant lemon-caper sauce, this dish brings restaurant-quality flavor straight to your kitchen. Once you make it from scratch, it’s bound to become a regular in your dinner rotation.

  • Zesty, Juicy & Perfectly Charred: The Ultimate Grilled Lemon Chicken Recipe

    Zesty, Juicy & Perfectly Charred: The Ultimate Grilled Lemon Chicken Recipe

    There’s something irresistible about the bright, fresh flavor of lemon paired with smoky, flame-kissed chicken.

    Grilled Lemon Chicken is simple, vibrant, and incredibly satisfying—perfect for weeknight dinners, weekend barbecues, or healthy meal prep. With just a handful of ingredients and a straightforward technique, you’ll get tender, juicy chicken bursting with citrus flavor and finished with gorgeous grill marks.

    Let’s break it down step by step so you can make perfectly grilled lemon chicken every time.


    Why You’ll Love This Recipe

    • Fresh, bold lemon flavor
    • Juicy and tender texture
    • Quick and easy to prepare
    • Healthy and protein-packed
    • Perfect for grilling season

    This recipe balances acidity, herbs, and smoky char for a dish that feels light yet deeply flavorful.


    Ingredients You’ll Need

    For the Marinade:

    • 4 boneless, skinless chicken breasts (or thighs)
    • ¼ cup fresh lemon juice (about 2 lemons)
    • Zest of 1 lemon
    • 3 tablespoons olive oil
    • 3 cloves garlic, minced
    • 1 teaspoon dried oregano (or 1 tablespoon fresh)
    • 1 teaspoon salt
    • ½ teaspoon black pepper
    • ½ teaspoon paprika
    • 1 tablespoon honey (optional, for balance)

    For Garnish:

    • Fresh parsley
    • Lemon slices

    Step 1: Prepare the Chicken

    If your chicken breasts are thick, slice them horizontally to create thinner cutlets. This helps them cook evenly and reduces grill time.

    Pat the chicken dry with paper towels before marinating. Removing excess moisture allows the marinade to adhere better.


    Step 2: Make the Lemon Marinade

    In a bowl, whisk together:

    • Lemon juice
    • Lemon zest
    • Olive oil
    • Garlic
    • Oregano
    • Salt
    • Pepper
    • Paprika
    • Honey (if using)

    The lemon juice tenderizes the chicken, while olive oil helps retain moisture. Garlic and oregano add depth, and paprika gives a subtle warmth.


    Step 3: Marinate for Maximum Flavor

    Place the chicken in a resealable plastic bag or shallow dish.

    Pour the marinade over the chicken, ensuring every piece is fully coated.

    Seal and refrigerate for at least 30 minutes, ideally 2–4 hours. Avoid marinating longer than 6 hours, as the acidity from the lemon can begin to break down the texture too much.

    Turn the chicken occasionally if using a dish to ensure even flavor distribution.


    Step 4: Preheat the Grill

    Preheat your grill to medium-high heat (about 400–450°F or 200–230°C).

    Clean the grates thoroughly and oil them lightly to prevent sticking.

    A properly heated grill ensures beautiful sear marks and prevents the chicken from drying out.


    Step 5: Remove from Marinade

    Take the chicken out of the marinade and let excess drip off.

    Discard the leftover marinade unless you plan to boil it thoroughly for use as a sauce.

    Let the chicken sit at room temperature for 10–15 minutes before grilling. This promotes even cooking.


    Step 6: Grill the Chicken

    Place the chicken on the hot grill.

    Cook for about 5–7 minutes per side, depending on thickness. Avoid flipping too frequently—let the grill create those signature char lines.

    Close the grill lid while cooking to retain heat and ensure even cooking.


    Step 7: Check for Doneness

    The chicken is done when the internal temperature reaches 165°F (74°C).

    Use a meat thermometer inserted into the thickest part for accuracy.

    If the outside is browning too quickly, move the chicken to a cooler section of the grill and finish cooking indirectly.


    Step 8: Rest the Chicken

    Remove the chicken from the grill and let it rest for 5 minutes.

    Resting allows the juices to redistribute, ensuring moist and tender results.

    Skipping this step can cause juices to run out when slicing.


    Step 9: Garnish and Serve

    Sprinkle freshly chopped parsley over the grilled chicken.

    Add lemon slices for extra brightness and presentation.

    Serve whole, sliced, or diced depending on your meal.


    Flavor Profile and Texture

    • Bright citrus freshness
    • Light herbal notes
    • Subtle smoky char
    • Tender, juicy interior
    • Slight caramelization from honey

    The balance of acidity and olive oil keeps the chicken moist while delivering a bold lemon punch.


    Serving Ideas

    Grilled Lemon Chicken is incredibly versatile. Try it with:

    • Steamed rice or lemon herb rice
    • Roasted vegetables
    • Fresh garden salad
    • Warm pita bread
    • Pasta with olive oil and herbs
    • Grilled corn on the cob

    It also works beautifully sliced over salads or stuffed into wraps.


    Pro Tips for Perfect Results

    Don’t skip the zest. Lemon zest intensifies flavor without extra acidity.

    Use fresh lemon juice. Bottled juice lacks brightness.

    Oil the grill grates. Prevents sticking and tearing.

    Avoid overcooking. Chicken dries out quickly past 165°F.

    Let it rest. This guarantees juiciness.


    Optional Variations

    Mediterranean Style: Add thyme and rosemary to the marinade.

    Spicy Kick: Include red pepper flakes or cayenne.

    Creamy Finish: Top with a spoonful of tzatziki sauce.

    Citrus Blend: Combine lemon with a splash of orange juice.

    Grill Pan Version: If you don’t have an outdoor grill, use a cast-iron grill pan over medium-high heat.


    Storage and Meal Prep

    Store leftover grilled chicken in an airtight container in the refrigerator for up to 4 days.

    Reheat gently in a skillet or microwave until warmed through.

    This chicken is excellent for meal prepping—slice and portion with rice and vegetables for balanced lunches throughout the week.


    Why This Recipe Works

    The acidity of lemon juice gently tenderizes the chicken while infusing it with fresh flavor. Olive oil locks in moisture and prevents dryness during grilling. High heat creates a quick sear, sealing juices inside and developing caramelized grill marks.

    Marinating ensures flavor penetrates beyond the surface, and resting after cooking keeps the meat succulent.

    The result? Chicken that’s juicy inside, lightly crisp outside, and bursting with bright, zesty flavor.


    Grilled Lemon Chicken is proof that simple ingredients can create something extraordinary. With its fresh citrus aroma, smoky char, and tender texture, this dish is a guaranteed crowd-pleaser. Whether you’re cooking for family, friends, or just yourself, this recipe delivers bold flavor with minimal effort.

    Light, vibrant, and endlessly versatile, it’s a recipe you’ll come back to again and again.