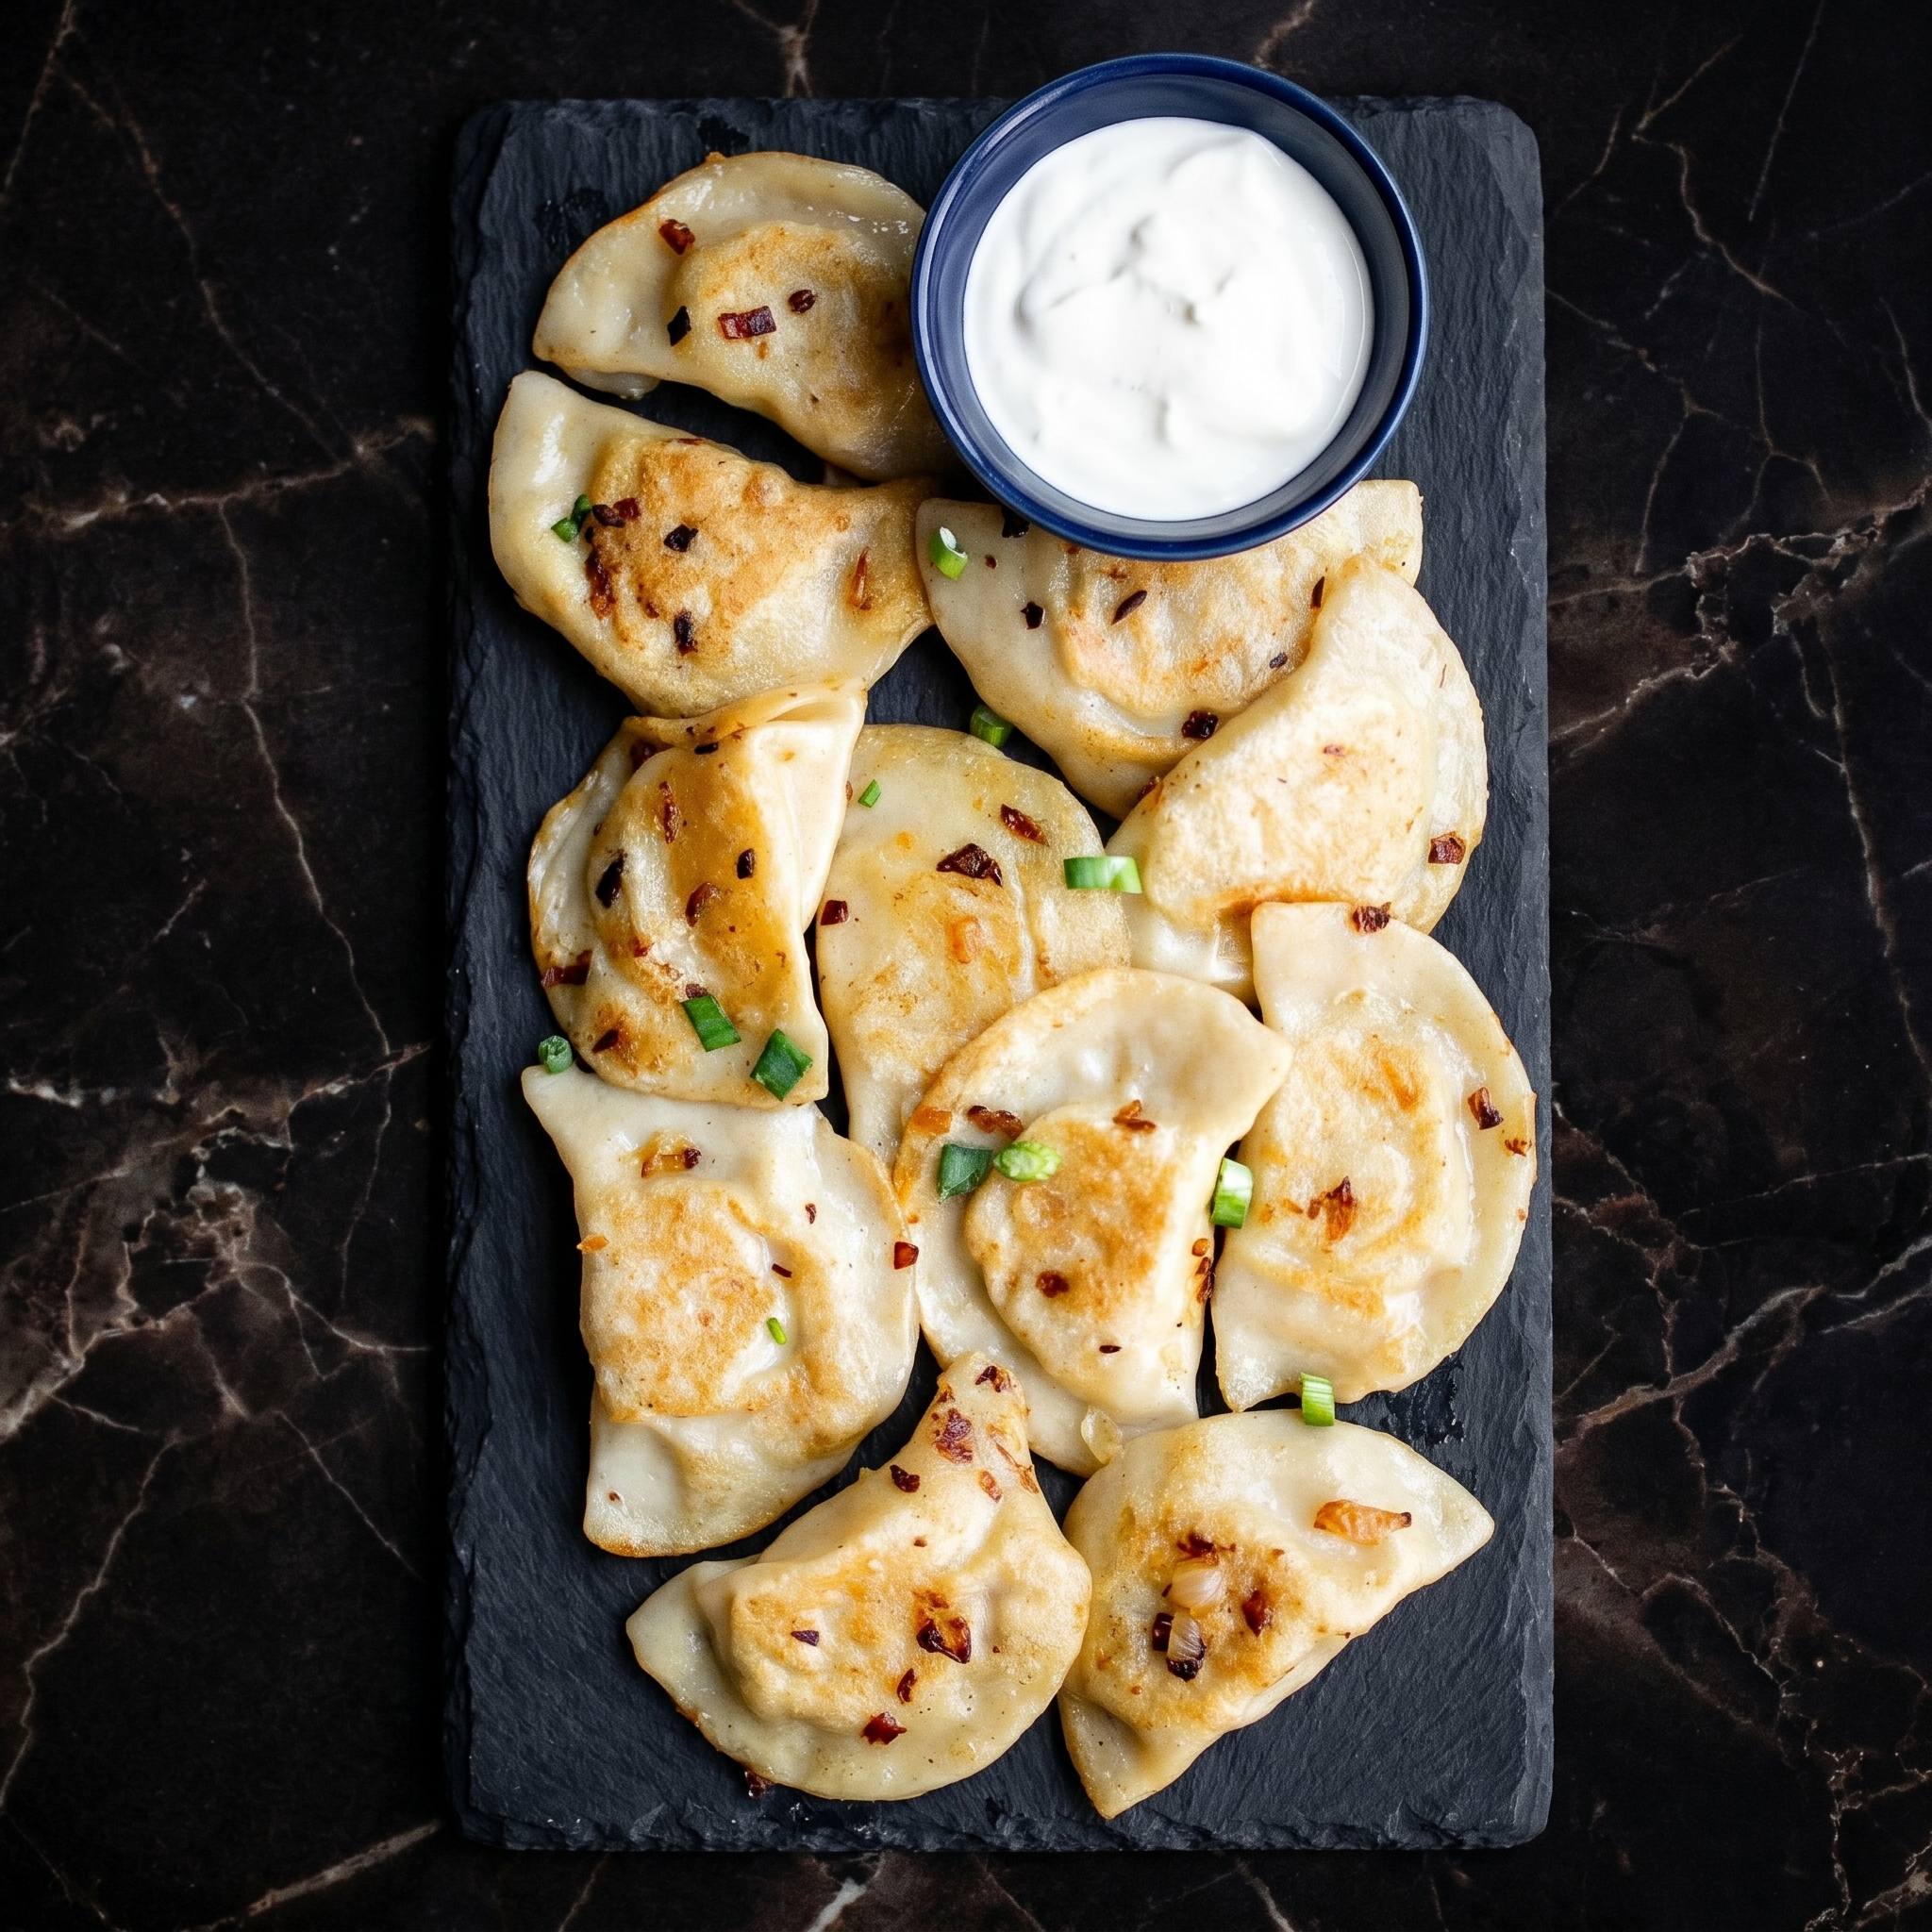
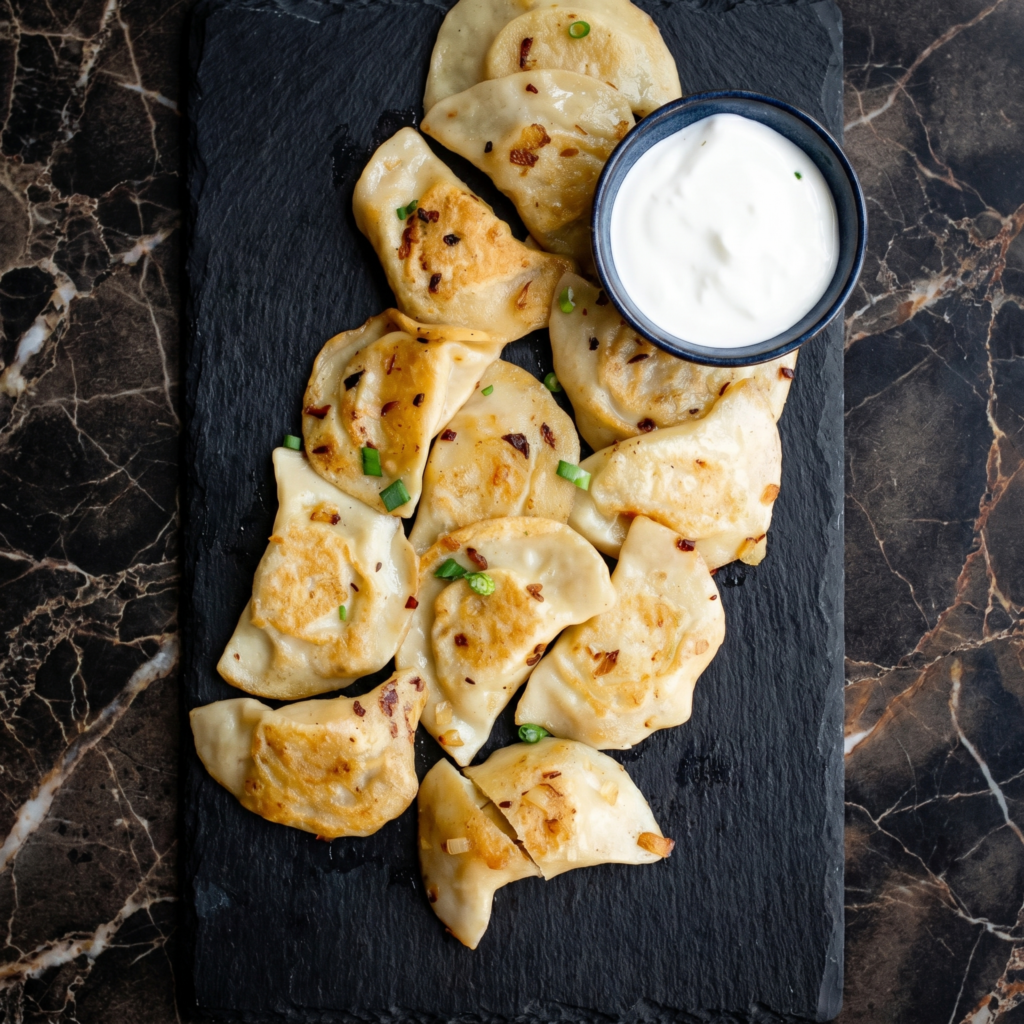
These Polish beauties are soft, buttery, and stuffed with the dreamiest potato-cheese filling. Pan-fry them with onions until crispy and golden. Then dip in sour cream. Then make more because these will disappear.
Ingredients
Makes about 24 pierogis.
For the Dough:
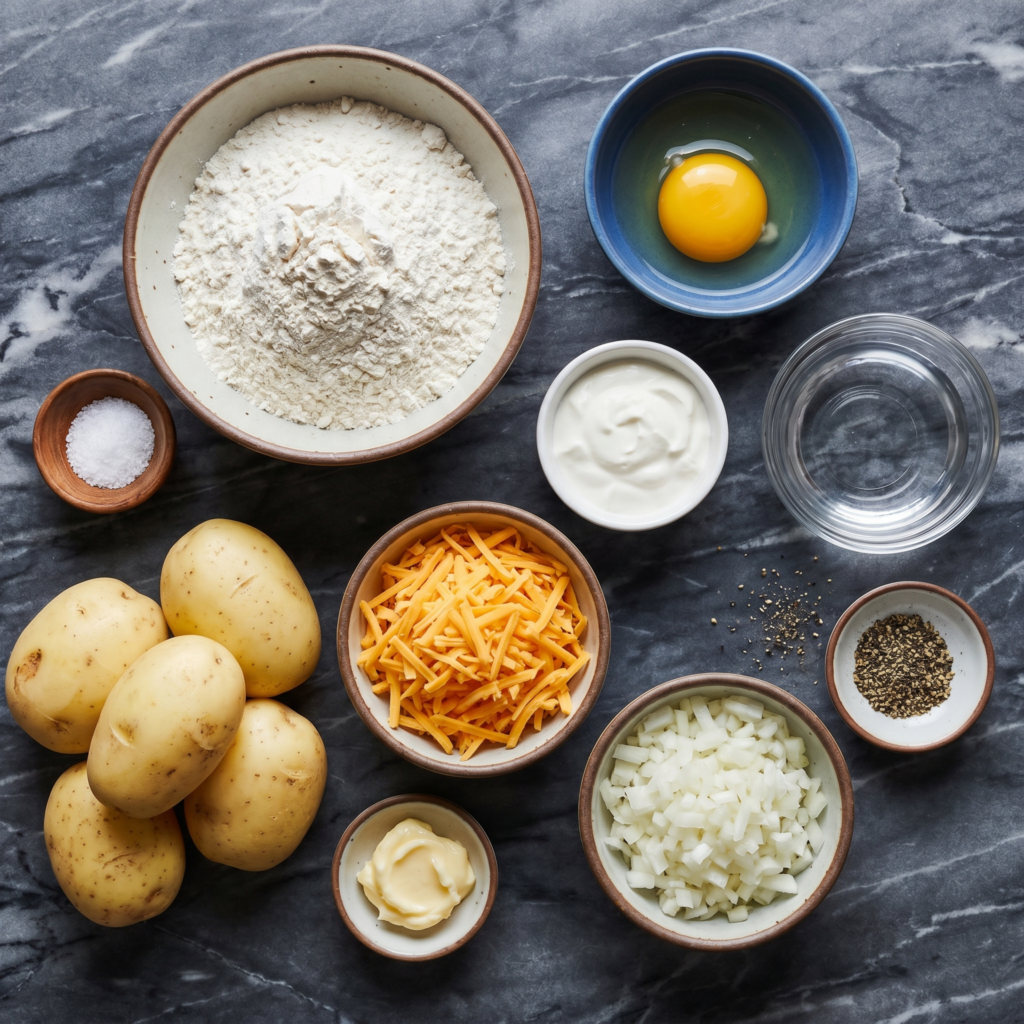
2 cups (260g) all-purpose flour
½ teaspoon salt
1 large egg
½ cup (120ml) sour cream
2 tablespoons melted butter
For the Filling:
2 cups mashed potatoes (about 2 medium potatoes)
½ cup shredded cheddar cheese
¼ cup cream cheese
Salt and pepper to taste
For Frying:
4 tablespoons butter
1 large onion, diced
Sour cream for serving
Step-by-Step Instructions
Step 1: Make the Dough
In a bowl, mix flour and salt. Add egg, sour cream, and melted butter.
Mix until a soft dough forms. Knead for 2-3 minutes. Wrap and rest for 30 minutes.
Step 2: Make the Filling
Mix mashed potatoes, cheddar, cream cheese, salt, and pepper until smooth.
Step 3: Fill the Pierogis
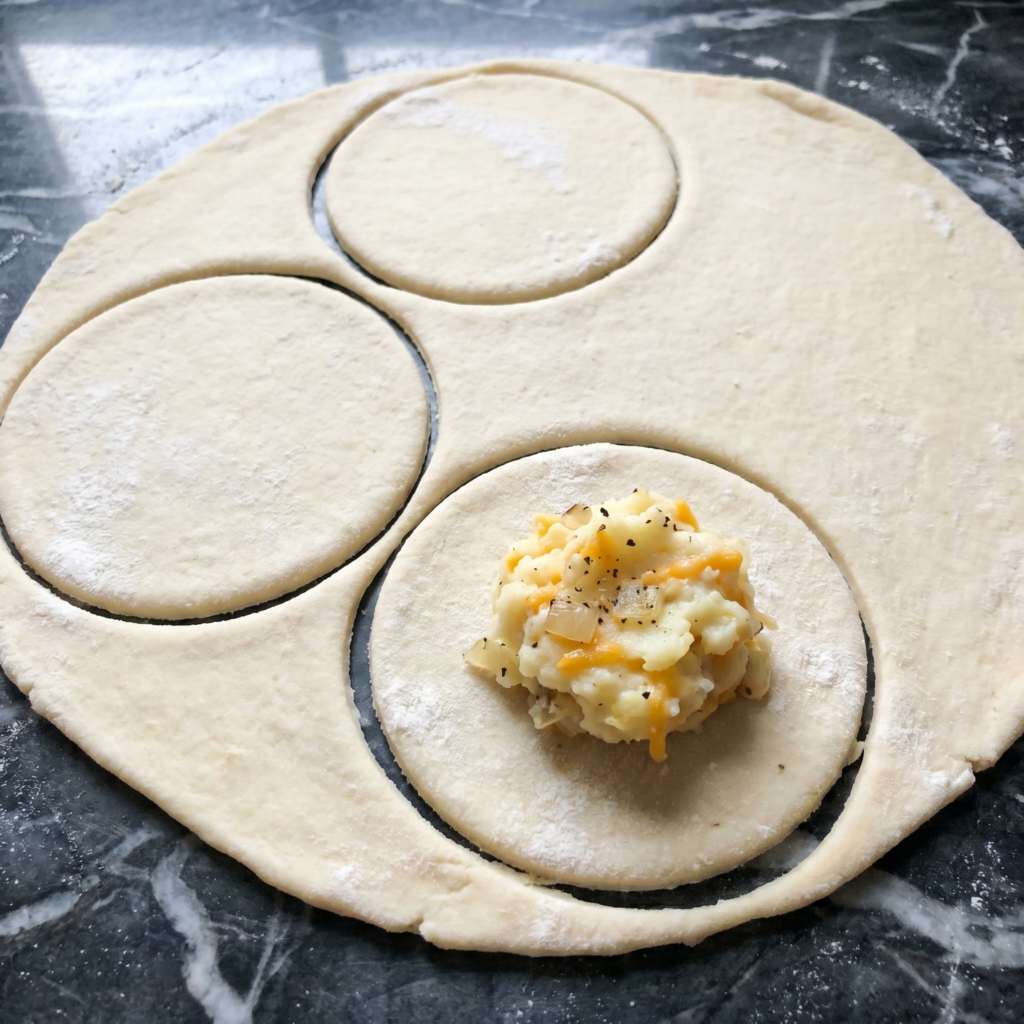
Roll dough to ⅛-inch thick. Cut 3-inch circles.
Place 1 teaspoon of filling in the center of each circle.
Fold over and pinch edges to seal. Press with a fork.
Step 4: Boil
Drop pierogis into salted boiling water. Cook 3-4 minutes until they float.
Remove with a slotted spoon and let drain.
Step 5: Pan-Fry
In a skillet, melt butter over medium heat. Add diced onion and cook until soft.
Add boiled pierogis. Fry 2-3 minutes per side until golden and crispy.
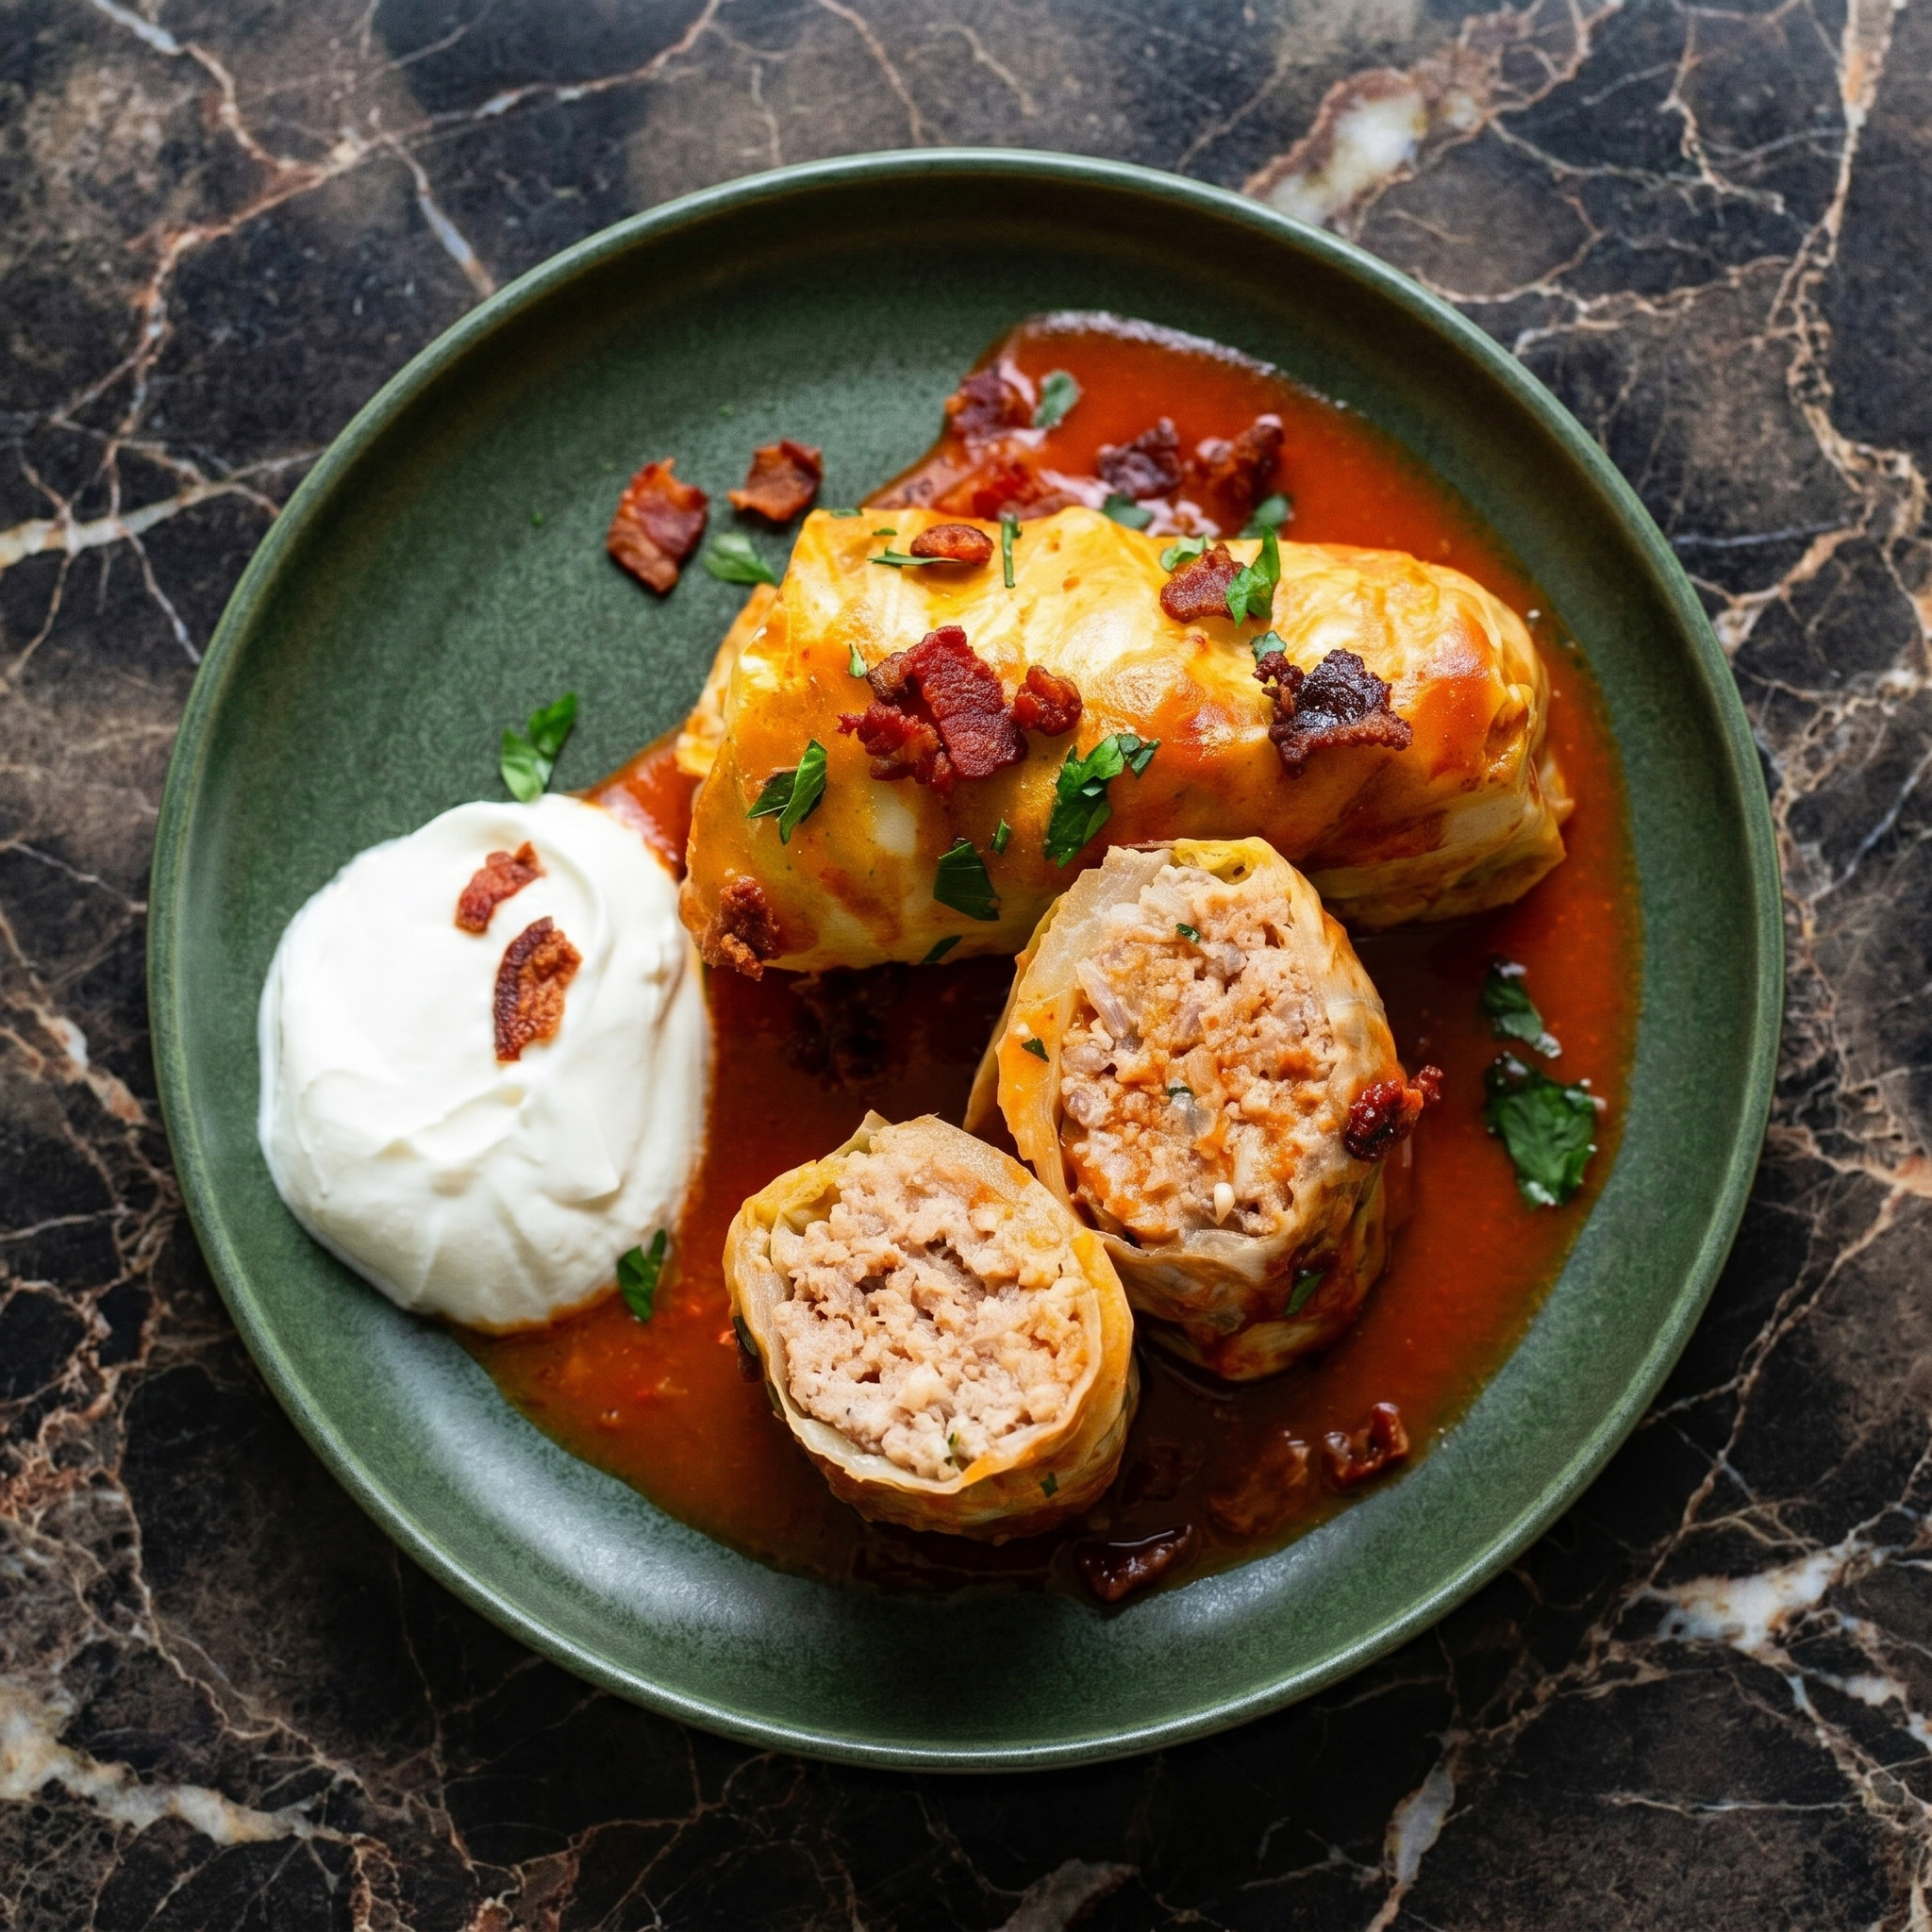
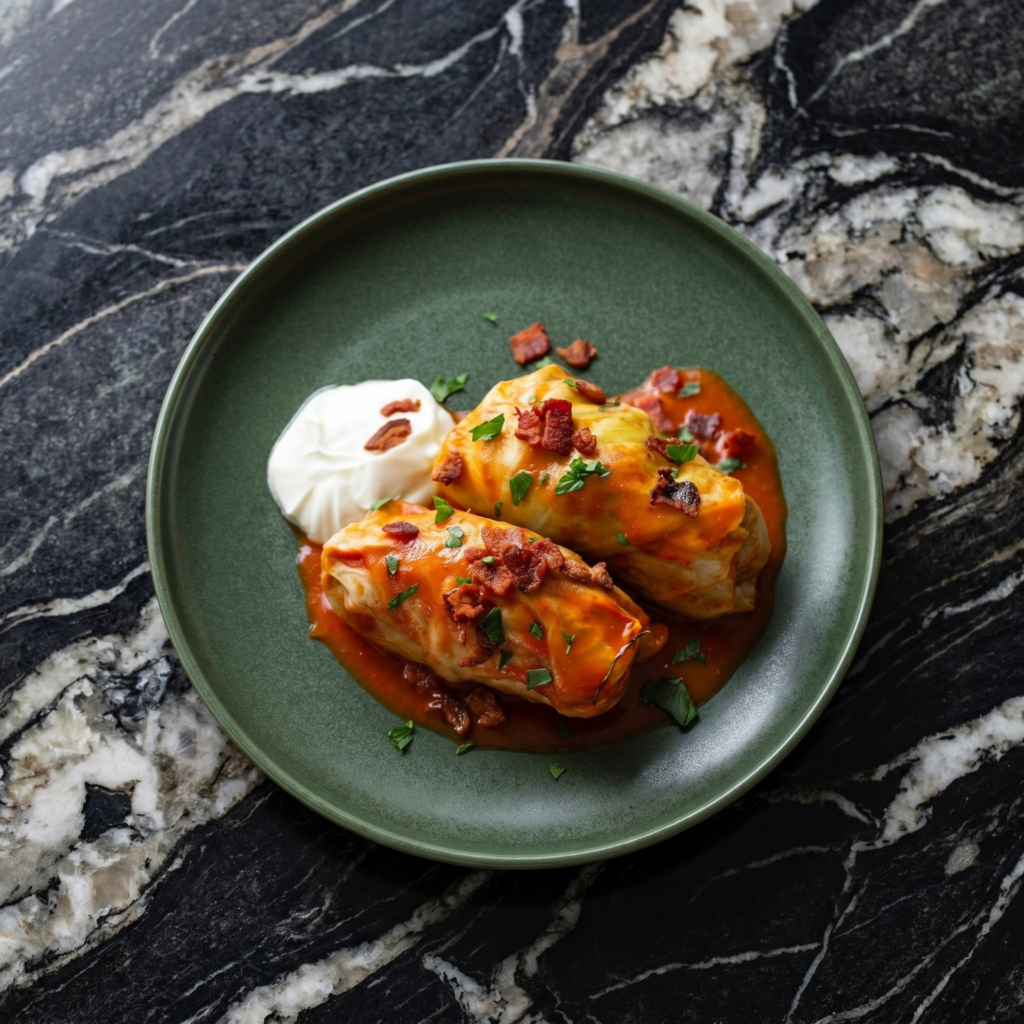
Stuffed cabbage rolls are the ultimate old-school comfort food. Tender leaves wrapped around savory beef and rice, slow-simmered in a sweet and tangy tomato sauce. Low and slow wins the race. Make extra. They freeze beautifully.
Bring a large pot of salted water to a boil. Cut out the cabbage core. Place cabbage in boiling water. Peel off leaves as they soften (about 2-3 minutes per leaf). You’ll need 12-14 leaves. Trim thick center stems.
Step 2: Make Filling
In a bowl, mix ground beef, rice, onion, garlic, egg, salt, pepper, and paprika.
Step 3: Roll
Place a cabbage leaf flat. Add ¼ cup filling near the stem end. Fold sides over, then roll up tightly. Repeat with all leaves.
Step 4: Make Sauce
In a large pot or Dutch oven, whisk crushed tomatoes, brown sugar, lemon juice, and beef broth.
Step 5: Layer & Simmer
Place cabbage rolls seam-side down in the pot, packed tightly. Add bay leaves. Spoon some sauce over the top.
Cover and simmer over low heat for 1½ to 2 hours until cabbage is tender and flavors meld.
Step 6: Serve
Remove bay leaves. Serve hot with sour cream and fresh dill if desired. This is pure nostalgia.
Summary
Prep Time: 30 min | Cook Time: 2 hours | Total: 2 hours 30 min
Yield: 6-8 servings | Difficulty: Medium
Storage Notes
Fridge: 5 days (tastes even better the next day). Freezer: 3 months. Reheat in oven or microwave. This is a perfect make-ahead meal for busy weeks.
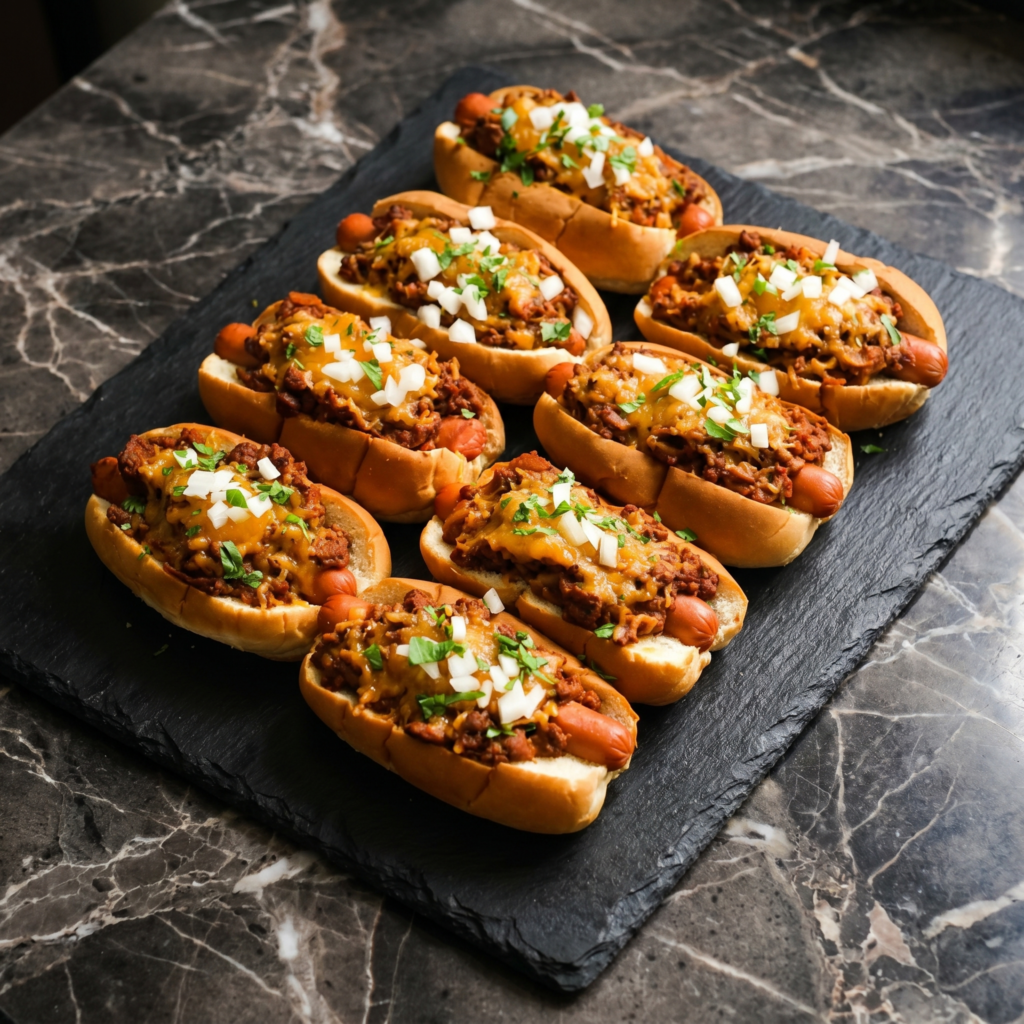
Some foods are meant to be messy. Chili cheese dogs are the king of messy.
Grilled hot dog. Smoky, beefy chili. A mountain of shredded cheddar. Diced onion. That’s it. 20 minutes. Eat with your hands. Lick your fingers. Zero regrets.
Ingredients
Serves 4.
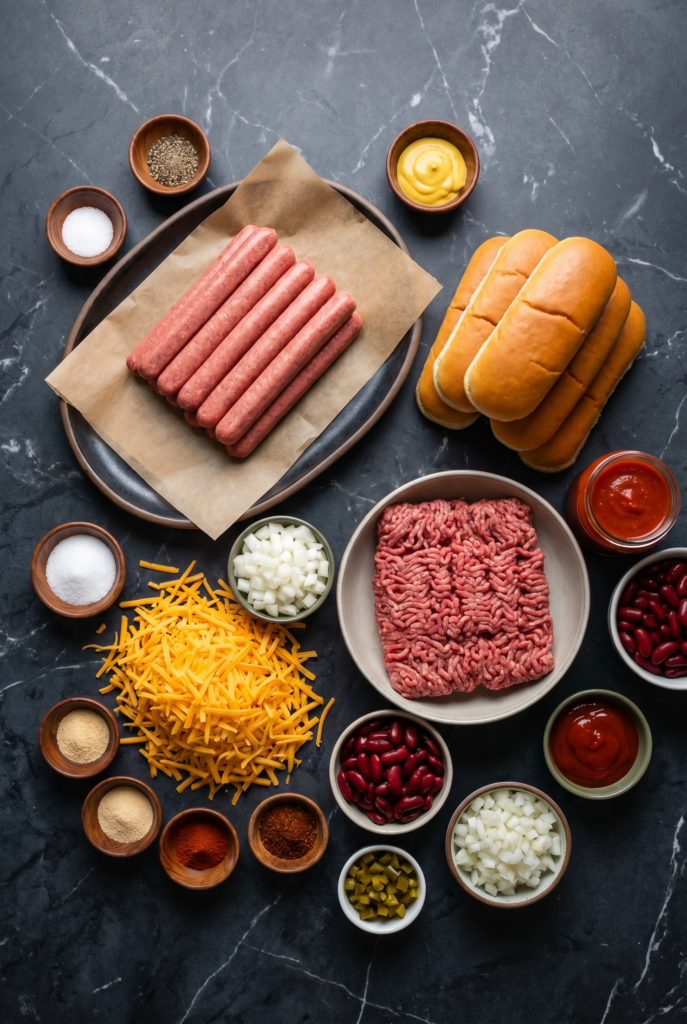
4 hot dogs (beef recommended)
4 hot dog buns
1 (15 oz) can chili (no beans or with beans—your call)
1 cup shredded cheddar cheese
¼ cup diced white onion (optional)
Yellow mustard (optional)
Pickled jalapeños (optional)
Quick Homemade Chili (Optional):
½ lb ground beef
1 (8 oz) can tomato sauce
1 tbsp chili powder
½ tsp cumin
Step-by-Step Instructions
Step 1: Heat the Chili
In a small pot, heat chili over medium heat until bubbly.
If making quick homemade: brown ground beef, drain, add tomato sauce, chili powder, and cumin. Simmer 5 minutes.
Step 2: Cook the Hot Dogs
Grill, pan-fry, or boil hot dogs until heated through.
Steam or toast buns lightly.
Step 3: Assemble
Place hot dog in bun. Squeeze mustard if using.
Ladle chili generously over the dog.
Pile on cheddar cheese. Top with onion and jalapeños.
Step 4: Serve
Serve immediately with a fork (and napkins. so many napkins).
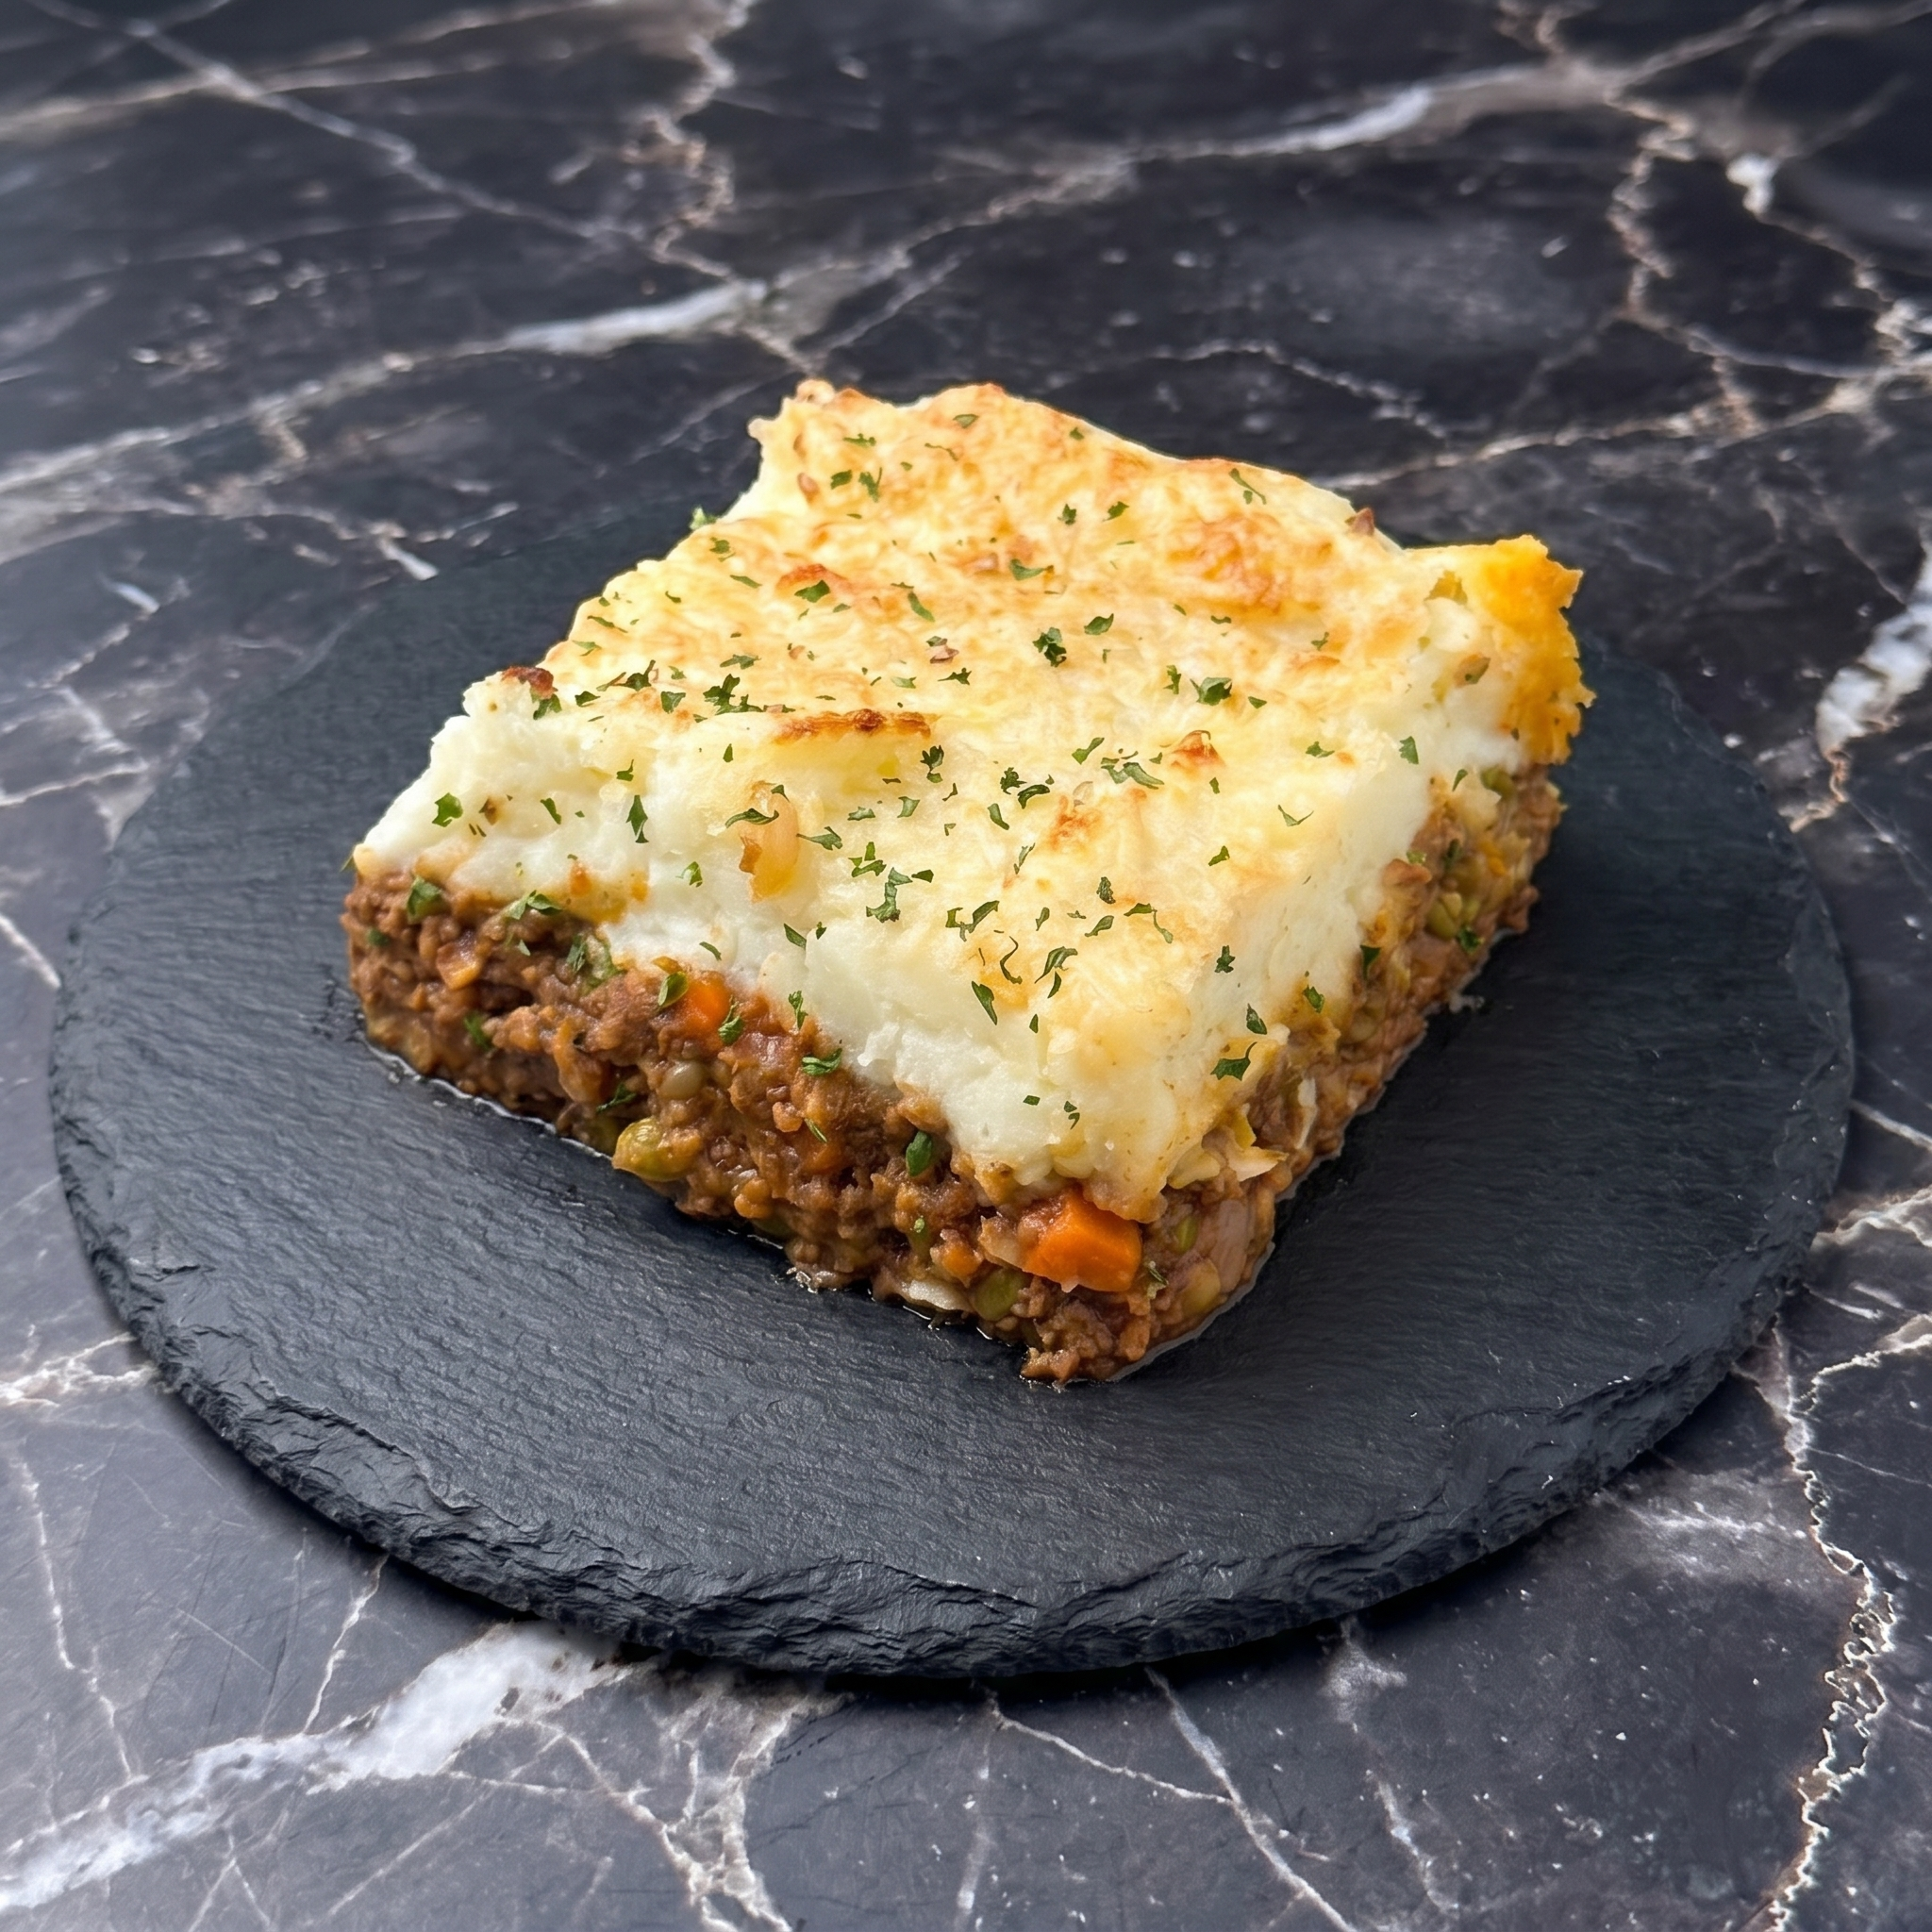
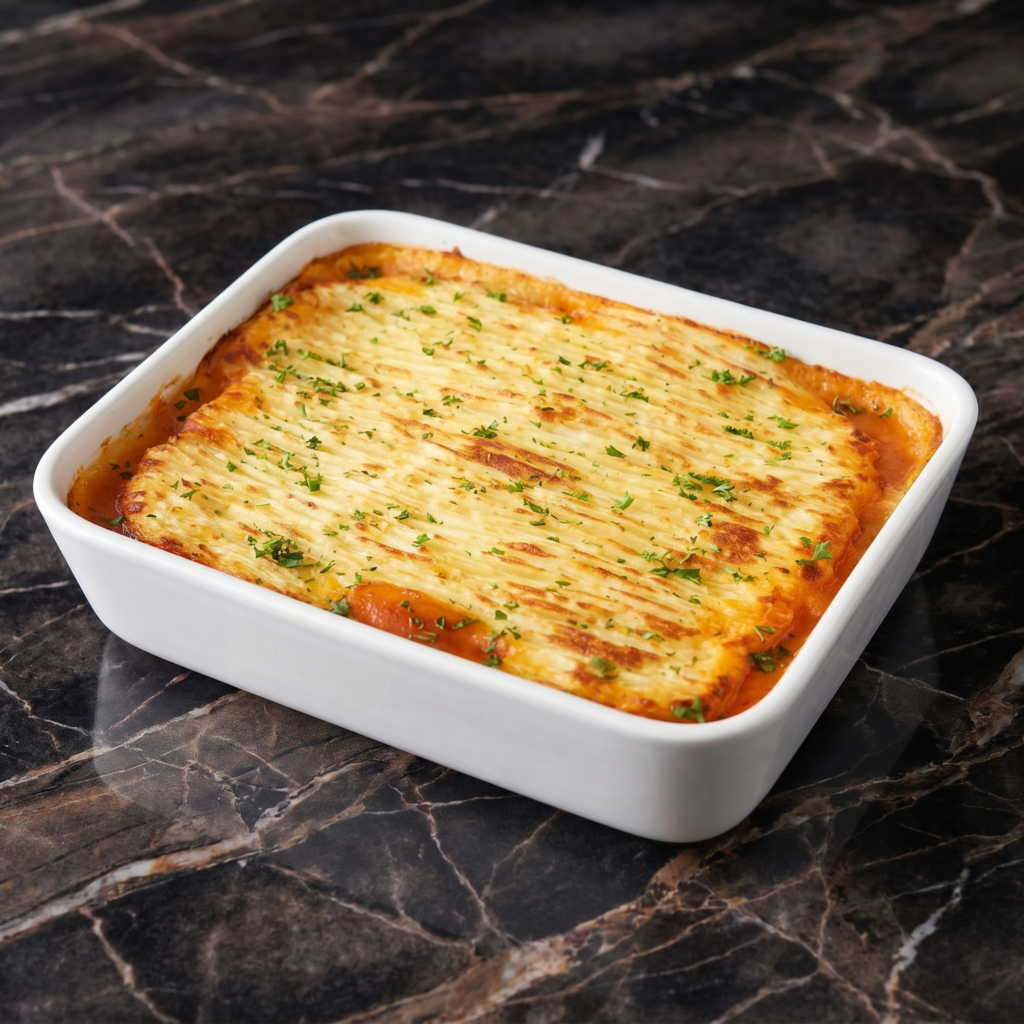
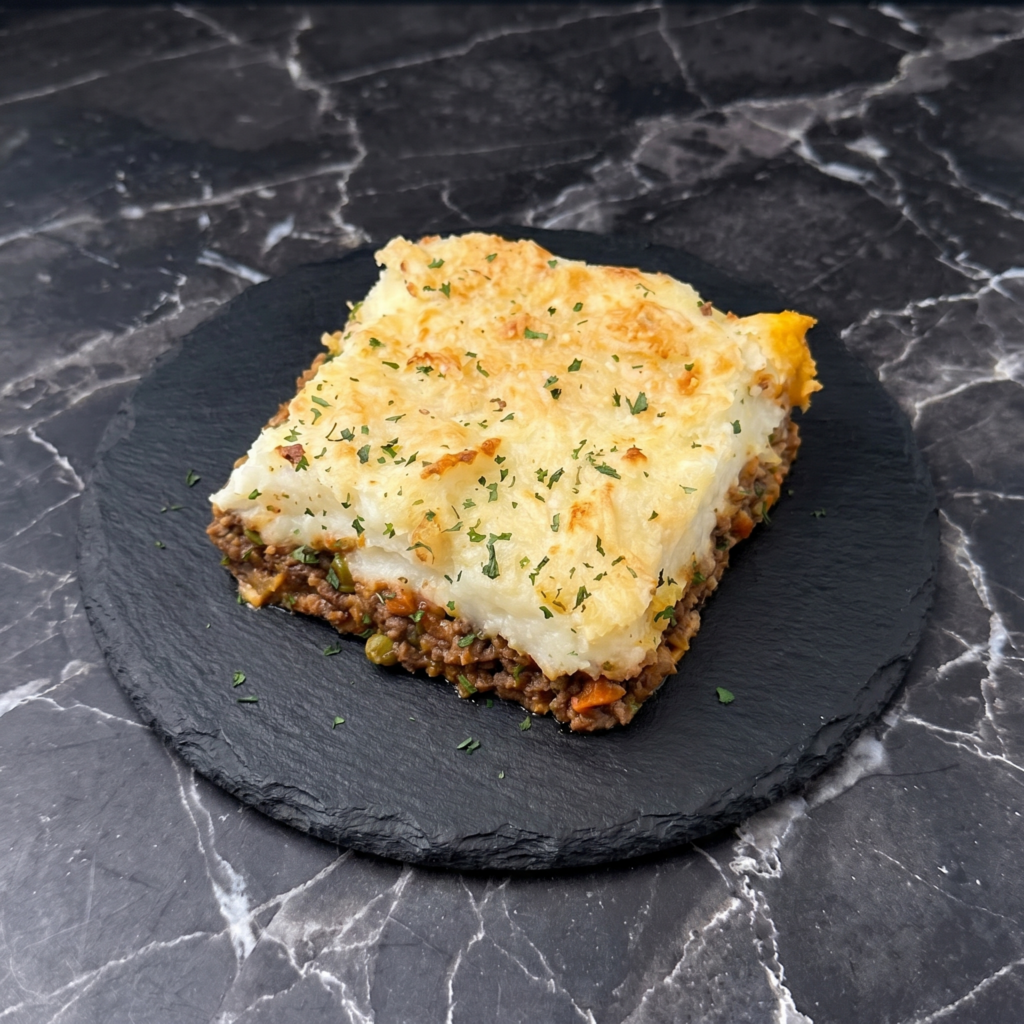
Shepherd’s pie is what happens when leftovers dream big. But honestly? It’s better when you make it on purpose.
Savory meat filling. Sweet carrots and peas. Topped with creamy mashed potatoes that get crispy edges in the oven. It’s a hug in a baking dish. No fancy skills required.
Ingredients
Serves 6.
2 lbs (900g) russet or Yukon gold potatoes, peeled and cubed
Few meals are as satisfying, quick, and crowd-pleasing as chicken quesadillas. With crispy golden tortillas, juicy seasoned chicken, and layers of gooey melted cheese, this classic dish delivers bold flavor with minimal effort.
Whether you’re preparing a quick weeknight dinner, a game-day snack, or a casual lunch, chicken quesadillas are always a reliable favorite.
Originating from Mexican cuisine, quesadillas traditionally consist of tortillas filled with cheese and other ingredients, then cooked until the exterior is crisp and the filling is hot and melty.
Adding seasoned chicken turns them into a hearty and protein-packed meal that’s both comforting and versatile.
In this step-by-step guide, you’ll learn exactly how to make restaurant-quality chicken quesadillas at home, complete with tips for achieving perfectly crisp tortillas and flavorful fillings.
Why Chicken Quesadillas Are So Popular
Chicken quesadillas have become a staple in kitchens around the world for several reasons:
Quick cooking time
Simple ingredients
Customizable fillings
Perfect balance of crunchy and cheesy textures
With just a few ingredients and one skillet, you can create a meal that tastes like it came from your favorite Mexican restaurant.
Ingredients
For four quesadillas, you will need:
2 cups cooked chicken, shredded or diced
4 large flour tortillas
1 ½ cups shredded cheese (cheddar, Monterey Jack, or Mexican blend)
½ small onion, finely chopped
½ bell pepper, thinly sliced
1 tablespoon olive oil
1 teaspoon chili powder
½ teaspoon paprika
½ teaspoon cumin
½ teaspoon garlic powder
Salt and pepper to taste
2 tablespoons butter or oil for cooking
Optional toppings:
Sour cream
Salsa
Guacamole
Chopped cilantro
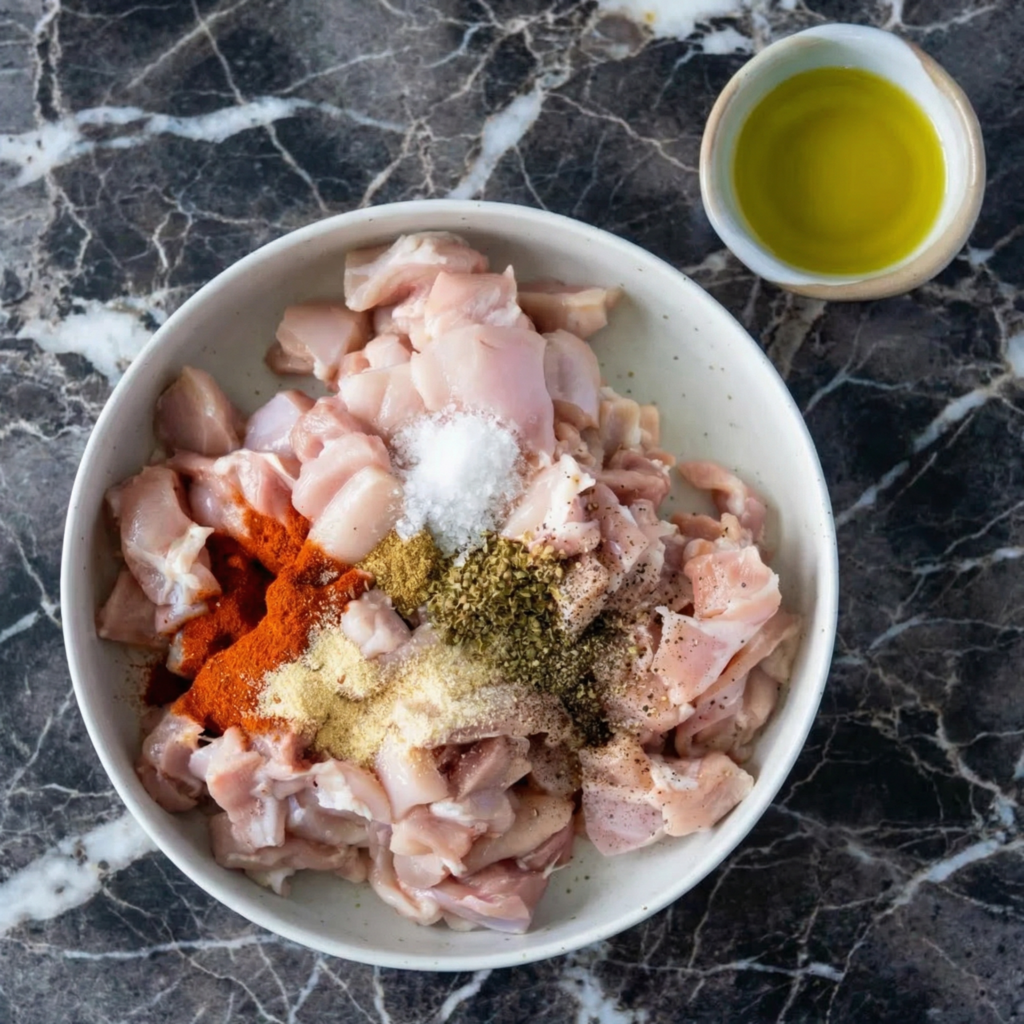
Step 1: Prepare the Chicken
If you don’t already have cooked chicken, start by seasoning chicken breast or thighs with chili powder, cumin, paprika, garlic powder, salt, and pepper.
Cook the chicken in a skillet with a little olive oil over medium heat for about 6–8 minutes per side, or until fully cooked.
Once done, allow it to cool slightly, then shred or dice the meat into bite-sized pieces.
Using leftover roasted or rotisserie chicken also works perfectly and saves time.
Step 2: Cook the Vegetables
Heat 1 tablespoon of olive oil in a skillet over medium heat.
Add the chopped onion and sliced bell pepper, cooking for about 3–4 minutes until softened and slightly caramelized.
This step enhances the flavor and adds a little sweetness that complements the savory chicken and cheese.
Once cooked, remove the vegetables from the pan and set aside.
Step 3: Combine the Filling
In a mixing bowl, combine the shredded chicken with the cooked onions and peppers.
Taste the mixture and adjust seasoning with a pinch of salt or extra spices if desired.
Mixing the filling beforehand ensures each quesadilla has evenly distributed flavor.
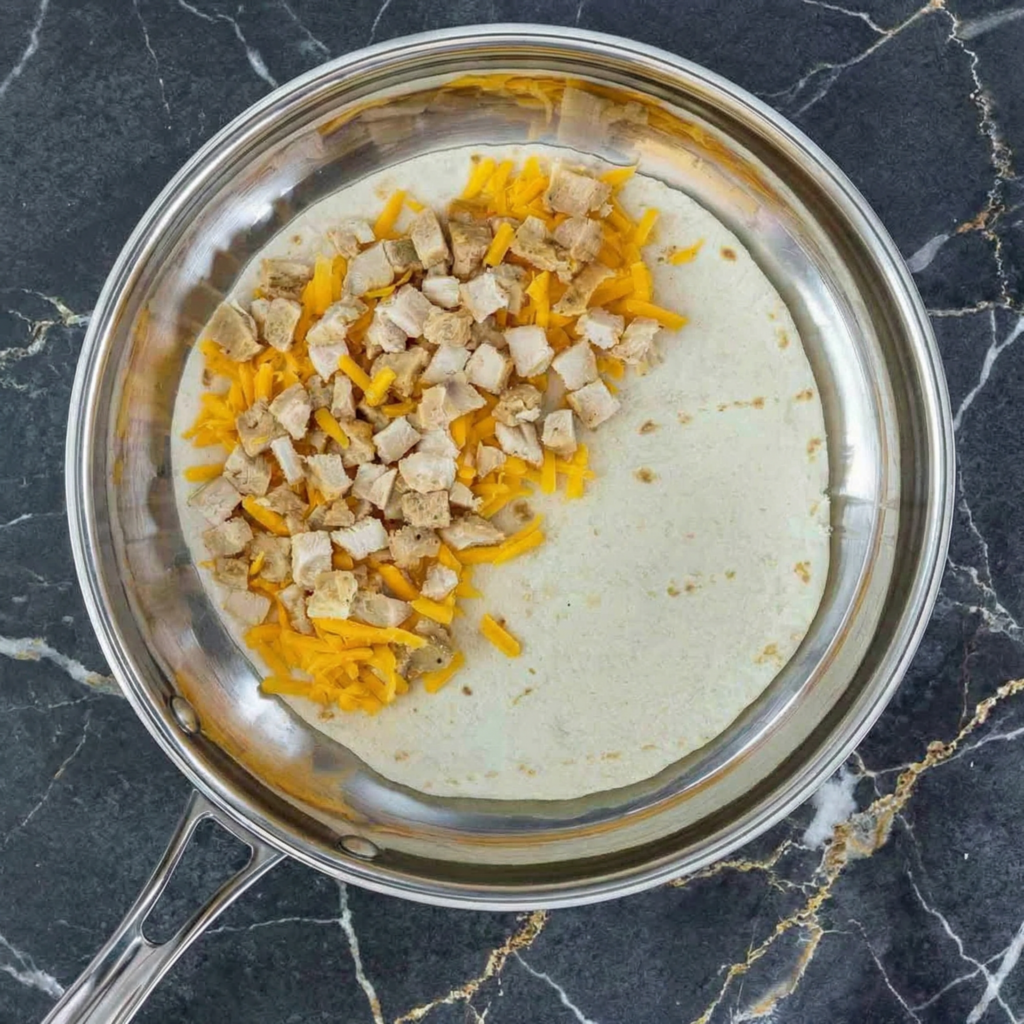
Step 4: Prepare the Tortillas
Lay the tortillas flat on a clean surface.
Sprinkle a layer of shredded cheese over half of each tortilla. The cheese acts as a “glue” that holds the filling together once melted.
Next, add a generous scoop of the chicken mixture over the cheese.
Top with another layer of shredded cheese before folding the tortilla in half.
The double layer of cheese helps ensure every bite is deliciously gooey.
Step 5: Heat the Skillet
Place a large skillet or griddle over medium heat.
Add a small amount of butter or oil and allow it to melt completely.
The fat helps the tortilla crisp up while adding rich flavor.
Step 6: Cook the Quesadillas
Place one or two folded quesadillas into the skillet, depending on its size.
Cook for about 3–4 minutes on the first side until the tortilla becomes golden brown and crispy.
Carefully flip the quesadilla and cook the other side for another 2–3 minutes until the cheese melts and the tortilla is evenly toasted.
Press gently with a spatula while cooking to help the filling heat evenly.
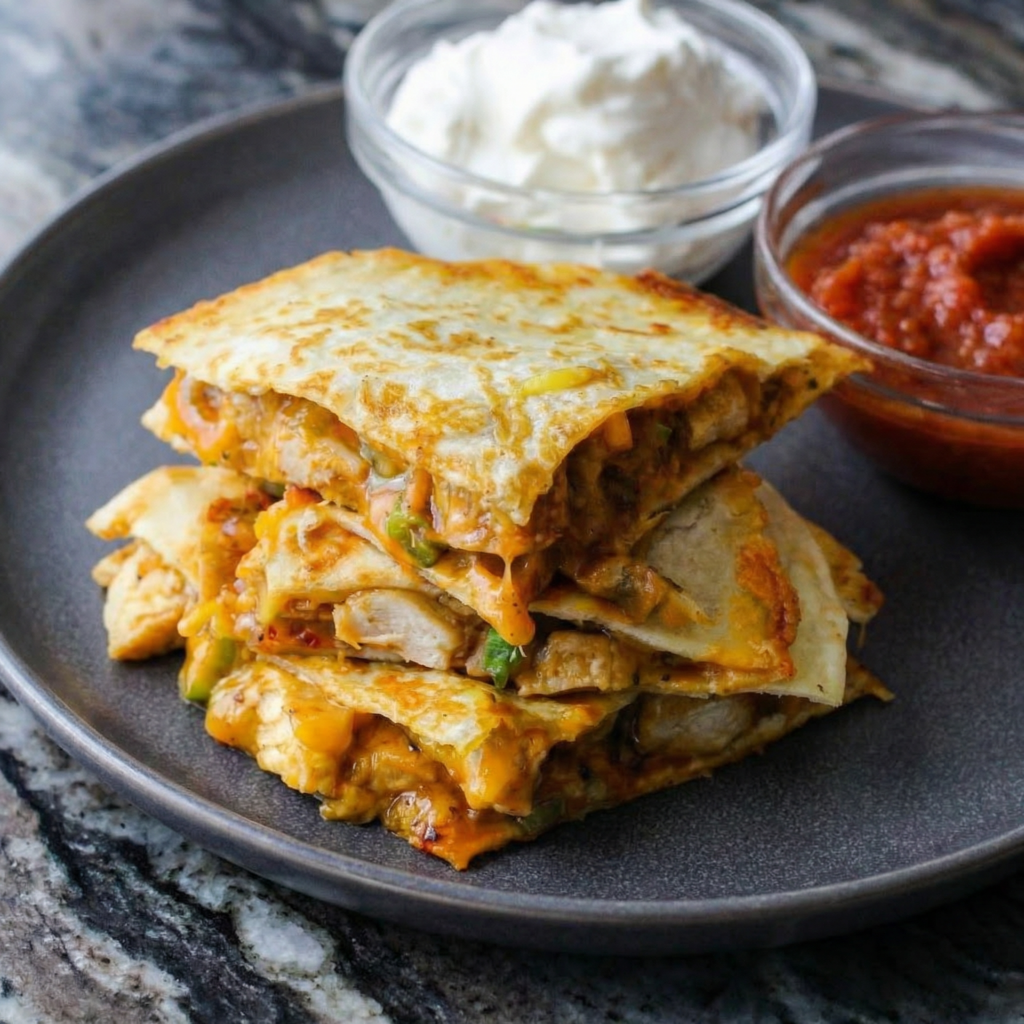
Step 7: Rest and Slice
Transfer the cooked quesadilla to a cutting board and let it rest for about one minute.
This short resting period allows the melted cheese to settle slightly so the filling doesn’t spill out when sliced.
Use a pizza cutter or sharp knife to slice each quesadilla into wedges.
Step 8: Prepare the Remaining Quesadillas
Repeat the cooking process with the remaining tortillas and filling.
Add more butter or oil to the skillet if needed to maintain a crispy texture.
Work in batches to avoid overcrowding the pan.
Step 9: Serve with Toppings
Arrange the sliced quesadillas on a serving plate.
Serve them with your favorite toppings such as sour cream, salsa, guacamole, or fresh cilantro.
The creamy and tangy toppings complement the cheesy filling perfectly.
Tips for the Best Chicken Quesadillas
For the most delicious results, keep these tips in mind:
Use good melting cheese. Monterey Jack, cheddar, Oaxaca, or a Mexican cheese blend melt beautifully.
Don’t overfill. Too much filling can cause the quesadilla to fall apart while cooking.
Cook over medium heat. This allows the cheese to melt fully without burning the tortilla.
Crisp both sides. A golden, crunchy exterior makes all the difference.
Flavor Variations
Once you master the basic recipe, you can experiment with different flavors.
Try adding:
Corn or black beans for extra texture
Jalapeños for heat
Mushrooms for a savory twist
Chipotle sauce for smoky flavor
Avocado slices for creaminess
Chicken quesadillas are incredibly flexible, making them perfect for using up leftovers or trying new combinations.
Final Thoughts
Chicken quesadillas are the ultimate combination of simplicity and flavor. With crispy tortillas, seasoned chicken, sautéed vegetables, and melted cheese, every bite delivers satisfying textures and bold taste.
Best of all, they come together quickly with everyday ingredients, making them perfect for busy weeknights or relaxed weekend meals. Once you master this recipe, you’ll have a go-to dish that everyone will love.
Serve them hot, add your favorite toppings, and enjoy a plate of homemade chicken quesadillas that taste every bit as good as restaurant versions—maybe even better.
If you love burritos but crave something crispy, indulgent, and packed with bold flavor, Chicken Chimichangas are about to become your new obsession.
These deep-fried (or baked!) burritos are stuffed with seasoned shredded chicken, melty cheese, and savory fillings, then cooked until perfectly golden and crunchy on the outside.
Every bite delivers a satisfying crunch followed by warm, flavorful filling that’s pure comfort food.
The best part?
They’re surprisingly easy to make at home. Follow this step-by-step guide and you’ll have restaurant-style chimichangas fresh from your own kitchen.
Ingredients You’ll Need
For the Chicken Filling:
2 cups cooked shredded chicken (rotisserie works great)
1 tablespoon olive oil
½ small onion, finely diced
2 cloves garlic, minced
1 teaspoon chili powder
1 teaspoon ground cumin
½ teaspoon smoked paprika
½ teaspoon salt
¼ teaspoon black pepper
½ cup salsa
1 cup shredded Mexican blend or cheddar cheese
For Assembling:
4 large flour tortillas
Vegetable oil (for frying)
Optional Toppings:
Sour cream
Guacamole
Shredded lettuce
Diced tomatoes
Chopped cilantro
Salsa
Step 1: Prepare the Chicken Filling
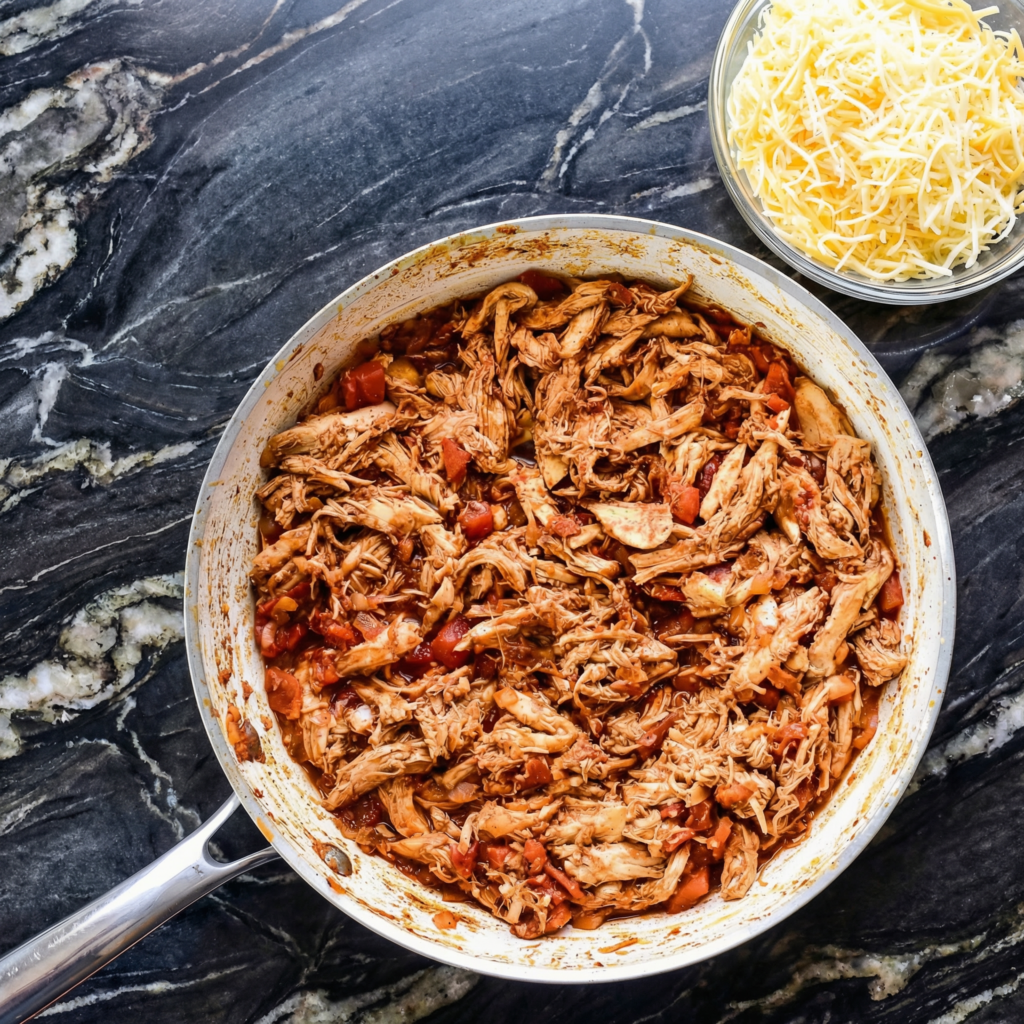
Heat olive oil in a skillet over medium heat. Add the diced onion and cook for 3–4 minutes until softened. Stir in the minced garlic and cook for another 30 seconds until fragrant.
Add the shredded chicken to the skillet. Sprinkle in the chili powder, cumin, smoked paprika, salt, and black pepper. Stir well to coat the chicken evenly with the spices.
Pour in the salsa and cook for 2–3 minutes, allowing everything to heat through and the flavors to blend. Remove from heat and stir in the shredded cheese while the mixture is still warm. The cheese should begin to melt slightly, creating a creamy filling.
Step 2: Warm the Tortillas
Warm the flour tortillas in the microwave for about 20–30 seconds. This makes them more pliable and less likely to tear when folding.
Lay them flat on a clean surface, ready for assembly.
Step 3: Assemble the Chimichangas
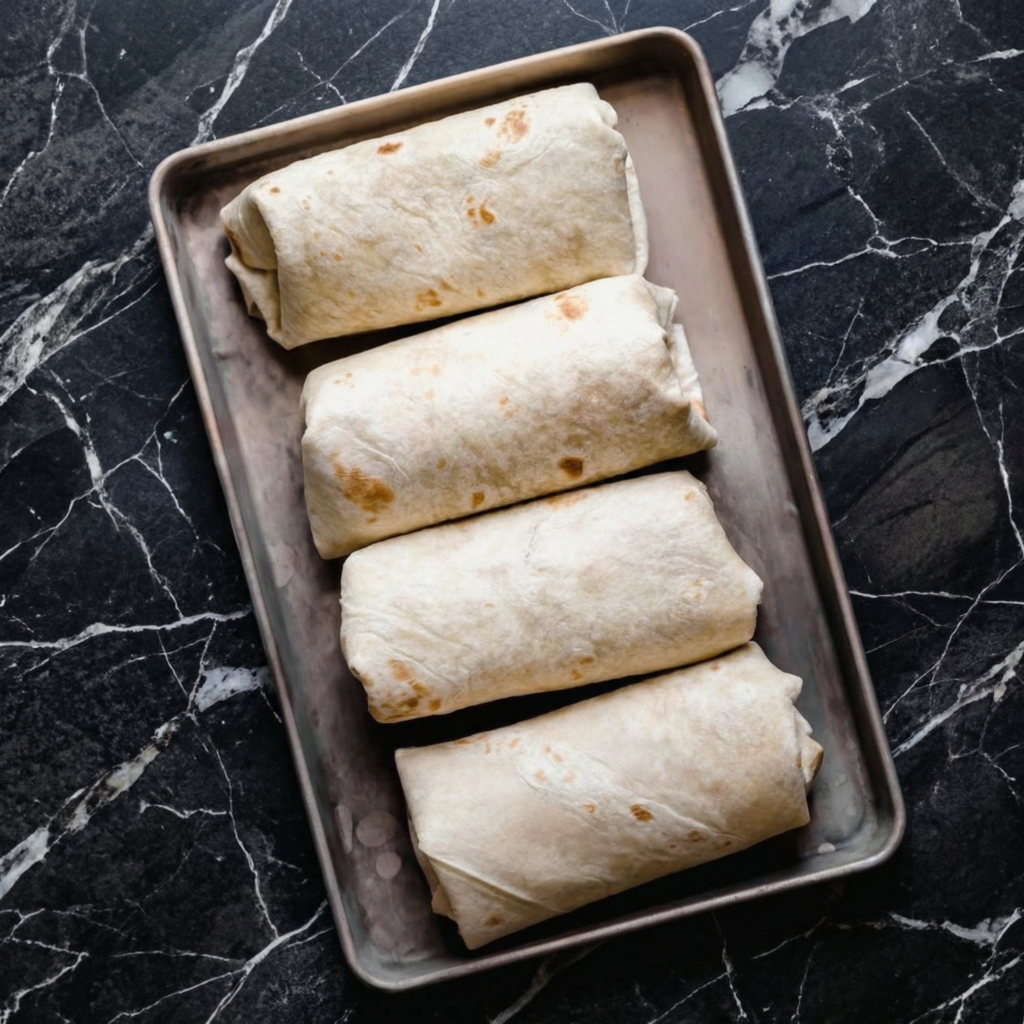
Spoon about ½ to ¾ cup of the chicken mixture into the center of each tortilla. Be careful not to overfill, as this can make rolling difficult.
Fold the sides inward first, then roll the tortilla tightly from the bottom up, burrito-style. The filling should be fully enclosed.
Place each rolled chimichanga seam-side down on a plate while you finish assembling the rest.
Step 4: Heat the Oil
Pour about 1–2 inches of vegetable oil into a deep skillet or heavy-bottomed pot.
Heat over medium heat until the oil reaches about 350°F (175°C). If you don’t have a thermometer, drop in a small piece of tortilla—if it sizzles immediately, the oil is ready.
Step 5: Fry Until Golden
Carefully place one or two chimichangas seam-side down into the hot oil. Do not overcrowd the pan.
Fry for 2–3 minutes per side, turning carefully with tongs, until golden brown and crispy all over.
Remove and place on a plate lined with paper towels to drain excess oil. Repeat with remaining chimichangas.
Step 6: Alternative Baking Method
If you prefer a lighter option, brush each chimichanga lightly with oil and place seam-side down on a baking sheet.
Bake at 400°F (200°C) for 20–25 minutes, flipping halfway through, until crispy and golden.
While not as deeply crispy as fried, the baked version is still delicious and satisfying.
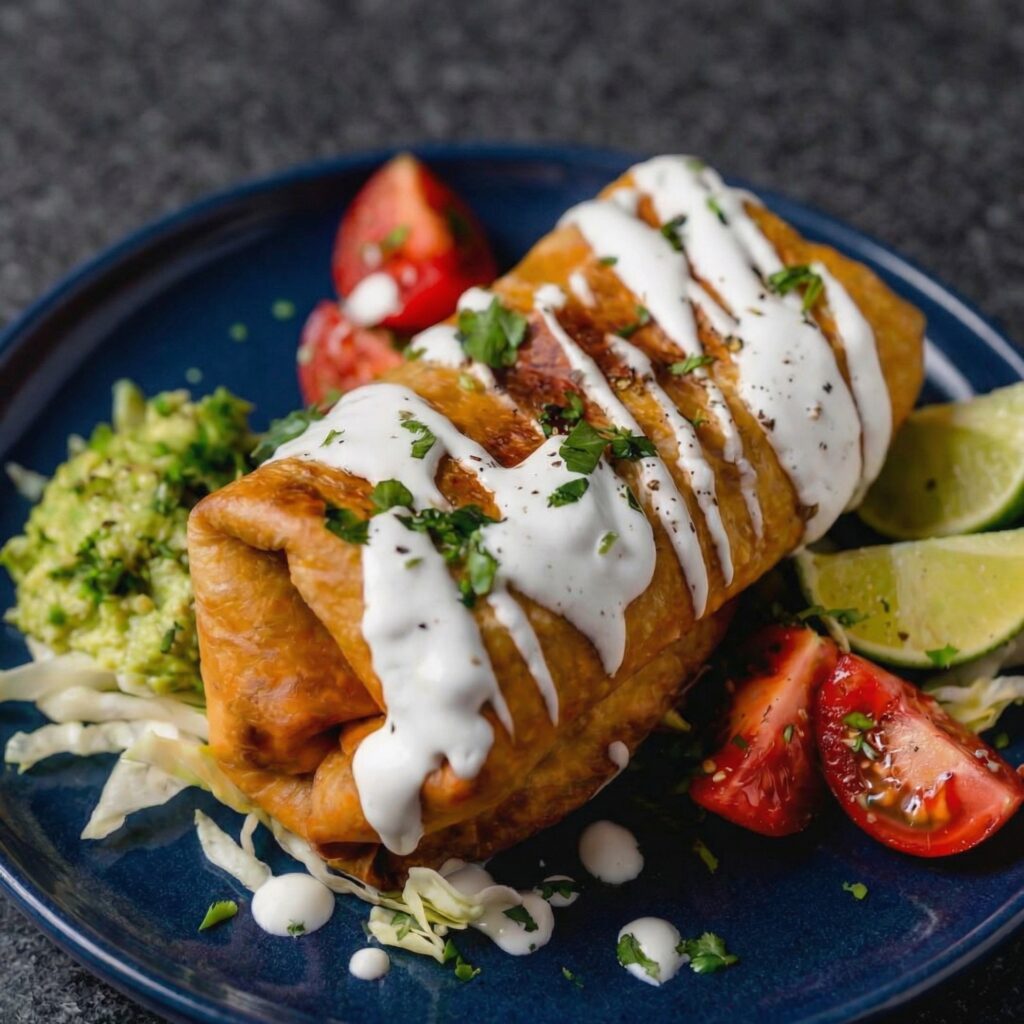
Step 7: Add Toppings and Serve
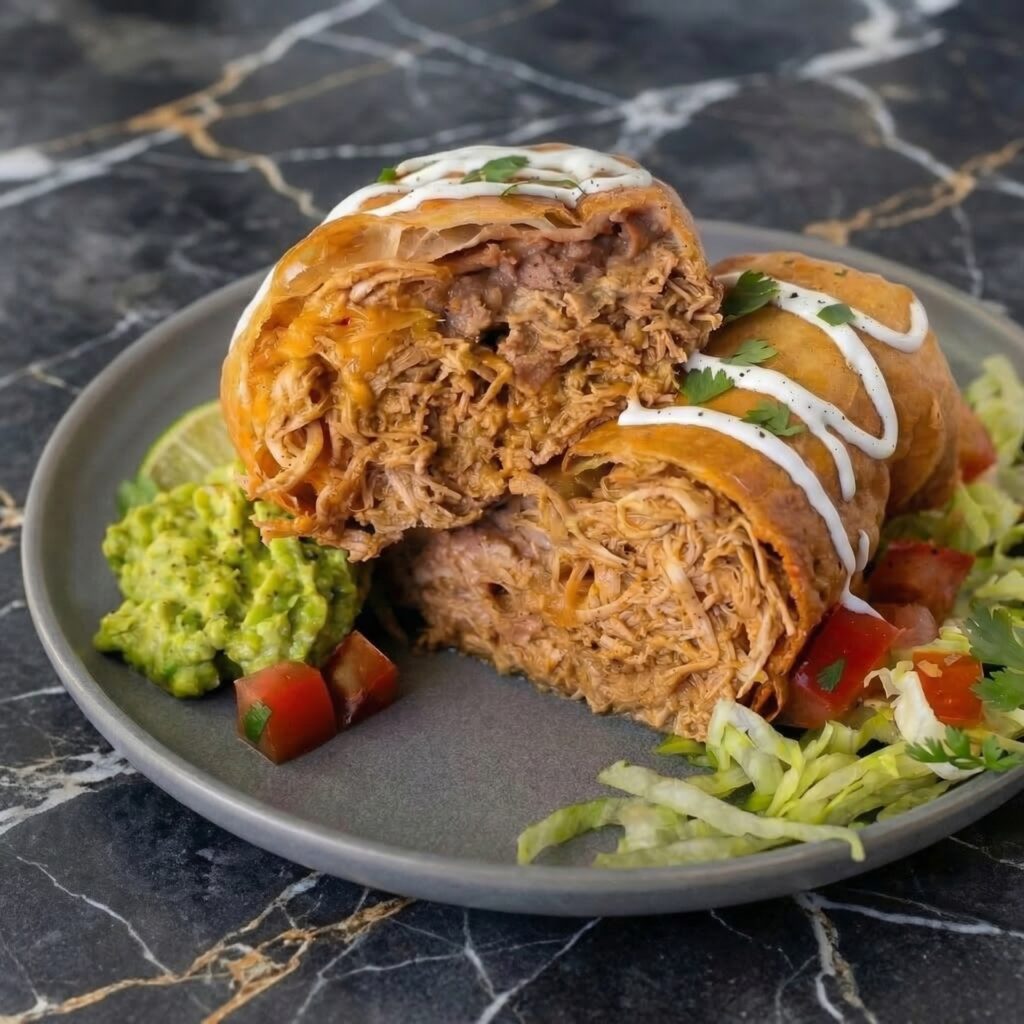
Place the hot chimichangas on serving plates. Top with sour cream, guacamole, shredded lettuce, diced tomatoes, or extra salsa.
For an extra indulgent touch, drizzle with warm queso or enchilada sauce before serving.
Serve immediately while crispy and hot.
Pro Tips for Perfect Chimichangas
Don’t overfill the tortillas to prevent bursting during frying.
Secure tightly when rolling to keep everything sealed.
Maintain oil temperature for even browning and crispiness.
Drain properly on paper towels to avoid sogginess.
Use rotisserie chicken for quick prep and extra flavor.
Flavor Variations
Once you master the classic chicken version, try these creative ideas:
Spicy Jalapeño Chicken: Add diced jalapeños to the filling.
Creamy Version: Stir in a few tablespoons of cream cheese for extra richness.
Bean & Rice Add-In: Add seasoned rice or refried beans for a heartier filling.
Buffalo Chicken Twist: Mix shredded chicken with buffalo sauce and mozzarella.
Make-Ahead and Storage
Chimichangas can be assembled ahead of time and stored in the refrigerator for up to 24 hours before cooking.
Cooked chimichangas can be stored in an airtight container for up to 3 days. Reheat in the oven at 375°F until warmed through and crispy again.
They also freeze well—wrap tightly in foil and freeze for up to 2 months.
Why This Recipe Works
Chicken chimichangas combine contrasting textures and bold flavors.
The seasoned chicken filling is savory and slightly saucy, while the melted cheese binds everything together. Frying creates that irresistible crispy shell that makes chimichangas stand apart from regular burritos.
They’re customizable, crowd-pleasing, and perfect for weeknight dinners or festive gatherings.
Final Thoughts
Chicken Chimichangas are comfort food at its finest—crispy on the outside, cheesy and flavorful on the inside.
With just a handful of ingredients and simple techniques, you can recreate this restaurant favorite in your own kitchen.
Whether you fry them for maximum crunch or bake them for a lighter option, these chimichangas deliver big flavor and satisfying texture every time.
Serve them with your favorite toppings, gather around the table, and enjoy every golden, crunchy bite.
There’s something deeply comforting about a bowl of Mushroom Risotto with Peas. It’s creamy without heavy cream, rich without being overwhelming, and filled with earthy mushrooms and sweet bursts of green peas.
This classic Italian-inspired dish transforms simple pantry staples into a luxurious meal that feels restaurant-worthy but is absolutely achievable at home.
Risotto has a reputation for being fussy, but once you understand the technique, it becomes a relaxing and rewarding cooking experience. With patience, warm broth, and steady stirring, you’ll create a silky, flavorful dish that’s perfect for both weeknight dinners and elegant gatherings.
Let’s walk through it step by step.
Why You’ll Love This Mushroom Risotto
Creamy texture without cream
Deep, savory mushroom flavor
Bright sweetness from peas
Naturally gluten-free
Elegant yet comforting
This dish is all about balance—earthy, sweet, rich, and fresh in every bite.
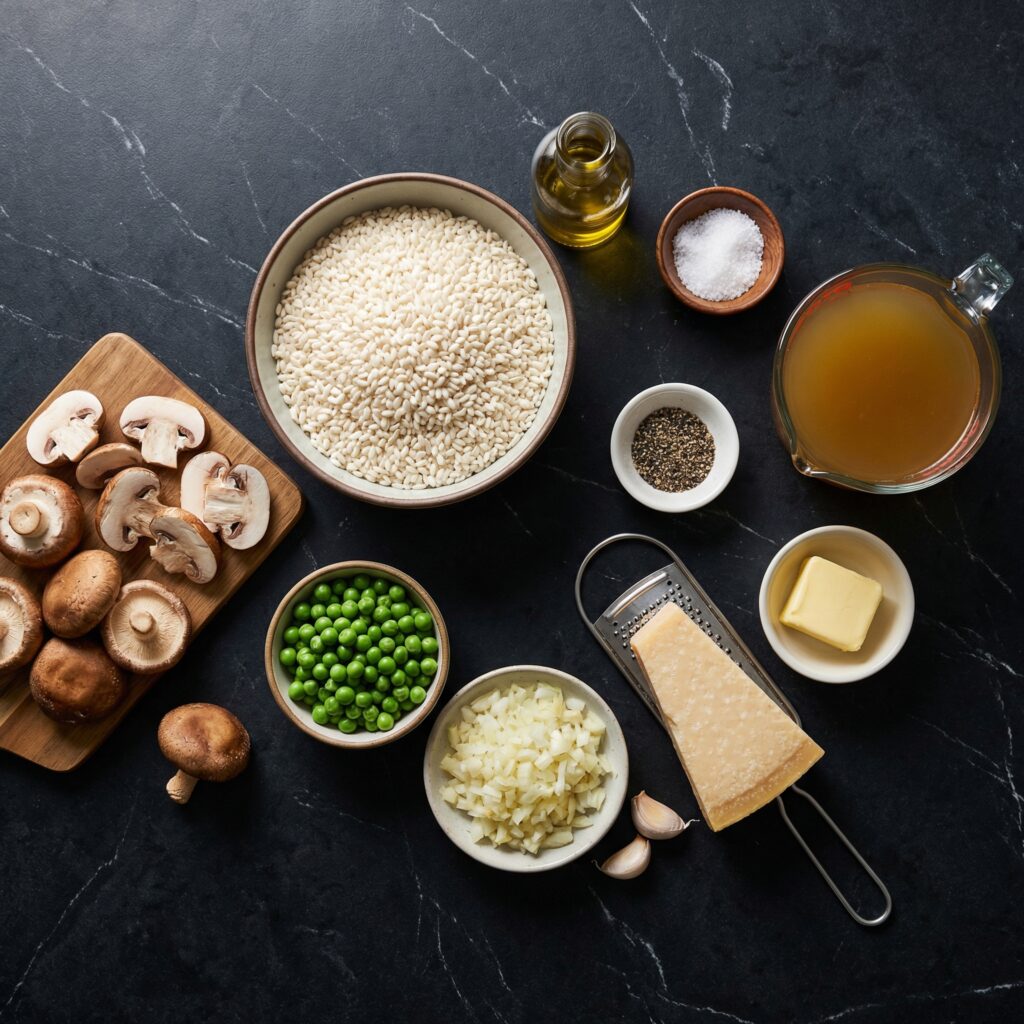
Ingredients You’ll Need
For the Risotto Base:
1 ½ cups Arborio rice
4–5 cups vegetable or chicken broth (kept warm)
2 tablespoons olive oil
2 tablespoons unsalted butter
For the Vegetables:
8 ounces mushrooms (cremini, button, or a mix), sliced
1 small onion or 2 shallots, finely diced
2 cloves garlic, minced
1 cup frozen peas
For Finishing:
½ cup dry white wine
½ cup freshly grated Parmesan cheese
Salt and freshly cracked black pepper
Optional Garnish:
Fresh parsley
Extra Parmesan
Lemon zest
Step 1: Warm the Broth
Pour your broth into a saucepan and keep it gently simmering over low heat.
Adding warm broth to risotto is essential—it allows the rice to cook evenly and release starch properly. Cold broth slows the cooking process and affects texture.
Step 2: Sauté the Mushrooms
Heat 1 tablespoon olive oil and 1 tablespoon butter in a large, heavy-bottomed skillet or saucepan over medium heat.
Add the sliced mushrooms in a single layer. Cook for 5–7 minutes, stirring occasionally, until they release their moisture and turn golden brown.
Season lightly with salt and pepper.
Remove the mushrooms from the pan and set aside. Cooking them separately ensures they stay tender and flavorful rather than watery.
Step 3: Cook the Aromatics
In the same pan, add the remaining olive oil.
Add diced onion or shallots and cook for 3–4 minutes until soft and translucent.
Stir in the minced garlic and cook for 30 seconds, just until fragrant.
These aromatics create a flavorful base that supports the creamy rice.
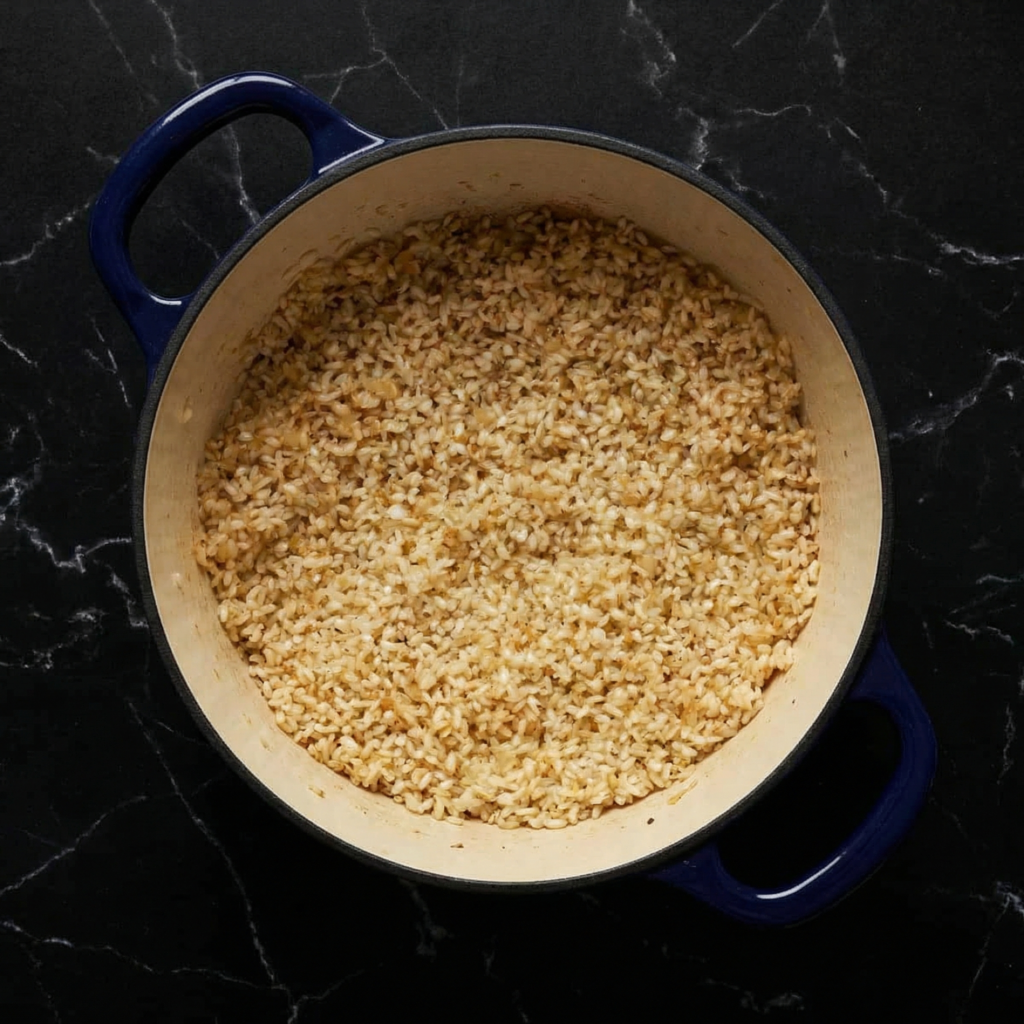
Step 4: Toast the Rice
Add the Arborio rice directly into the pan.
Stir continuously for 1–2 minutes, coating each grain in oil. The edges will become slightly translucent while the center remains opaque.
Toasting enhances the rice’s nutty flavor and helps maintain structure during cooking.
Step 5: Deglaze with Wine
Pour in the white wine and stir constantly.
Allow it to simmer until most of the liquid evaporates. This adds acidity and depth, balancing the richness of the final dish.
If you prefer not to use wine, substitute with a splash of broth and a squeeze of lemon.
Step 6: Add Broth Gradually
Add one ladle (about ½ cup) of warm broth to the rice.
Stir gently and frequently until the liquid is mostly absorbed.
Repeat this process—adding broth one ladle at a time—waiting for each addition to absorb before adding the next.
This gradual addition is the key to creamy risotto. It encourages the rice to release starch slowly, creating that signature silky texture.
Step 7: Stir with Patience
Continue adding broth and stirring for 18–22 minutes.
Taste as you go. The rice should be tender but still slightly firm in the center—al dente.
Adjust the heat as needed to maintain a gentle simmer.
Risotto isn’t about constant frantic stirring but steady, attentive movement.
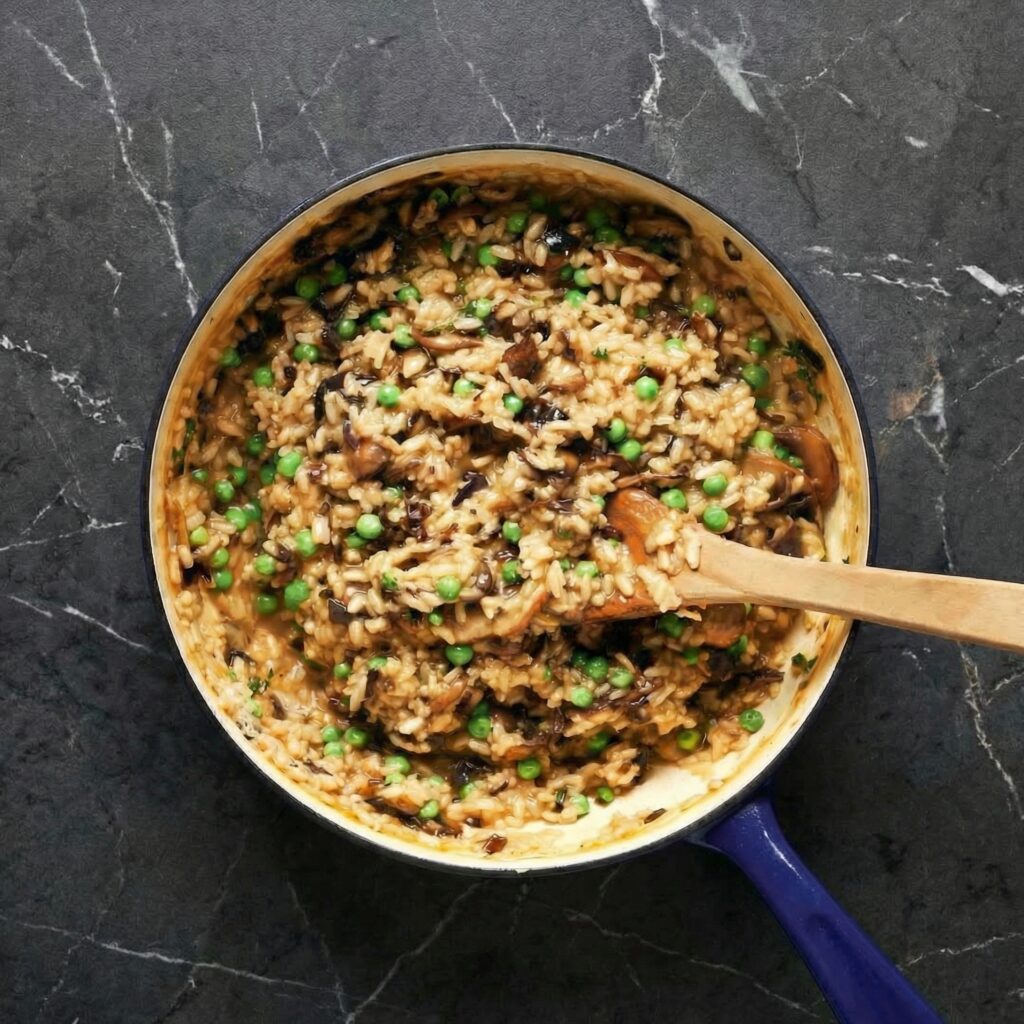
Step 8: Add Mushrooms and Peas
When the rice is nearly done, stir the sautéed mushrooms back into the pan.
Add the peas and cook for 2–3 minutes until heated through and bright green.
The peas add a pop of sweetness and color, complementing the earthy mushrooms.
Step 9: Finish with Butter and Parmesan
Remove the pan from the heat.
Stir in the remaining tablespoon of butter and the grated Parmesan cheese.
This step, called mantecatura, gives risotto its luxurious, glossy finish.
Taste and adjust seasoning with salt and freshly cracked black pepper.
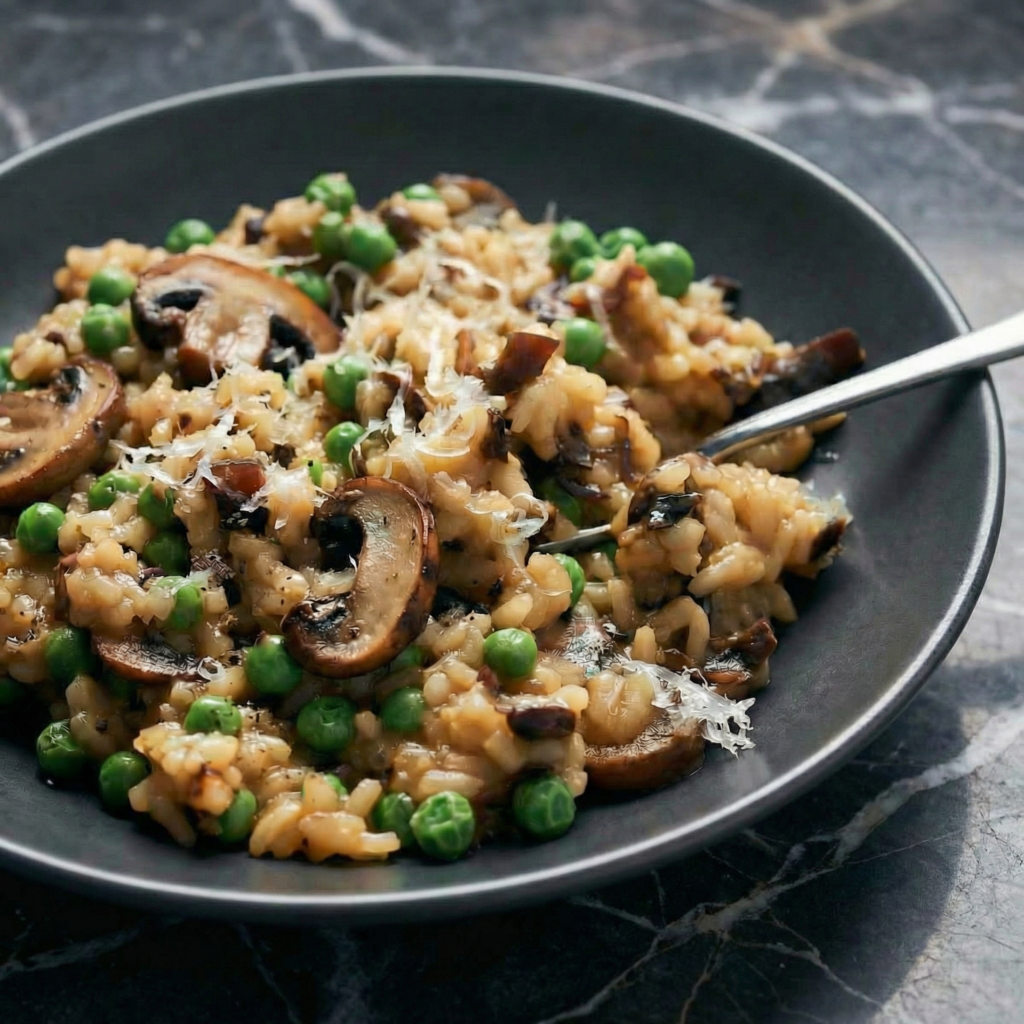
Step 10: Rest and Serve
Let the risotto rest for 1–2 minutes before serving.
It should flow slightly when spooned onto a plate—not stiff or dry.
Garnish with fresh parsley, extra Parmesan, and a touch of lemon zest if desired.
Serve immediately while warm and creamy.
Texture and Flavor Highlights
Silky, creamy consistency
Tender rice with slight bite
Rich umami from mushrooms
Sweet bursts of peas
Savory, cheesy finish
The combination creates a beautifully balanced dish that feels indulgent yet fresh.
Pro Tips for Perfect Risotto
Use Arborio rice. Its high starch content is essential.
Keep broth warm. It ensures even cooking.
Don’t rush the process. Gradual broth addition is key.
Taste frequently. Texture matters as much as flavor.
Serve immediately. Risotto thickens as it cools.
Optional Variations
Vegan Version: Use olive oil instead of butter and plant-based Parmesan.
Protein Boost: Top with grilled chicken or shrimp.
Herb Forward: Add thyme or rosemary.
Extra Creamy: Stir in a spoonful of mascarpone at the end.
Lemon Brightness: Add extra lemon zest for freshness.
Storage and Reheating
Risotto is best enjoyed fresh, but leftovers can be stored in the refrigerator for up to 2 days.
Reheat gently on the stovetop with a splash of broth or water to restore creaminess.
Avoid high heat to prevent drying out the rice.
Why This Recipe Works
Mushroom Risotto with Peas works because it relies on technique rather than complicated ingredients. Slow stirring and gradual broth addition allow the rice’s natural starch to create creaminess.
Sautéed mushrooms add depth and umami, while peas bring brightness and contrast.
The finishing touch of butter and Parmesan ties everything together into a glossy, cohesive dish that feels comforting yet elegant.
Creamy, savory, and beautifully balanced, Mushroom Risotto with Peas is a dish that rewards patience and simple technique.
Once you master it, you’ll have a timeless recipe that delivers comfort, elegance, and incredible flavor every single time.
If you love classic banana bread but crave something more indulgent, Double Chocolate Banana Bread is about to become your new obsession.
This recipe combines sweet, ripe bananas with deep cocoa flavor and melty chocolate chips for a loaf that’s incredibly moist, tender, and decadently rich. It’s the perfect balance of comforting and chocolatey—ideal for breakfast, dessert, or an afternoon treat with coffee.
Let’s walk step by step through making bakery-style double chocolate banana bread right in your own kitchen.
Why You’ll Love This Recipe
Extra moist and tender texture
Deep chocolate flavor from cocoa and chocolate chips
Perfect way to use overripe bananas
Simple, pantry-friendly ingredients
Freezer-friendly and great for meal prep
This isn’t just banana bread—it’s a chocolate lover’s dream.
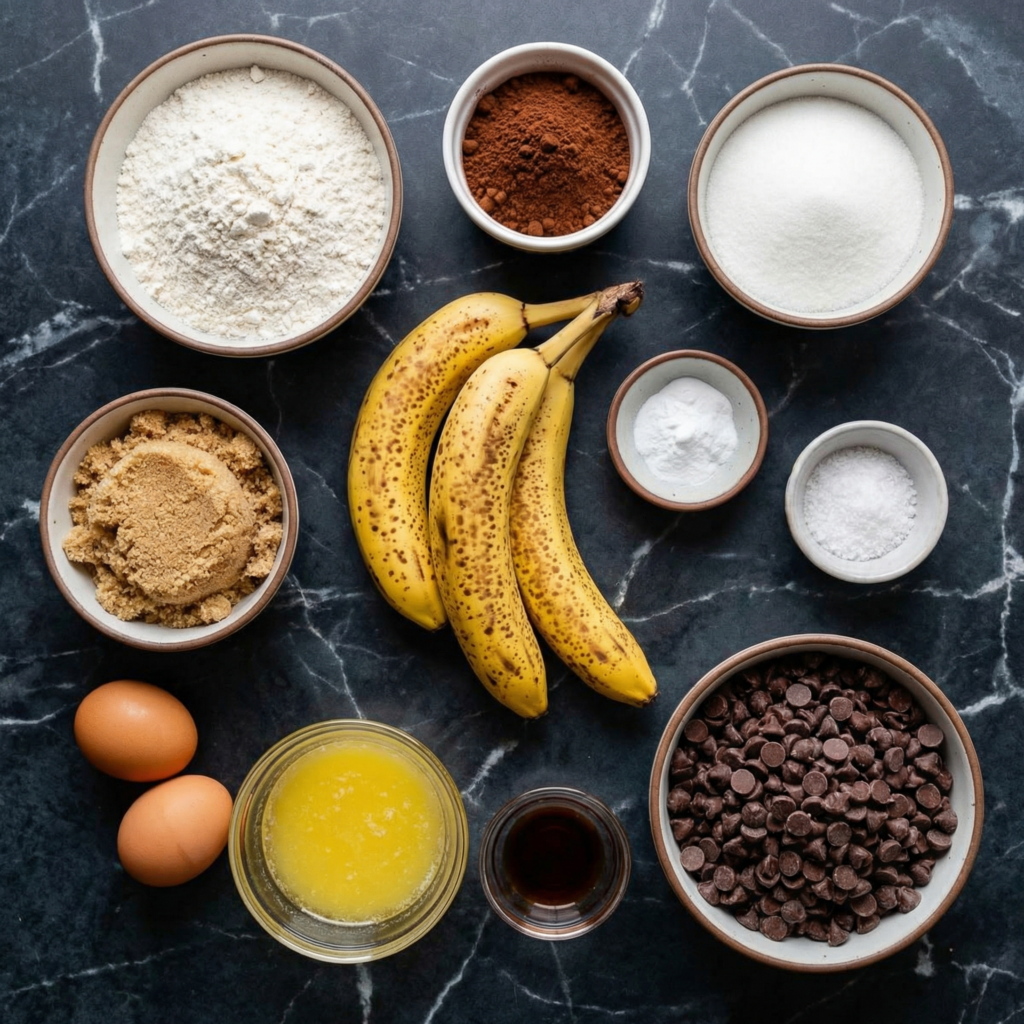
Ingredients You’ll Need
Wet Ingredients:
3 very ripe bananas (mashed)
½ cup unsalted butter, melted (or vegetable oil)
¾ cup granulated sugar
¼ cup brown sugar
2 large eggs
1 teaspoon vanilla extract
Dry Ingredients:
1 ½ cups all-purpose flour
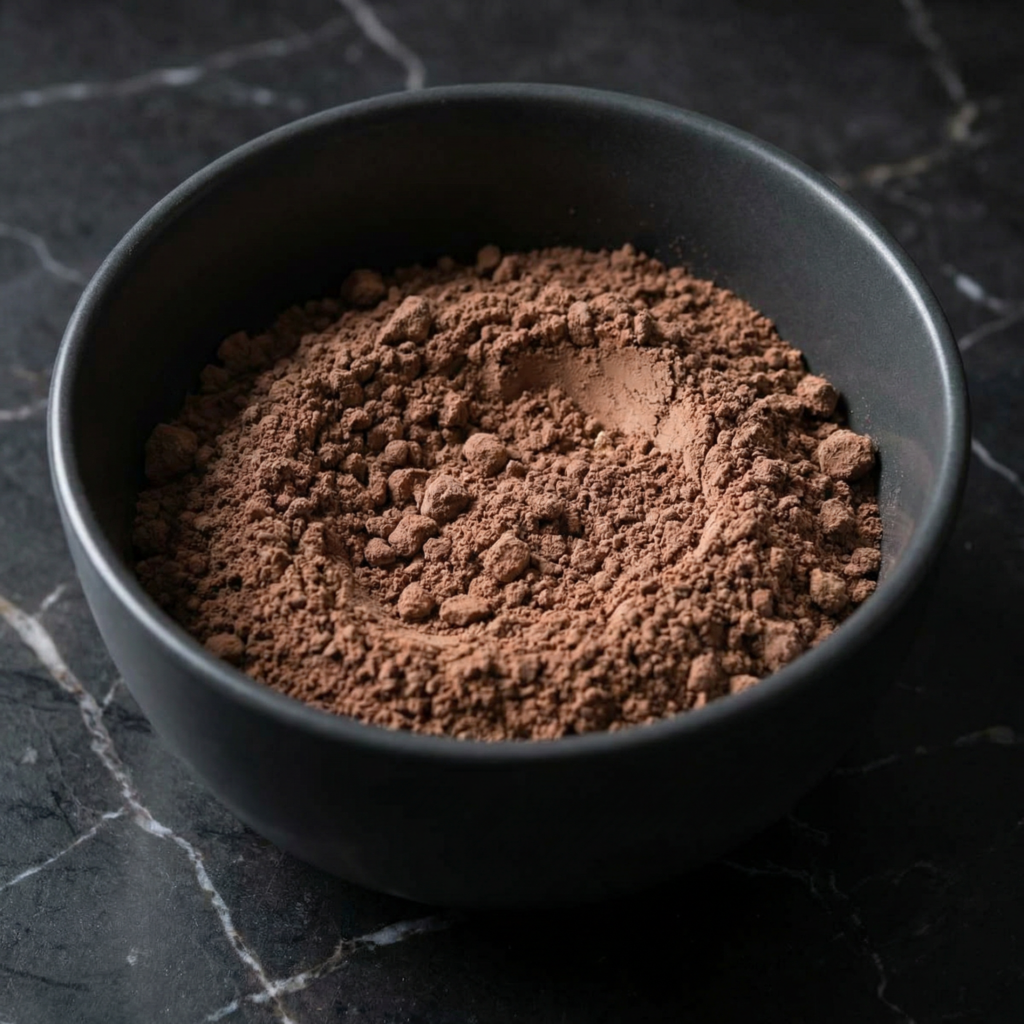
½ cup unsweetened cocoa powder
1 teaspoon baking soda
½ teaspoon salt
Chocolate Add-Ins:
1 cup semi-sweet chocolate chips
½ cup dark chocolate chunks (optional but recommended)
Step 1: Preheat and Prepare Your Pan
Preheat your oven to 350°F (175°C).
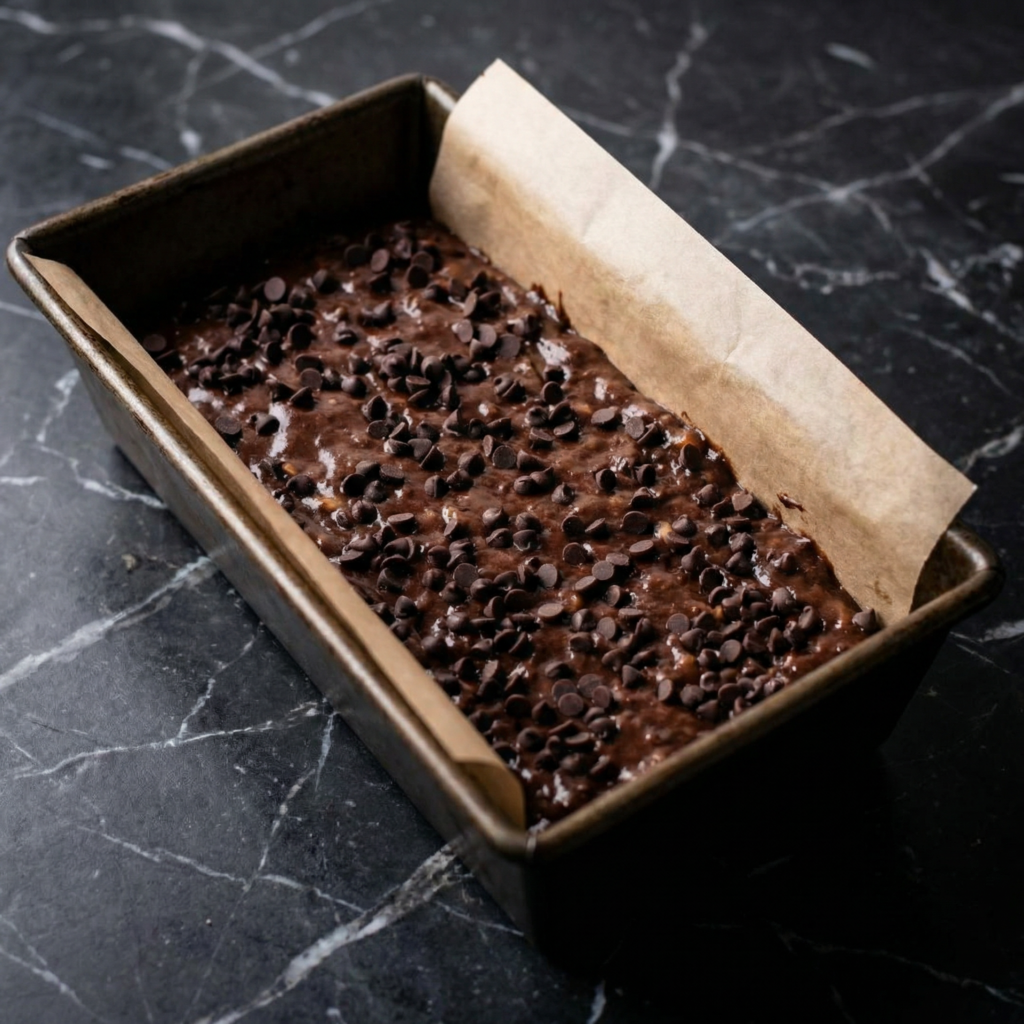
Grease a 9×5-inch loaf pan and line it with parchment paper, leaving an overhang for easy removal. Proper preparation ensures clean slices and prevents sticking.
Step 2: Mash the Bananas
In a large mixing bowl, mash the ripe bananas until mostly smooth with a few small lumps remaining.
The riper the bananas, the sweeter and more flavorful your bread will be. Overripe bananas with brown spots are perfect.
Step 3: Combine Wet Ingredients
Add melted butter (cooled slightly) to the mashed bananas. Stir to combine.
Mix in granulated sugar and brown sugar until smooth.
Add the eggs one at a time, whisking well after each addition.
Stir in vanilla extract.
The mixture should look glossy and well blended.
Step 4: Mix Dry Ingredients
In a separate bowl, whisk together:
Flour
Cocoa powder
Baking soda
Salt
Sifting the cocoa powder helps eliminate lumps and ensures even chocolate flavor throughout.
Step 5: Combine Wet and Dry Mixtures
Gradually add the dry ingredients into the wet mixture.
Use a spatula to fold gently until just combined. Avoid overmixing—this keeps the bread soft and tender rather than dense.
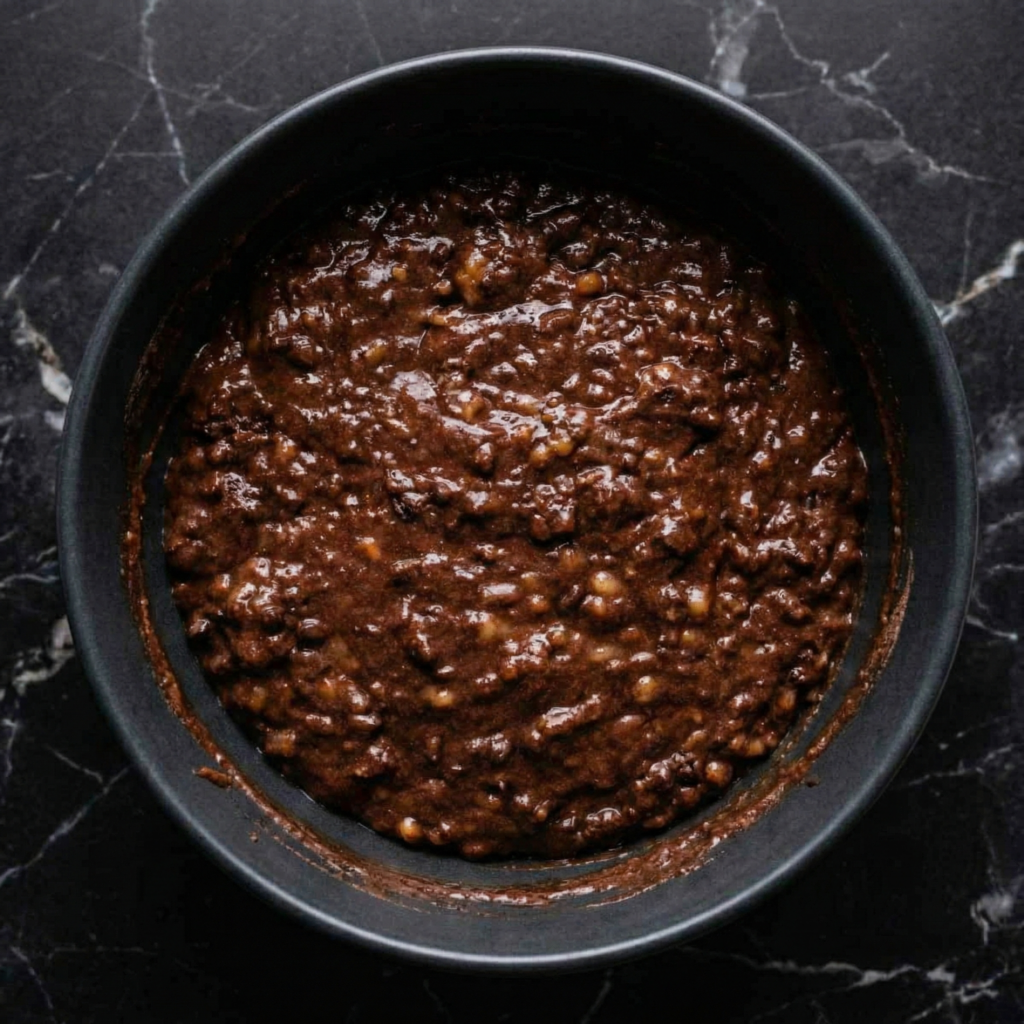
The batter will be thick and rich.
Step 6: Fold in Chocolate Chips
Gently fold in the chocolate chips and chocolate chunks.
Reserve a small handful to sprinkle on top for a bakery-style finish.
This step creates that irresistible double chocolate effect—cocoa in the batter plus pockets of melted chocolate.
Step 7: Transfer to Pan
Pour the batter into the prepared loaf pan.
Smooth the top evenly with a spatula.
Sprinkle remaining chocolate chips on top.
For a decorative touch, slice a banana lengthwise and place it cut-side up on top before baking (optional).
Step 8: Bake to Perfection
Bake for 55–65 minutes, or until a toothpick inserted into the center comes out with moist crumbs but no raw batter.
If the top begins browning too quickly, loosely tent with foil during the last 15 minutes.
Avoid overbaking—slightly underbaked ensures a fudgy texture.
Step 9: Cool Properly
Remove from the oven and let the bread cool in the pan for 10–15 minutes.
Then lift it out using the parchment overhang and transfer to a wire rack to cool completely.
Cooling allows the crumb to set and makes slicing easier.
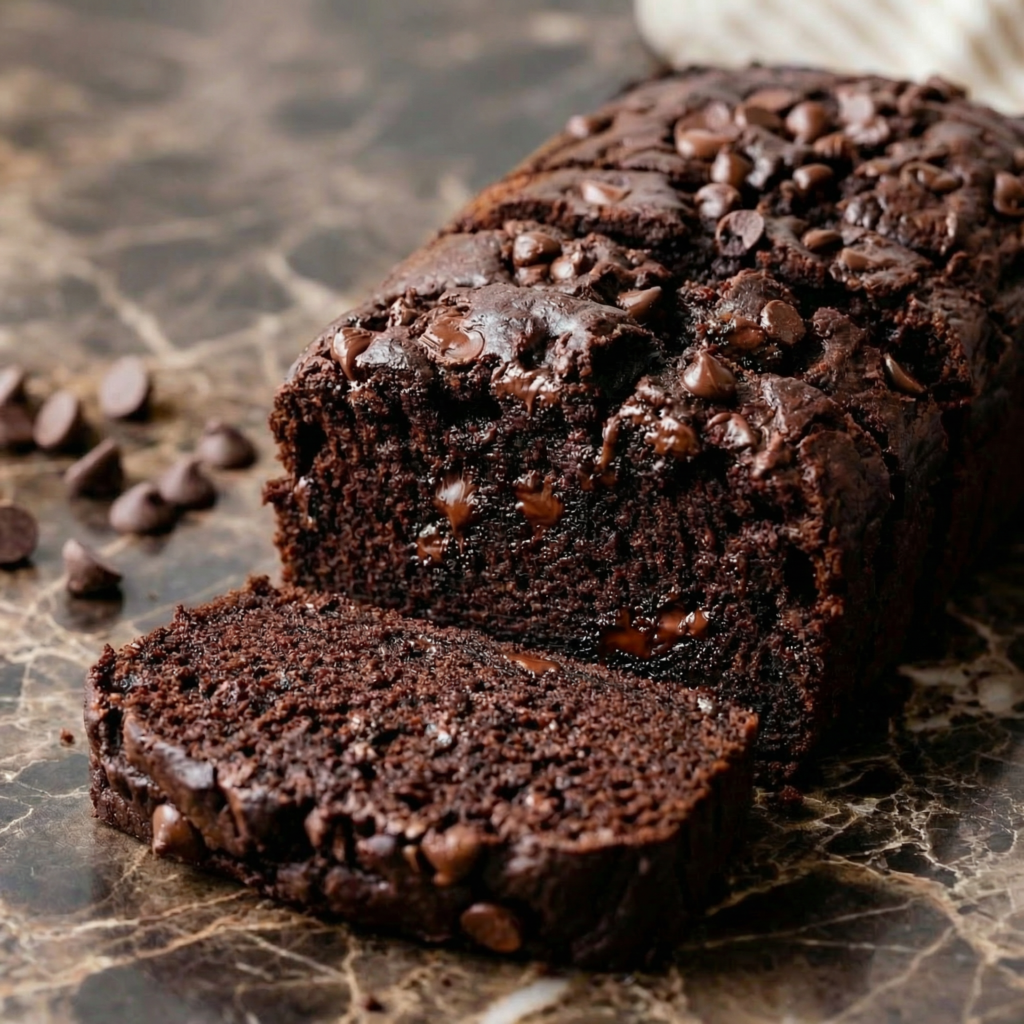
Step 10: Slice and Enjoy
Once cooled, slice using a sharp serrated knife.
Serve plain, warm with butter, or slightly toasted for an even richer experience.
Texture and Flavor Highlights
Deep chocolate intensity
Ultra-moist banana base
Melty chocolate pockets
Soft, tender crumb
Slightly crisp top edges
Every bite delivers rich cocoa flavor balanced by natural banana sweetness.
Pro Tips for Perfect Double Chocolate Banana Bread
Use very ripe bananas. The darker, the better.
Don’t overmix. Gentle folding keeps the bread tender.
Measure flour correctly. Spoon and level for accuracy.
Add espresso powder. A teaspoon enhances chocolate flavor without tasting like coffee.
Check early. Ovens vary—start checking at 50 minutes.
Optional Variations
Nutty Crunch: Add ½ cup chopped walnuts or pecans.
Healthier Swap: Replace half the butter with Greek yogurt.
Extra Fudgy: Add ¼ cup melted dark chocolate to the batter.
Mini Loaves: Divide batter into mini pans and bake 25–30 minutes.
Chocolate Swirl: Swirl Nutella into the top before baking.
Storage Instructions
Store at room temperature in an airtight container for up to 4 days.
Refrigerate for up to 1 week.
To freeze, wrap slices individually in plastic wrap and store in a freezer-safe bag for up to 3 months.
Thaw at room temperature or microwave for 15–20 seconds.
Why This Recipe Works
Double Chocolate Banana Bread succeeds because it balances moisture and structure perfectly. Bananas provide natural sweetness and tenderness, while cocoa powder delivers concentrated chocolate flavor.
The combination of granulated and brown sugar adds depth and helps maintain moisture.
Chocolate chips create melty pockets that elevate every slice, while careful mixing prevents toughness. Baking at a moderate temperature ensures even cooking without drying out the loaf.
If you’re craving something comforting yet indulgent, this Double Chocolate Banana Bread checks every box. It’s rich, moist, packed with chocolate, and wonderfully simple to make.
Whether served as a sweet breakfast, afternoon snack, or dessert, it’s guaranteed to satisfy chocolate lovers and banana bread fans alike.
Once you try it, plain banana bread may never be enough again.