Few meals are as satisfying, quick, and crowd-pleasing as chicken quesadillas. With crispy golden tortillas, juicy seasoned chicken, and layers of gooey melted cheese, this classic dish delivers bold flavor with minimal effort.
Whether you’re preparing a quick weeknight dinner, a game-day snack, or a casual lunch, chicken quesadillas are always a reliable favorite.
Originating from Mexican cuisine, quesadillas traditionally consist of tortillas filled with cheese and other ingredients, then cooked until the exterior is crisp and the filling is hot and melty.
Adding seasoned chicken turns them into a hearty and protein-packed meal that’s both comforting and versatile.
In this step-by-step guide, you’ll learn exactly how to make restaurant-quality chicken quesadillas at home, complete with tips for achieving perfectly crisp tortillas and flavorful fillings.
Why Chicken Quesadillas Are So Popular
Chicken quesadillas have become a staple in kitchens around the world for several reasons:
- Quick cooking time
- Simple ingredients
- Customizable fillings
- Perfect balance of crunchy and cheesy textures
With just a few ingredients and one skillet, you can create a meal that tastes like it came from your favorite Mexican restaurant.
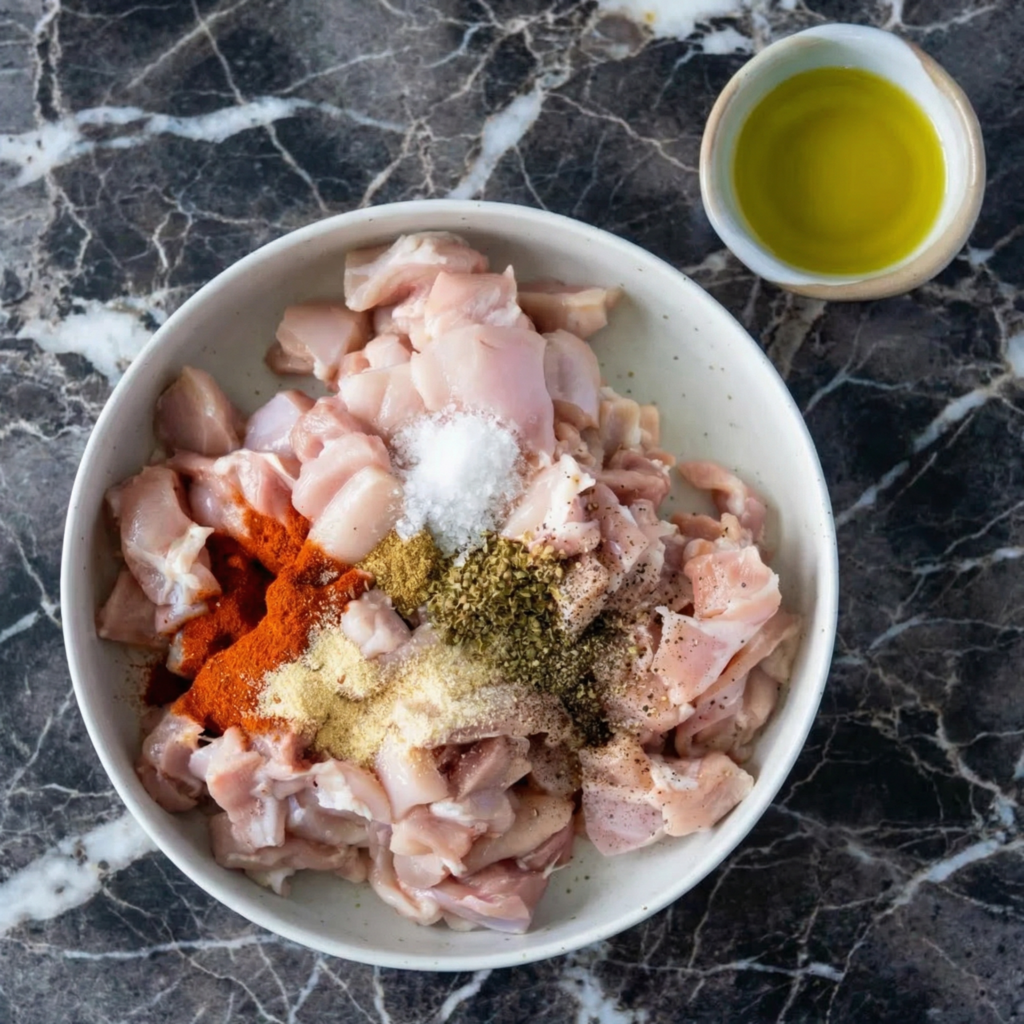
Ingredients
For four quesadillas, you will need:
- 2 cups cooked chicken, shredded or diced
- 4 large flour tortillas
- 1 ½ cups shredded cheese (cheddar, Monterey Jack, or Mexican blend)
- ½ small onion, finely chopped
- ½ bell pepper, thinly sliced
- 1 tablespoon olive oil
- 1 teaspoon chili powder
- ½ teaspoon paprika
- ½ teaspoon cumin
- ½ teaspoon garlic powder
- Salt and pepper to taste
- 2 tablespoons butter or oil for cooking
Optional toppings:
- Sour cream
- Salsa
- Guacamole
- Chopped cilantro
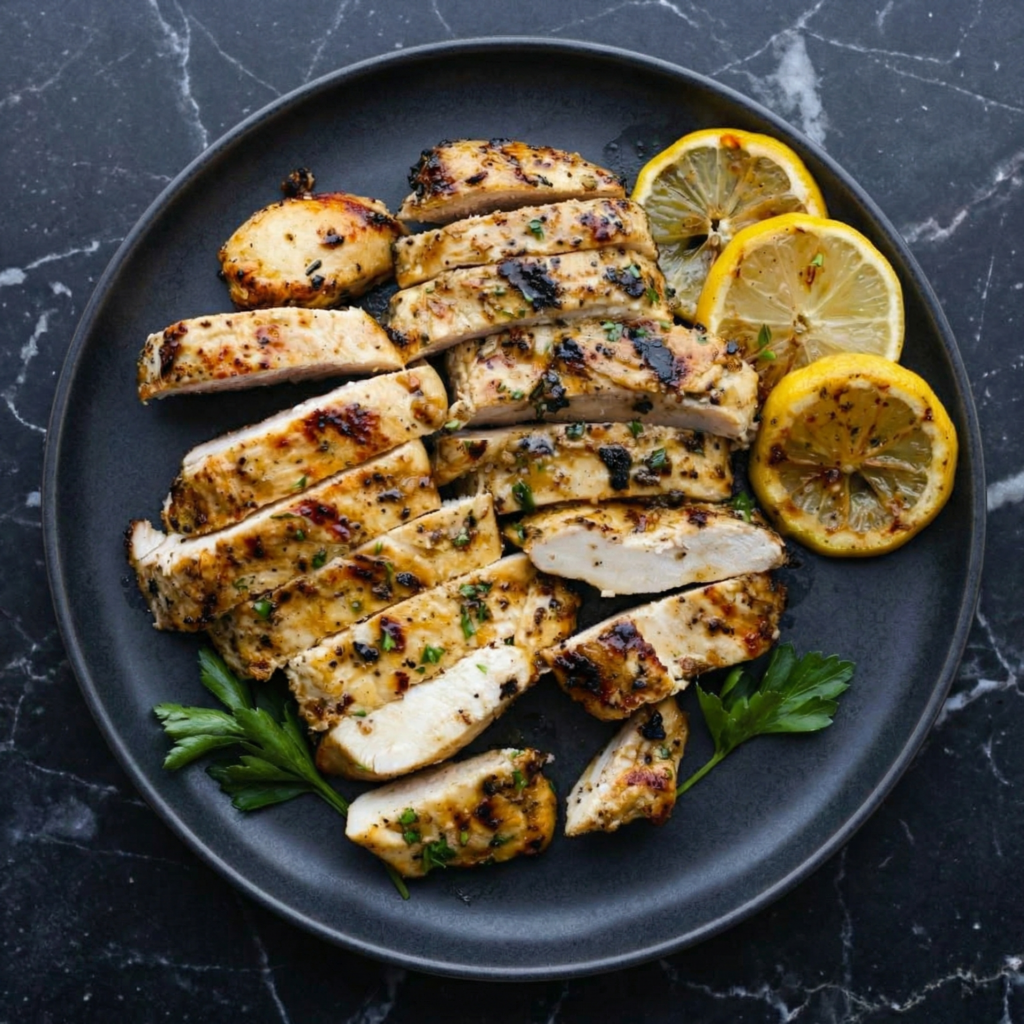
Step 1: Prepare the Chicken
If you don’t already have cooked chicken, start by seasoning chicken breast or thighs with chili powder, cumin, paprika, garlic powder, salt, and pepper.
Cook the chicken in a skillet with a little olive oil over medium heat for about 6–8 minutes per side, or until fully cooked.
Once done, allow it to cool slightly, then shred or dice the meat into bite-sized pieces.
Using leftover roasted or rotisserie chicken also works perfectly and saves time.
Step 2: Cook the Vegetables
Heat 1 tablespoon of olive oil in a skillet over medium heat.
Add the chopped onion and sliced bell pepper, cooking for about 3–4 minutes until softened and slightly caramelized.
This step enhances the flavor and adds a little sweetness that complements the savory chicken and cheese.
Once cooked, remove the vegetables from the pan and set aside.
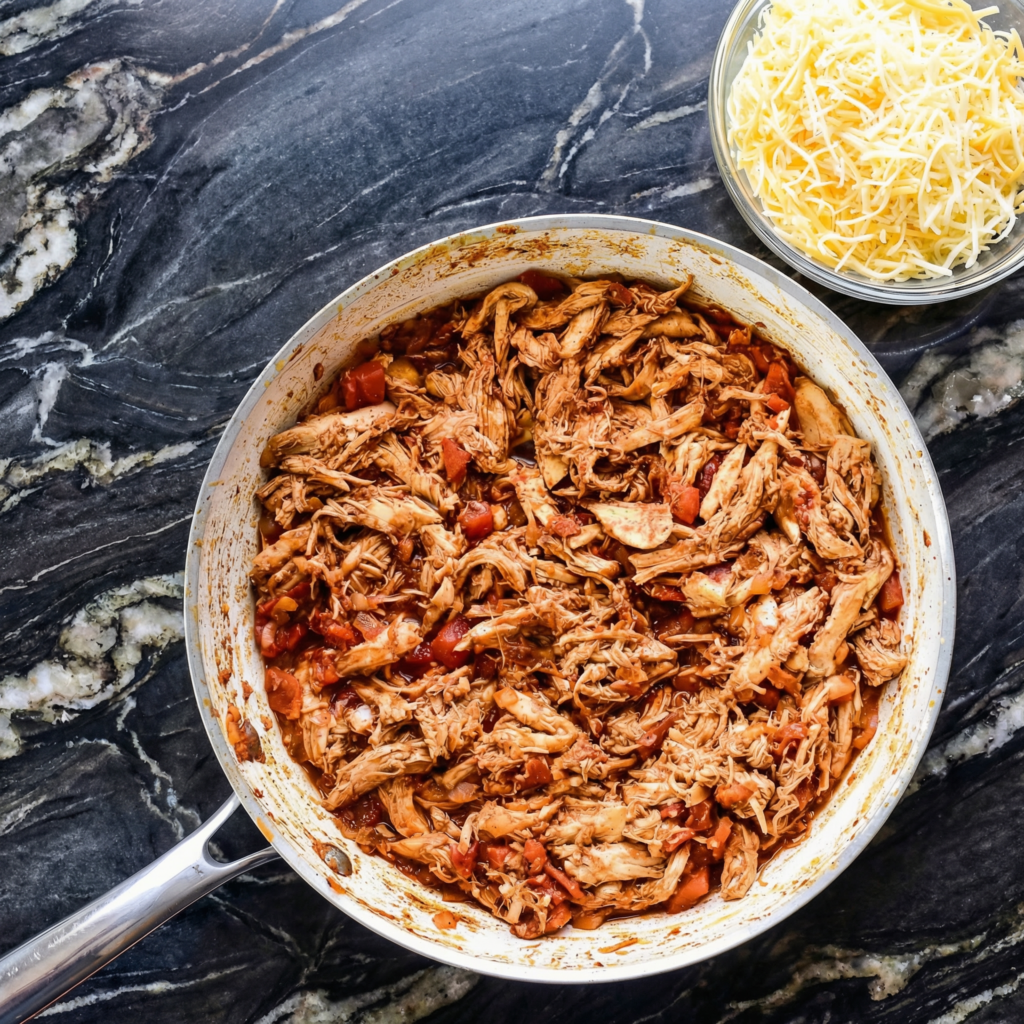
Step 3: Combine the Filling
In a mixing bowl, combine the shredded chicken with the cooked onions and peppers.
Taste the mixture and adjust seasoning with a pinch of salt or extra spices if desired.
Mixing the filling beforehand ensures each quesadilla has evenly distributed flavor.
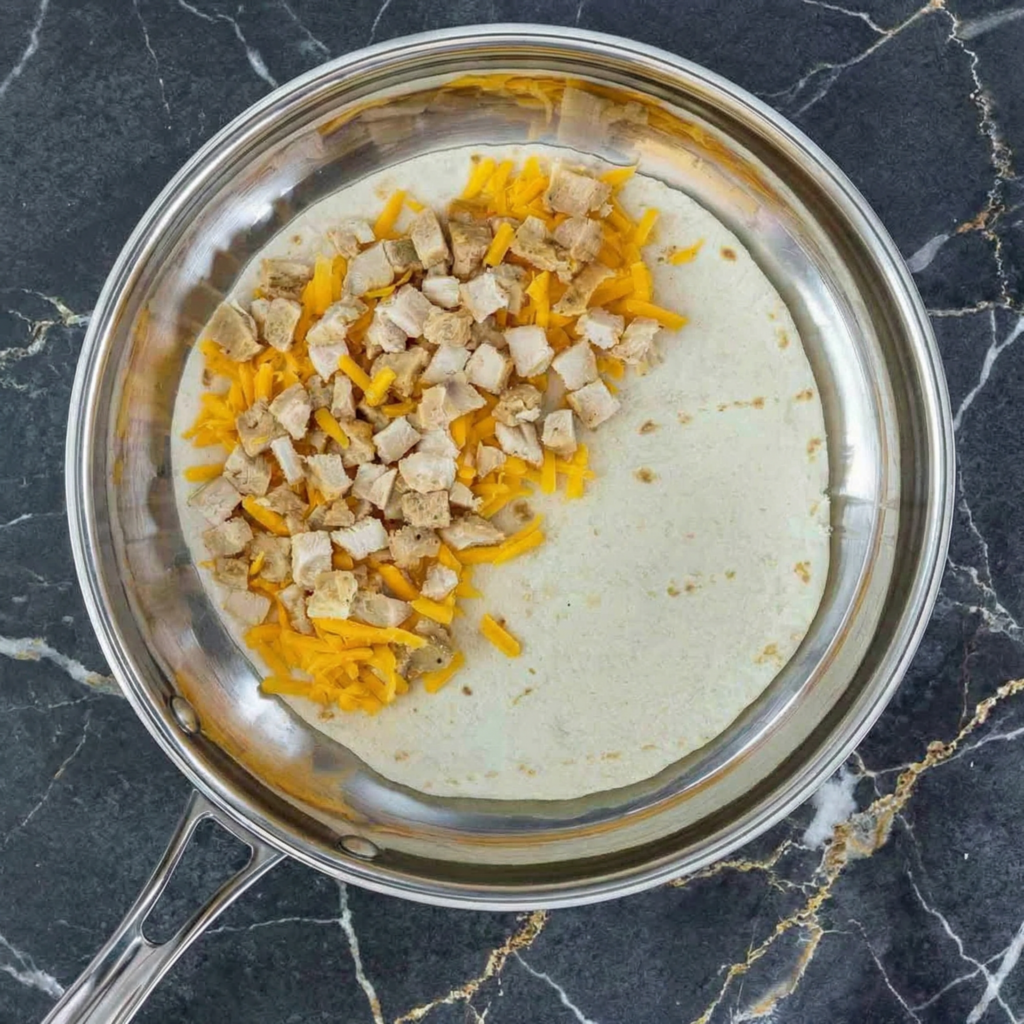
Step 4: Prepare the Tortillas
Lay the tortillas flat on a clean surface.
Sprinkle a layer of shredded cheese over half of each tortilla. The cheese acts as a “glue” that holds the filling together once melted.
Next, add a generous scoop of the chicken mixture over the cheese.
Top with another layer of shredded cheese before folding the tortilla in half.
The double layer of cheese helps ensure every bite is deliciously gooey.
Step 5: Heat the Skillet
Place a large skillet or griddle over medium heat.
Add a small amount of butter or oil and allow it to melt completely.
The fat helps the tortilla crisp up while adding rich flavor.
Step 6: Cook the Quesadillas
Place one or two folded quesadillas into the skillet, depending on its size.
Cook for about 3–4 minutes on the first side until the tortilla becomes golden brown and crispy.
Carefully flip the quesadilla and cook the other side for another 2–3 minutes until the cheese melts and the tortilla is evenly toasted.
Press gently with a spatula while cooking to help the filling heat evenly.
Step 7: Rest and Slice
Transfer the cooked quesadilla to a cutting board and let it rest for about one minute.
This short resting period allows the melted cheese to settle slightly so the filling doesn’t spill out when sliced.
Use a pizza cutter or sharp knife to slice each quesadilla into wedges.
Step 8: Prepare the Remaining Quesadillas
Repeat the cooking process with the remaining tortillas and filling.
Add more butter or oil to the skillet if needed to maintain a crispy texture.
Work in batches to avoid overcrowding the pan.
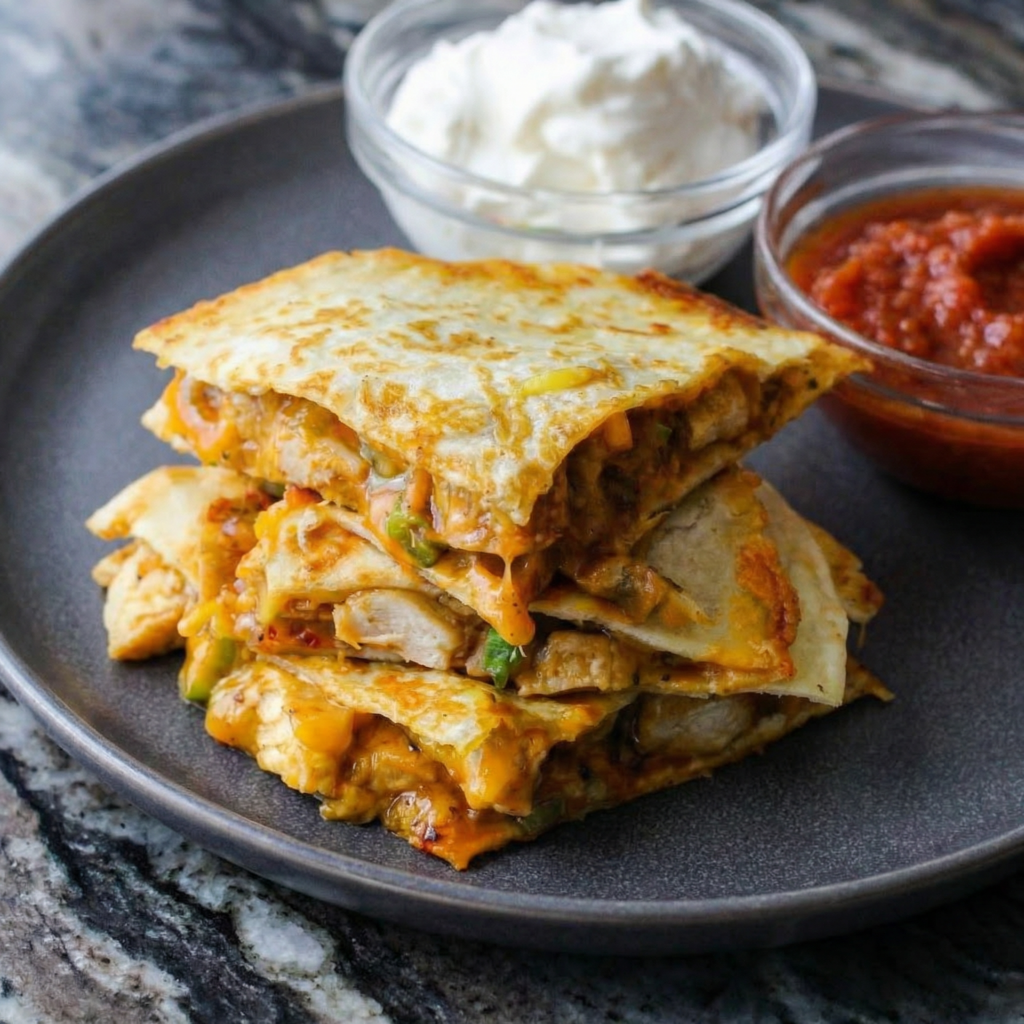
Step 9: Serve with Toppings
Arrange the sliced quesadillas on a serving plate.
Serve them with your favorite toppings such as sour cream, salsa, guacamole, or fresh cilantro.
The creamy and tangy toppings complement the cheesy filling perfectly.
Tips for the Best Chicken Quesadillas
For the most delicious results, keep these tips in mind:
Use good melting cheese. Monterey Jack, cheddar, Oaxaca, or a Mexican cheese blend melt beautifully.
Don’t overfill. Too much filling can cause the quesadilla to fall apart while cooking.
Cook over medium heat. This allows the cheese to melt fully without burning the tortilla.
Crisp both sides. A golden, crunchy exterior makes all the difference.
Flavor Variations
Once you master the basic recipe, you can experiment with different flavors.
Try adding:
- Corn or black beans for extra texture
- Jalapeños for heat
- Mushrooms for a savory twist
- Chipotle sauce for smoky flavor
- Avocado slices for creaminess
Chicken quesadillas are incredibly flexible, making them perfect for using up leftovers or trying new combinations.
Final Thoughts
Chicken quesadillas are the ultimate combination of simplicity and flavor. With crispy tortillas, seasoned chicken, sautéed vegetables, and melted cheese, every bite delivers satisfying textures and bold taste.
Best of all, they come together quickly with everyday ingredients, making them perfect for busy weeknights or relaxed weekend meals. Once you master this recipe, you’ll have a go-to dish that everyone will love.
Serve them hot, add your favorite toppings, and enjoy a plate of homemade chicken quesadillas that taste every bit as good as restaurant versions—maybe even better.