Tag: quick dinner

  • Garlic Butter Lobster Rolls: Fancy Fingers, No Fuss

    Garlic Butter Lobster Rolls: Fancy Fingers, No Fuss

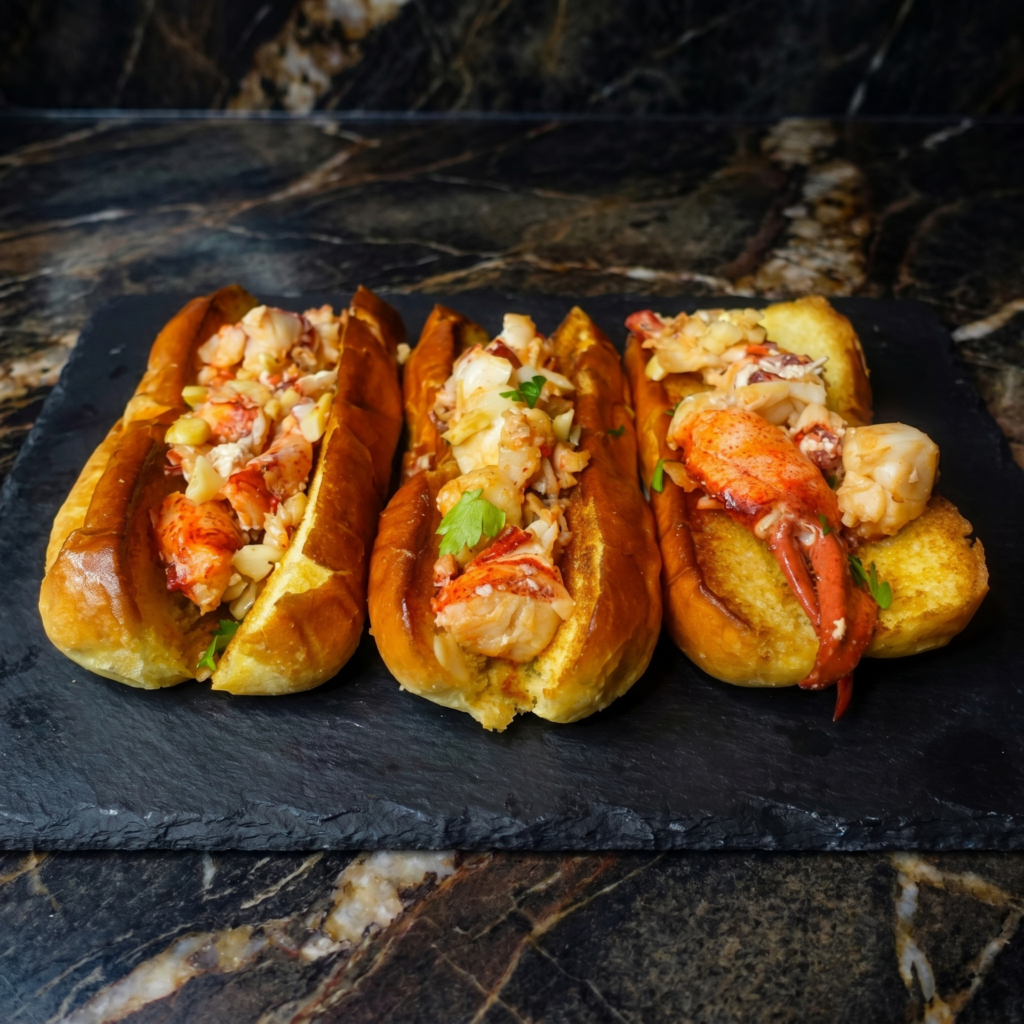
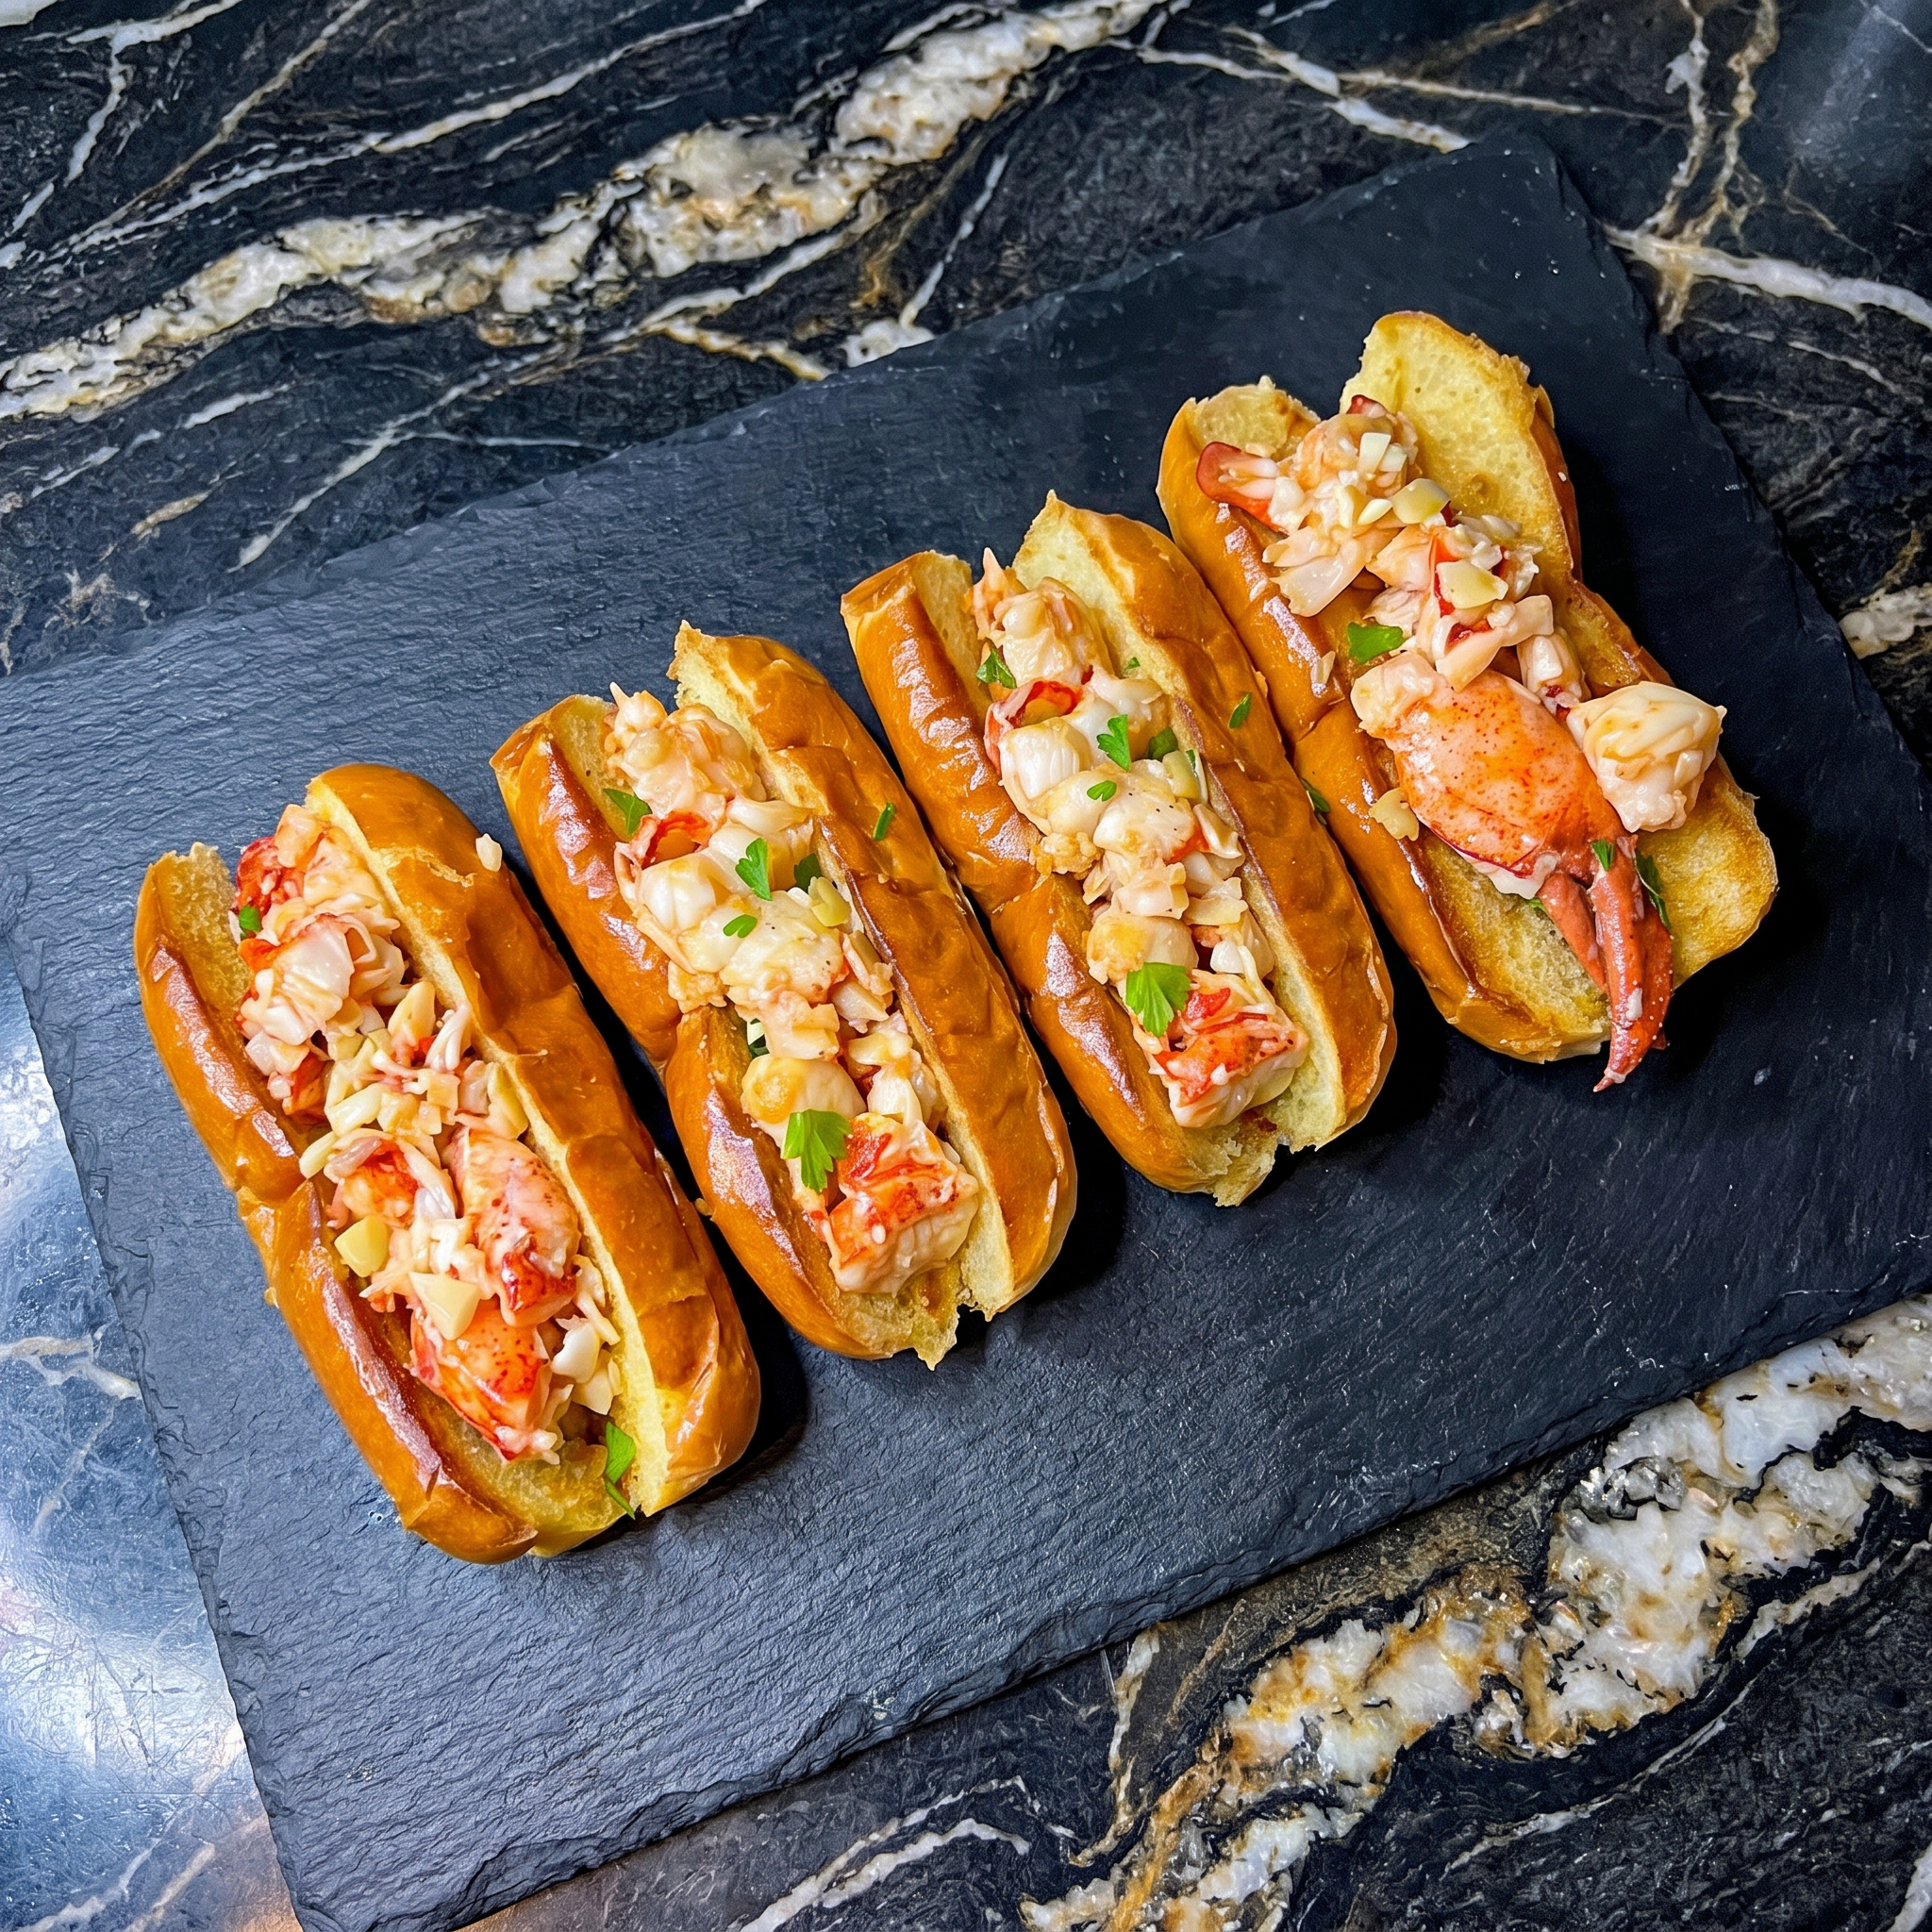
    Lobster rolls sound fancy. They are not hard.

    The secret? Garlic butter. Lots of it. Toss lobster in warm, garlicky butter. Stuff into a toasted, buttery brioche bun. That’s it. No mayo (unless you want it). 15 minutes. Pure luxury.
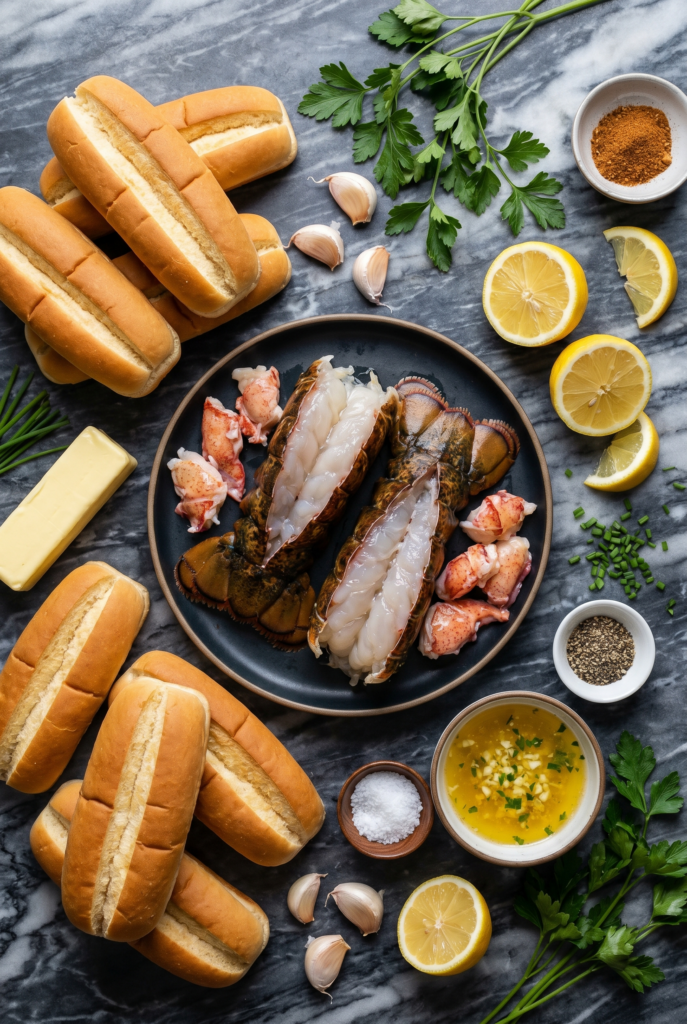
    Ingredients

    Serves 4.

    • 1 lb cooked lobster meat (claw and knuckle meat best)
    • 4 brioche or New England-style hot dog buns
    • 4 tbsp unsalted butter (divided)
    • 4 garlic cloves, minced
    • 1 tbsp fresh lemon juice
    • 1 tbsp fresh chives or parsley, chopped
    • ¼ tsp salt
    • Lemon wedges for serving

    Optional (Connecticut style only): Extra melted butter for dipping

    Optional (Maine style): ¼ cup mayo, celery, and a squeeze of lemon

    Step-by-Step Instructions

    Step 1: Toast the Buns

    1. Heat a skillet over medium heat. Melt 2 tbsp butter.
    2. Place buns cut-side down in the skillet. Toast 1-2 minutes until golden brown. Set aside.

    Step 2: Make Garlic Butter

    1. In the same skillet, melt remaining 2 tbsp butter over medium-low heat.
    2. Add minced garlic. Cook 1-2 minutes until fragrant (don’t burn it).

    Step 3: Warm the Lobster

    1. Add lobster meat to the skillet. Toss gently in garlic butter for 1-2 minutes until warmed through.
    2. Stir in lemon juice, chives, and salt.

    Step 4: Assemble the Rolls

    1. Stuff each toasted bun generously with garlic butter lobster.
    2. Drizzle any remaining butter from the pan over the top.

    Step 5: Serve

    1. Serve immediately with lemon wedges. Napkins mandatory. Happiness guaranteed.

    Summary

    Prep Time: 5 minutes | Cook Time: 10 minutes | Total Time: 15 minutes

    Yield: 4 lobster rolls

    Difficulty: Easy

    Storage Notes

    Best Fresh:

    Assemble and eat immediately. Soggy buns are sad buns.

    Leftover Lobster:

    Store cooked lobster in the fridge for 2 days max. Reheat gently in a skillet with a little butter.

    Pro Tip:

    Costco and most fish counters sell pre-cooked frozen lobster meat. Thaw overnight. Works perfectly and saves $$$.

  • Philly Cheesesteak Quesadillas: Two Legends, One Pan

    Philly Cheesesteak Quesadillas: Two Legends, One Pan

    Philly cheesesteak meets Mexican quesadilla. It’s beautiful.

    All the classic fillings—thin steak, peppers, onions, mushrooms, provolone—griddled inside a crispy tortilla. Dipped in ketchup or ranch. 20 minutes. You’re welcome.

    Ingredients

    Serves 4.

    • 4 large flour tortillas (10-inch)
    • 1 lb thinly sliced ribeye or steak-umms
    • 1 green bell pepper, thinly sliced
    • 1 onion, thinly sliced
    • 4 oz mushrooms, sliced (optional)
    • 2 tbsp olive oil
    • ½ tsp salt
    • ¼ tsp black pepper
    • 8 slices provolone cheese (or 2 cups shredded)
    • Butter or oil for the pan

    Dipping options: Ketchup, ranch, sriracha mayo, or extra provolone sauce

    Step-by-Step Instructions

    Step 1: Cook the Fillings

    1. Heat 1 tbsp oil in a large skillet over medium-high heat.
    2. Add onion, pepper, and mushrooms. Cook 5 minutes until soft. Remove.
    3. Add steak to same skillet. Cook 3-4 minutes until browned. Season with salt and pepper.
    4. Mix steak with cooked vegetables.

    Step 2: Assemble Quesadillas

    1. Lay tortillas flat. Place 2 slices provolone (or ½ cup shredded) on one half.
    2. Top with steak mixture. Add more cheese on top.
    3. Fold the empty half over.

    Step 3: Griddle Until Crispy

    1. Heat a clean skillet over medium heat. Add butter or oil.
    2. Place quesadilla in skillet. Cook 2-3 minutes per side until golden brown and cheese is melted.

    Step 4: Slice and Serve

    1. Transfer to cutting board. Rest 1 minute.
    2. Slice into wedges. Serve with your favorite dip.

    Summary

    Prep Time: 10 minutes | Cook Time: 15 minutes | Total Time: 25 minutes

    Yield: 4 quesadillas

    Difficulty: Easy

    Storage Notes

    Fridge:

    Store leftovers for 3 days.

    Reheat:

    Skillet over medium heat for 2-3 minutes per side. Air fryer at 350°F for 4 minutes. Skip the microwave (soggy tortilla).

    Pro Tip:

    Use provolone or Cheez Whiz for authentic Philly flavor. Both work great in quesadilla form.

  • BBQ Chicken Quesadillas: Crispy, Smoky, Cheesy Perfection

    BBQ Chicken Quesadillas: Crispy, Smoky, Cheesy Perfection

    Quesadillas are the fastest dinner on earth. These are the best ones.

    BBQ chicken. Red onion. Cilantro. Lots of cheese. Griddled until crispy on the outside, gooey on the inside. Dip in ranch. Eat with your hands. No regrets.

    Ingredients

    Serves 4.

    • 4 large flour tortillas (10-inch)
    • 2 cups cooked chicken, shredded (rotisserie = hero)
    • ½ cup BBQ sauce (plus extra for dipping)
    • ½ red onion, thinly sliced
    • ¼ cup fresh cilantro, chopped
    • 2 cups shredded cheese (cheddar, Monterey Jack, or blend)
    • Butter or oil for the pan
    • Ranch dressing for dipping

    Step-by-Step Instructions

    Step 1: Sauce the Chicken

    1. In a bowl, toss shredded chicken with BBQ sauce until coated.

    Step 2: Assemble Quesadillas

    1. Lay tortillas flat. Sprinkle cheese on one half.
    2. Top with BBQ chicken, red onion, and cilantro.
    3. Sprinkle more cheese. Fold the empty half over.

    Step 3: Griddle Until Crispy

    1. Heat a large skillet over medium heat. Add butter or oil.
    2. Place quesadilla in skillet. Cook 2-3 minutes per side until golden brown and cheese is melted.

    Step 4: Slice and Serve

    1. Transfer to cutting board. Let rest 1 minute.
    2. Slice into wedges. Serve with extra BBQ sauce and ranch.

    Summary

    Prep Time: 5 minutes | Cook Time: 10 minutes | Total Time: 15 minutes

    Yield: 4 quesadillas

    Difficulty: Easy

    Storage Notes

    Fridge:

    Store leftovers for 3 days. Reheat in a skillet or air fryer (microwave makes them floppy).

    Reheat:

    Skillet over medium heat for 2 minutes per side. Air fryer at 350°F for 3 minutes.

    Pro Tip:

    Don’t overstuff. Less filling = crispier quesadilla. Trust the process.

  • Shrimp Tacos (Ready in 15, Gone in 5)

    Shrimp Tacos (Ready in 15, Gone in 5)

    Taco Tuesday just met its match. Shrimp tacos are fast, fresh, and foolproof. The shrimp cook in like 2 minutes. The slaw is a chop-and-toss situation. And that creamy lime sauce? You’ll want to put it on everything.

    No marinating. No complicated spice blends. Just a ridiculously good dinner that’s on the table in 15 minutes flat. Let’s taco ’bout it.

    Ingredients

    Makes 8 small tacos (serves 2-3).

    For the Shrimp:

    • 1 lb (450g) shrimp, peeled and deveined (tails off)
    • 2 tablespoons olive oil
    • 1 teaspoon chili powder
    • ½ teaspoon cumin
    • ½ teaspoon smoked paprika
    • ¼ teaspoon garlic powder
    • ¼ teaspoon salt
    • Pinch of cayenne (optional, for heat)

    For the Slaw & Sauce:

    • 2 cups shredded cabbage or coleslaw mix
    • ¼ cup sour cream or Greek yogurt
    • ¼ cup mayonnaise
    • Juice of 1 lime (plus extra wedges for serving)
    • 1 tablespoon hot sauce (optional)
    • ¼ cup chopped cilantro

    For Serving:

    • 8 small corn or flour tortillas
    • Avocado slices or guacamole

    Step-by-Step Instructions

    Step 1: Make the Sauce and Slaw

    1. Whisk sour cream, mayo, lime juice, and hot sauce in a small bowl.
    2. Toss cabbage with half the sauce. Save the rest for drizzling.
    3. Stir cilantro into the slaw.

    Step 2: Season the Shrimp

    1. Pat shrimp dry. Toss with olive oil and all spices (chili powder through cayenne).

    Step 3: Cook the Shrimp

    1. Heat a large skillet over medium-high heat.
    2. Cook shrimp for 1-2 minutes per side until pink and curled into a “C” shape. Do not overcook.

    Step 4: Warm the Tortillas

    1. Warm tortillas in a dry skillet or microwave (wrapped in a damp paper towel).

    Step 5: Assemble Tacos

    1. Fill each tortilla with slaw, shrimp, and avocado slices.
    2. Drizzle with reserved sauce. Squeeze extra lime. Eat immediately.

    Summary

    Prep Time: 10 mins | Cook Time: 5 mins | Total Time: 15 minutes

    Yield: 8 small tacos (2-3 servings)

    Difficulty: Easy

    Storage Notes

    These tacos do not reheat well (soggy shrimp = sad). Make only what you’ll eat. Store leftover cooked shrimp separately in the fridge for 2 days—eat cold on a salad or reheat gently in a pan. Sauce keeps for 5 days. Slaw gets watery after a few hours, so make it fresh.

  • BLT Sandwich (Perfection Needs Only 4 Ingredients)

    BLT Sandwich (Perfection Needs Only 4 Ingredients)

    The BLT doesn’t need an introduction. It needs respect.

    Four ingredients. One rule: use the best tomatoes you can find. Summer heirlooms are ideal, but a ripe beefsteak will do the job. This is about texture, salt, acid, and crunch. Don’t overthink it. Just build it right.

    Ingredients

    Serves 2.

    • 4 slices thick-cut bacon
    • 2 slices sourdough or white bread (toasted)
    • 2 tablespoons mayonnaise (Duke’s or Kewpie)
    • 1 large ripe tomato (beefsteak or heirloom)
    • Handful of crisp lettuce (iceberg or romaine)
    • Salt and black pepper for the tomato

    Step-by-Step Instructions

    Step 1: Cook the Bacon

    1. In a cold skillet, lay bacon strips flat. Turn heat to medium.
    2. Cook 8-10 minutes, flipping occasionally, until crispy and browned.
    3. Drain on paper towels. (Reserve a little bacon fat for brushing bread if you’re fancy.)

    Step 2: Prep the Veggies

    1. Slice tomato into ¼-inch thick rounds. Season with salt and pepper.
    2. Wash and dry lettuce thoroughly (soggy lettuce = sad BLT).

    Step 3: Toast the Bread

    1. Toast bread until golden brown and crisp.
    2. Spread mayo generously on both slices (all the way to the edges).

    Step 4: Assemble

    1. Bottom slice: lettuce first (creates a moisture barrier).
    2. Then tomato slices, then bacon strips.
    3. Top with the other slice of bread, mayo-side down.

    Step 5: Slice and Serve

    1. Cut diagonally (essential for flavor, some say). Serve immediately with chips or pickles.

    Summary

    Prep Time: 5 minutes | Cook Time: 10 minutes | Total Time: 15 minutes

    Yield: 1 sandwich (easily doubled)

    Difficulty: Easy

    Storage Notes

    Don’t assemble ahead. The BLT is a fresh-only sandwich. Soggy bread is a crime against humanity.

    Meal prep: Cook bacon up to 5 days ahead. Keep in the fridge. Toast bread and slice tomato when ready.

    Leftover bacon: Use on salads, pasta, or just eat it standing over the sink. No judgment.