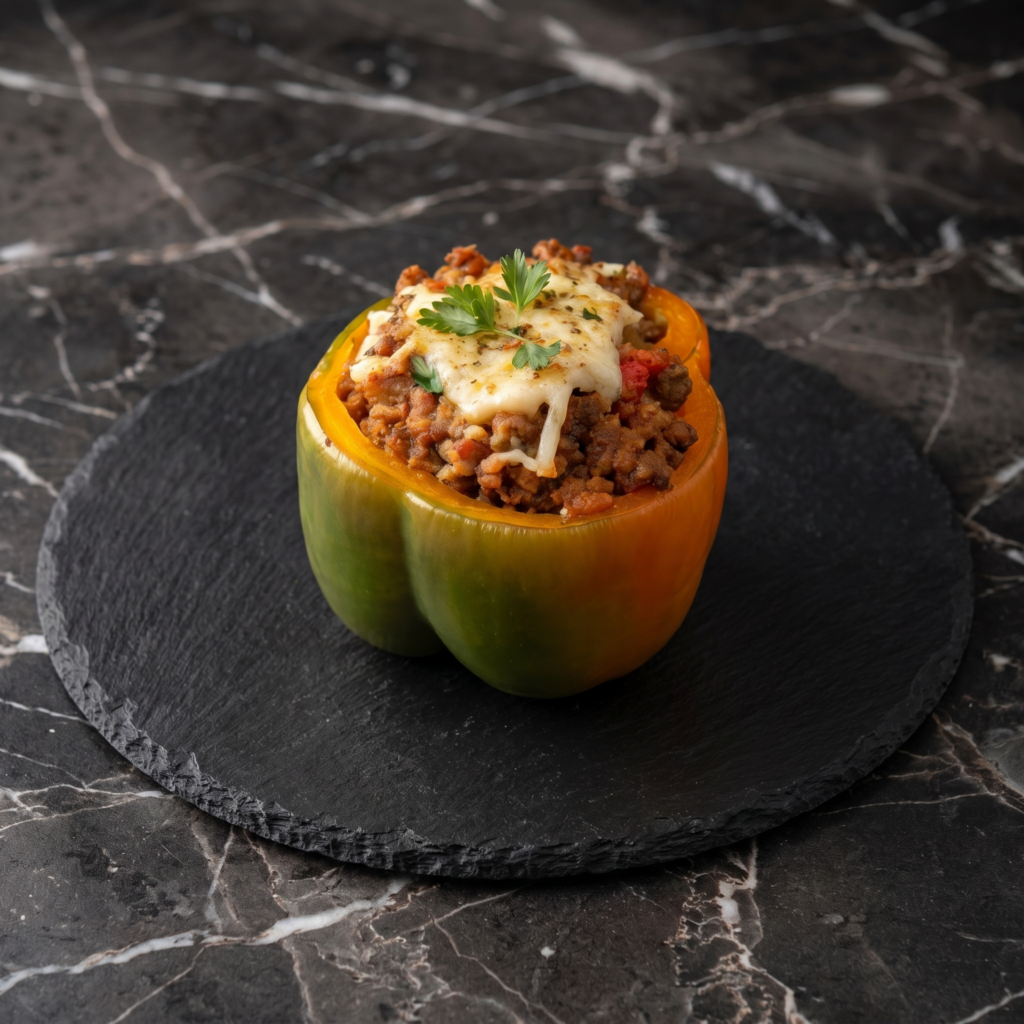
Stuffed bell peppers are dinner magic. The pepper gets tender and sweet, the filling is savory and hearty, and the cheese on top turns into a golden, bubbly crown.
This version uses basic pantry ingredients and bakes everything in one dish. No boiling peppers first. No complicated steps. Just dinner that actually works.
Ingredients
Serves 4.
4 large bell peppers (any color, but red and yellow are sweetest)
1 lb (450g) ground beef (or ground turkey)
1 cup cooked rice (white or brown)
1 small onion, diced
2 cloves garlic, minced
1 can (15 oz) diced tomatoes, drained
1 cup shredded mozzarella or cheddar cheese
1 teaspoon salt, ½ teaspoon black pepper
Optional: fresh parsley for garnish
Step-by-Step Instructions
Step 1: Prep the Peppers
Preheat oven to 375°F (190°C).
Slice the tops off each pepper and remove seeds and membranes.
Arrange peppers standing up in a baking dish.
Step 2: Cook the Filling
In a skillet over medium heat, cook ground beef until browned. Drain excess fat.
Add onion and garlic, cook for 2 minutes until soft.
Stir in cooked rice, drained tomatoes, salt, and pepper. Remove from heat.
Step 3: Stuff and Top
Spoon the filling into each pepper, packing it gently.
Sprinkle cheese generously over the top of each pepper.
Step 4: Bake Until Tender
Add ¼ cup of water to the bottom of the baking dish (steams the peppers).
Cover with foil and bake for 30 minutes.
Remove foil and bake for 10 more minutes until cheese is bubbly and browned.
Step 5: Serve Hot
Garnish with parsley and serve immediately. Those peppers are juicy, so watch for drips.
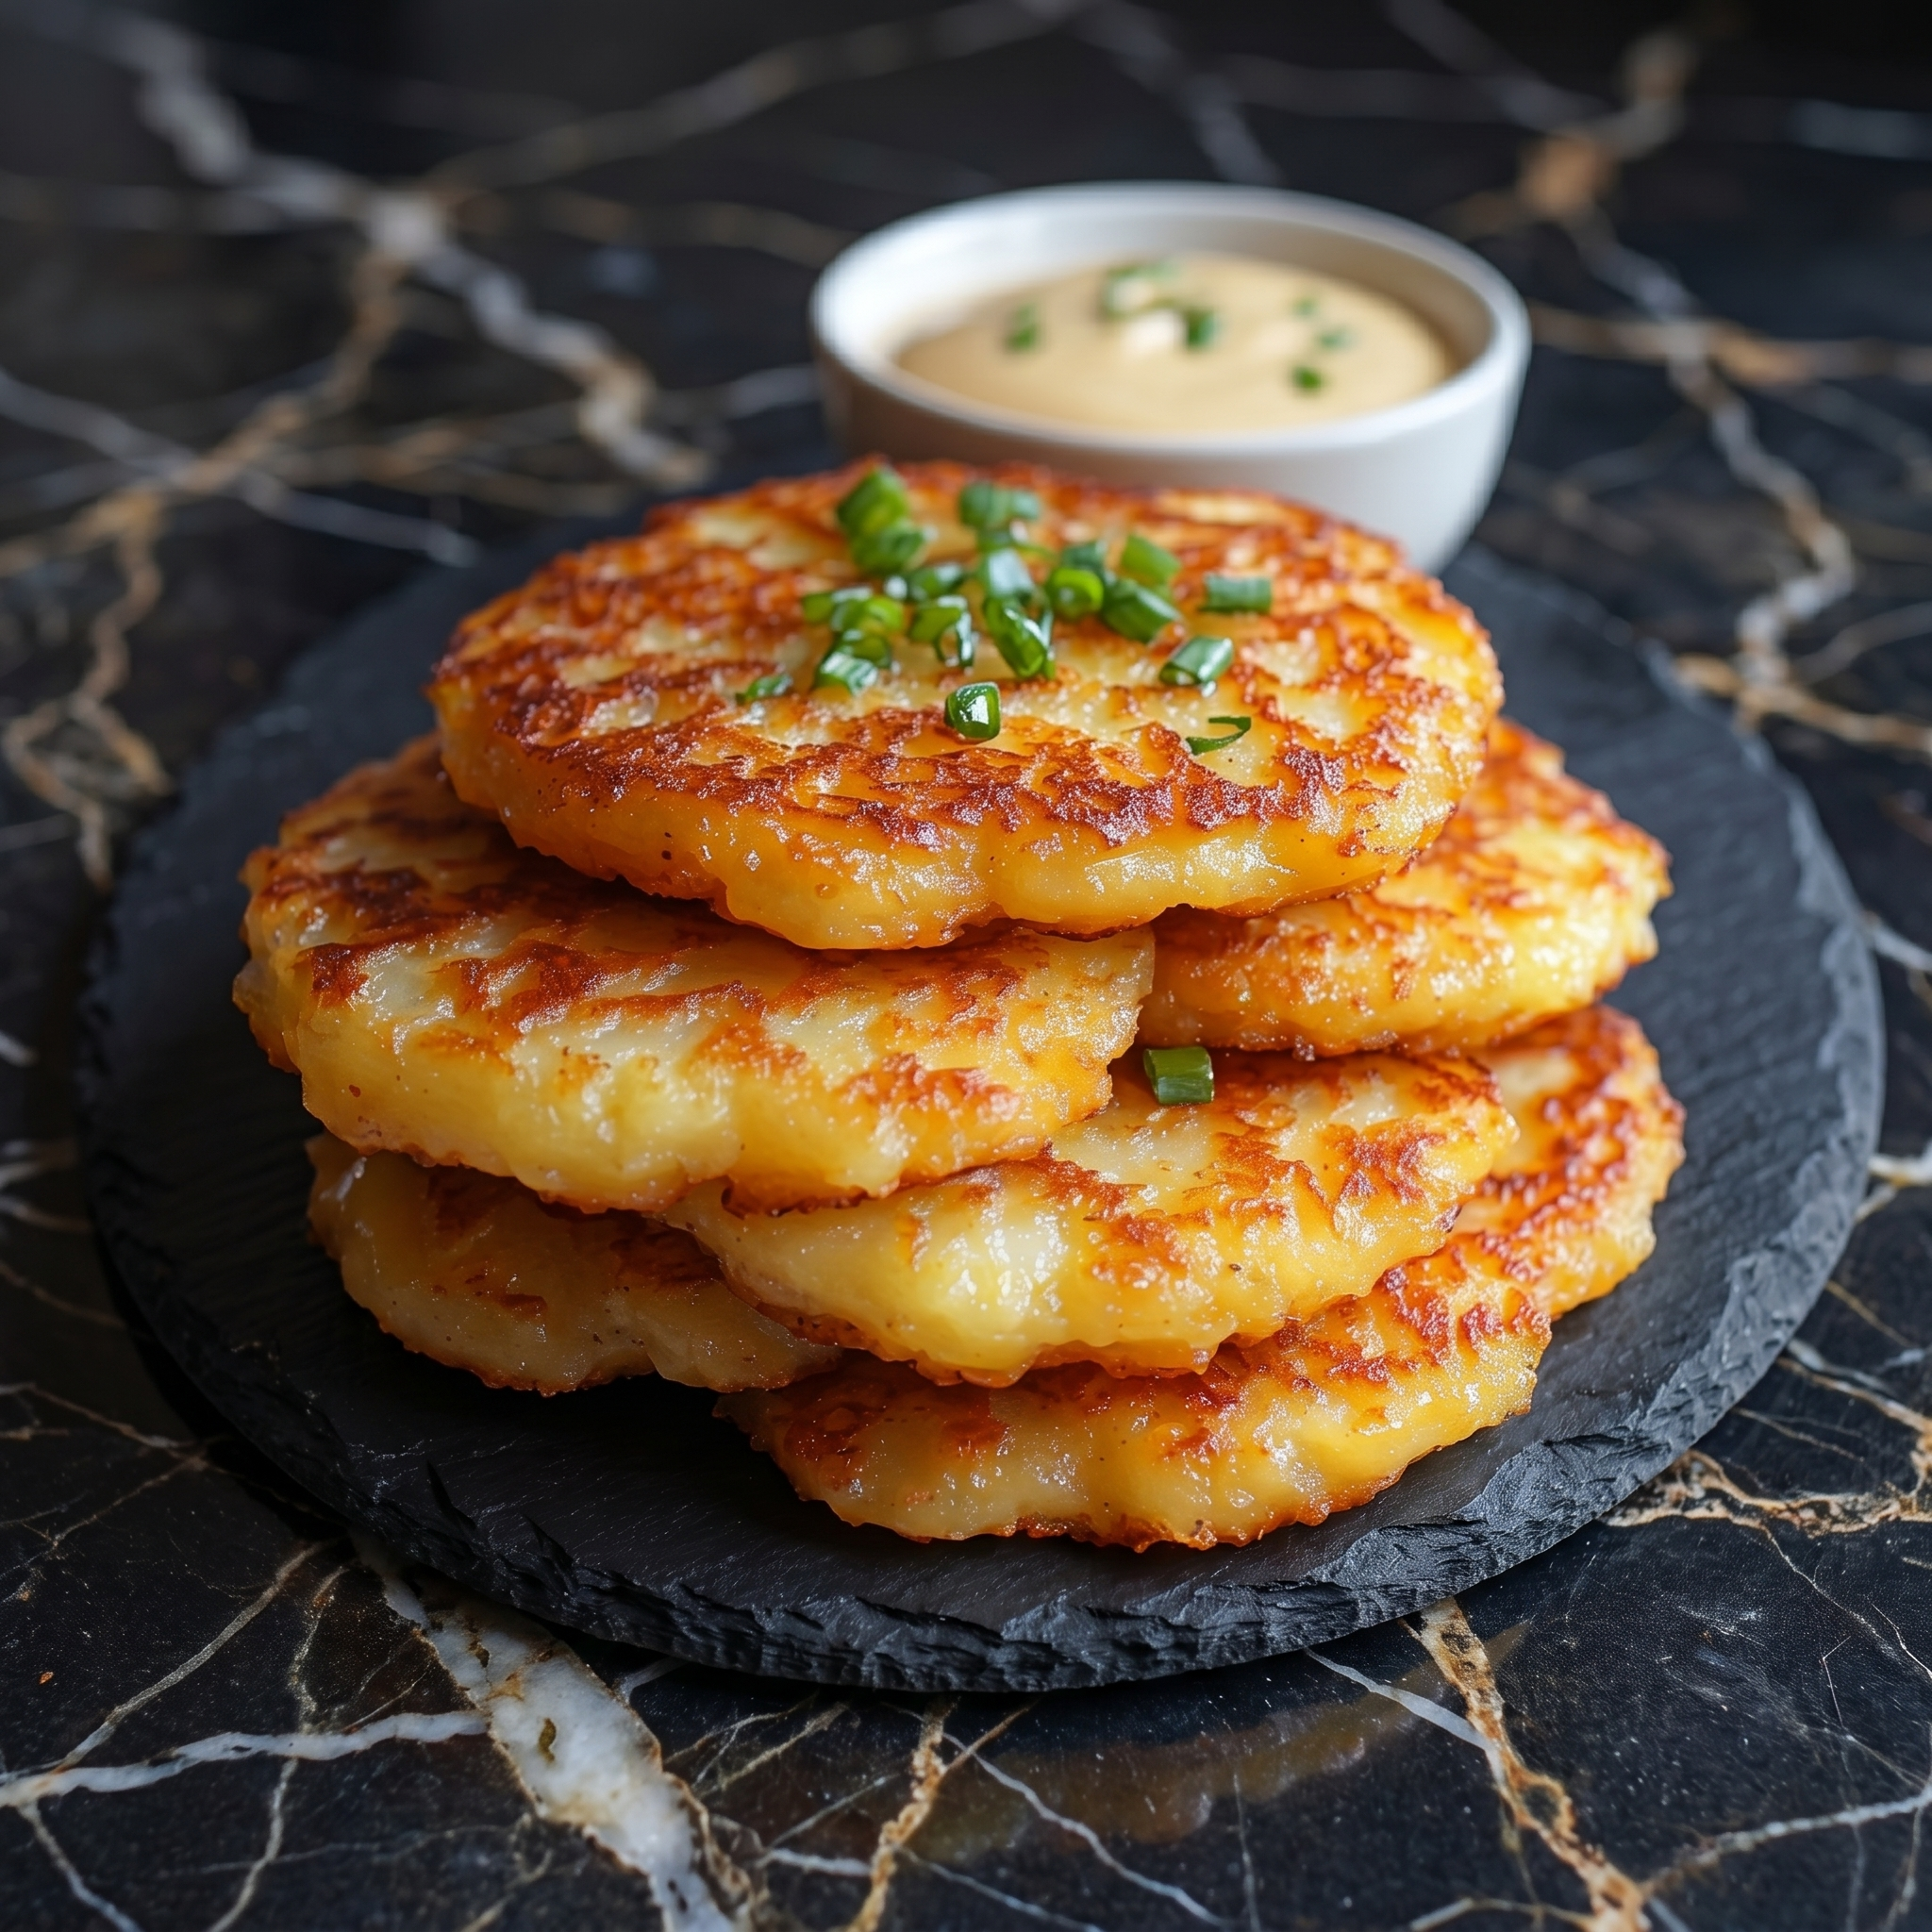
Forget the boxed stuff. Real potato pancakes are just shredded potatoes, onion, and egg, fried until lacy and crispy. They’re salty, crunchy, and tender all at once.
This recipe keeps it simple. No fancy equipment. No draining for hours. Just potato perfection in under 30 minutes.
Ingredients
Serves 4 (makes about 8 pancakes).
1 lb (450g) russet potatoes (about 2 large)
½ small yellow onion
1 large egg, lightly beaten
2 tablespoons all-purpose flour
½ teaspoon salt
¼ teaspoon black pepper
Oil for frying (vegetable or canola)
For serving: applesauce or sour cream
Step-by-Step Instructions
Step 1: Shred the Potatoes and Onion
Peel potatoes (or don’t—skin adds texture).
Shred potatoes and onion using a box grater or food processor.
Step 2: Remove Excess Liquid
Transfer shreds to a clean kitchen towel or several paper towels.
Squeeze firmly over the sink to wring out as much liquid as possible.
Don’t skip this—it’s the secret to crispy pancakes.
Step 3: Make the Batter
In a bowl, combine squeezed shreds, egg, flour, salt, and pepper.
Mix until just combined. Don’t overmix.
Step 4: Fry Until Golden
Heat ¼ inch of oil in a large skillet over medium-high heat.
Drop spoonfuls of batter into the oil and flatten slightly with a spatula.
Fry for 2–3 minutes per side until deep golden brown and crispy.
Drain on paper towels and sprinkle with a pinch of salt.
Step 5: Serve Immediately
These are best hot and crunchy. Serve with a big scoop of applesauce or a dollop of sour cream.
Let’s be honest: the toppings are why we’re here. A perfect loaded baked potato is a buttery, fluffy cloud cradled in a salty, crispy shell, then absolutely buried in cheese, bacon, and chives. It’s cheap, it’s easy, and it makes everyone happy.
This recipe skips the fuss. You’ll get a potato with crispy skin, a tender inside, and a topping-to-potato ratio that respects your time and taste buds.
Ingredients
Serves 4.
4 medium russet potatoes (the best for baking)
2 tablespoons olive oil
1 teaspoon kosher salt
1 cup shredded cheddar cheese
6 slices cooked bacon, crumbled
½ cup sour cream
¼ cup chopped fresh chives or green onions
Optional: butter, black pepper, hot sauce
Step-by-Step Instructions
Step 1: Prep the Potatoes
Preheat oven to 400°F (200°C).
Scrub potatoes dry, then prick each one several times with a fork.
Rub with olive oil and sprinkle with salt all over.
Step 2: Bake Until Tender
Place potatoes directly on the middle oven rack.
Bake for 50–60 minutes, until a knife slides in easily with no resistance.
Step 3: Fluff the Inside
Cut a slit down the middle of each potato.
Gently squeeze the ends toward the center to open it up.
Use a fork to fluff the inside while adding a pat of butter if you’re feeling fancy.
Step 4: Load It Up
Pile on the cheddar cheese (it will melt instantly).
Sprinkle with crumbled bacon and chives.
Top with a generous dollop of sour cream.
Finish with black pepper or hot sauce.
Step 5: Serve Immediately
These potatoes do not wait. Serve hot, with extra toppings on the side for the over-achievers at your table.
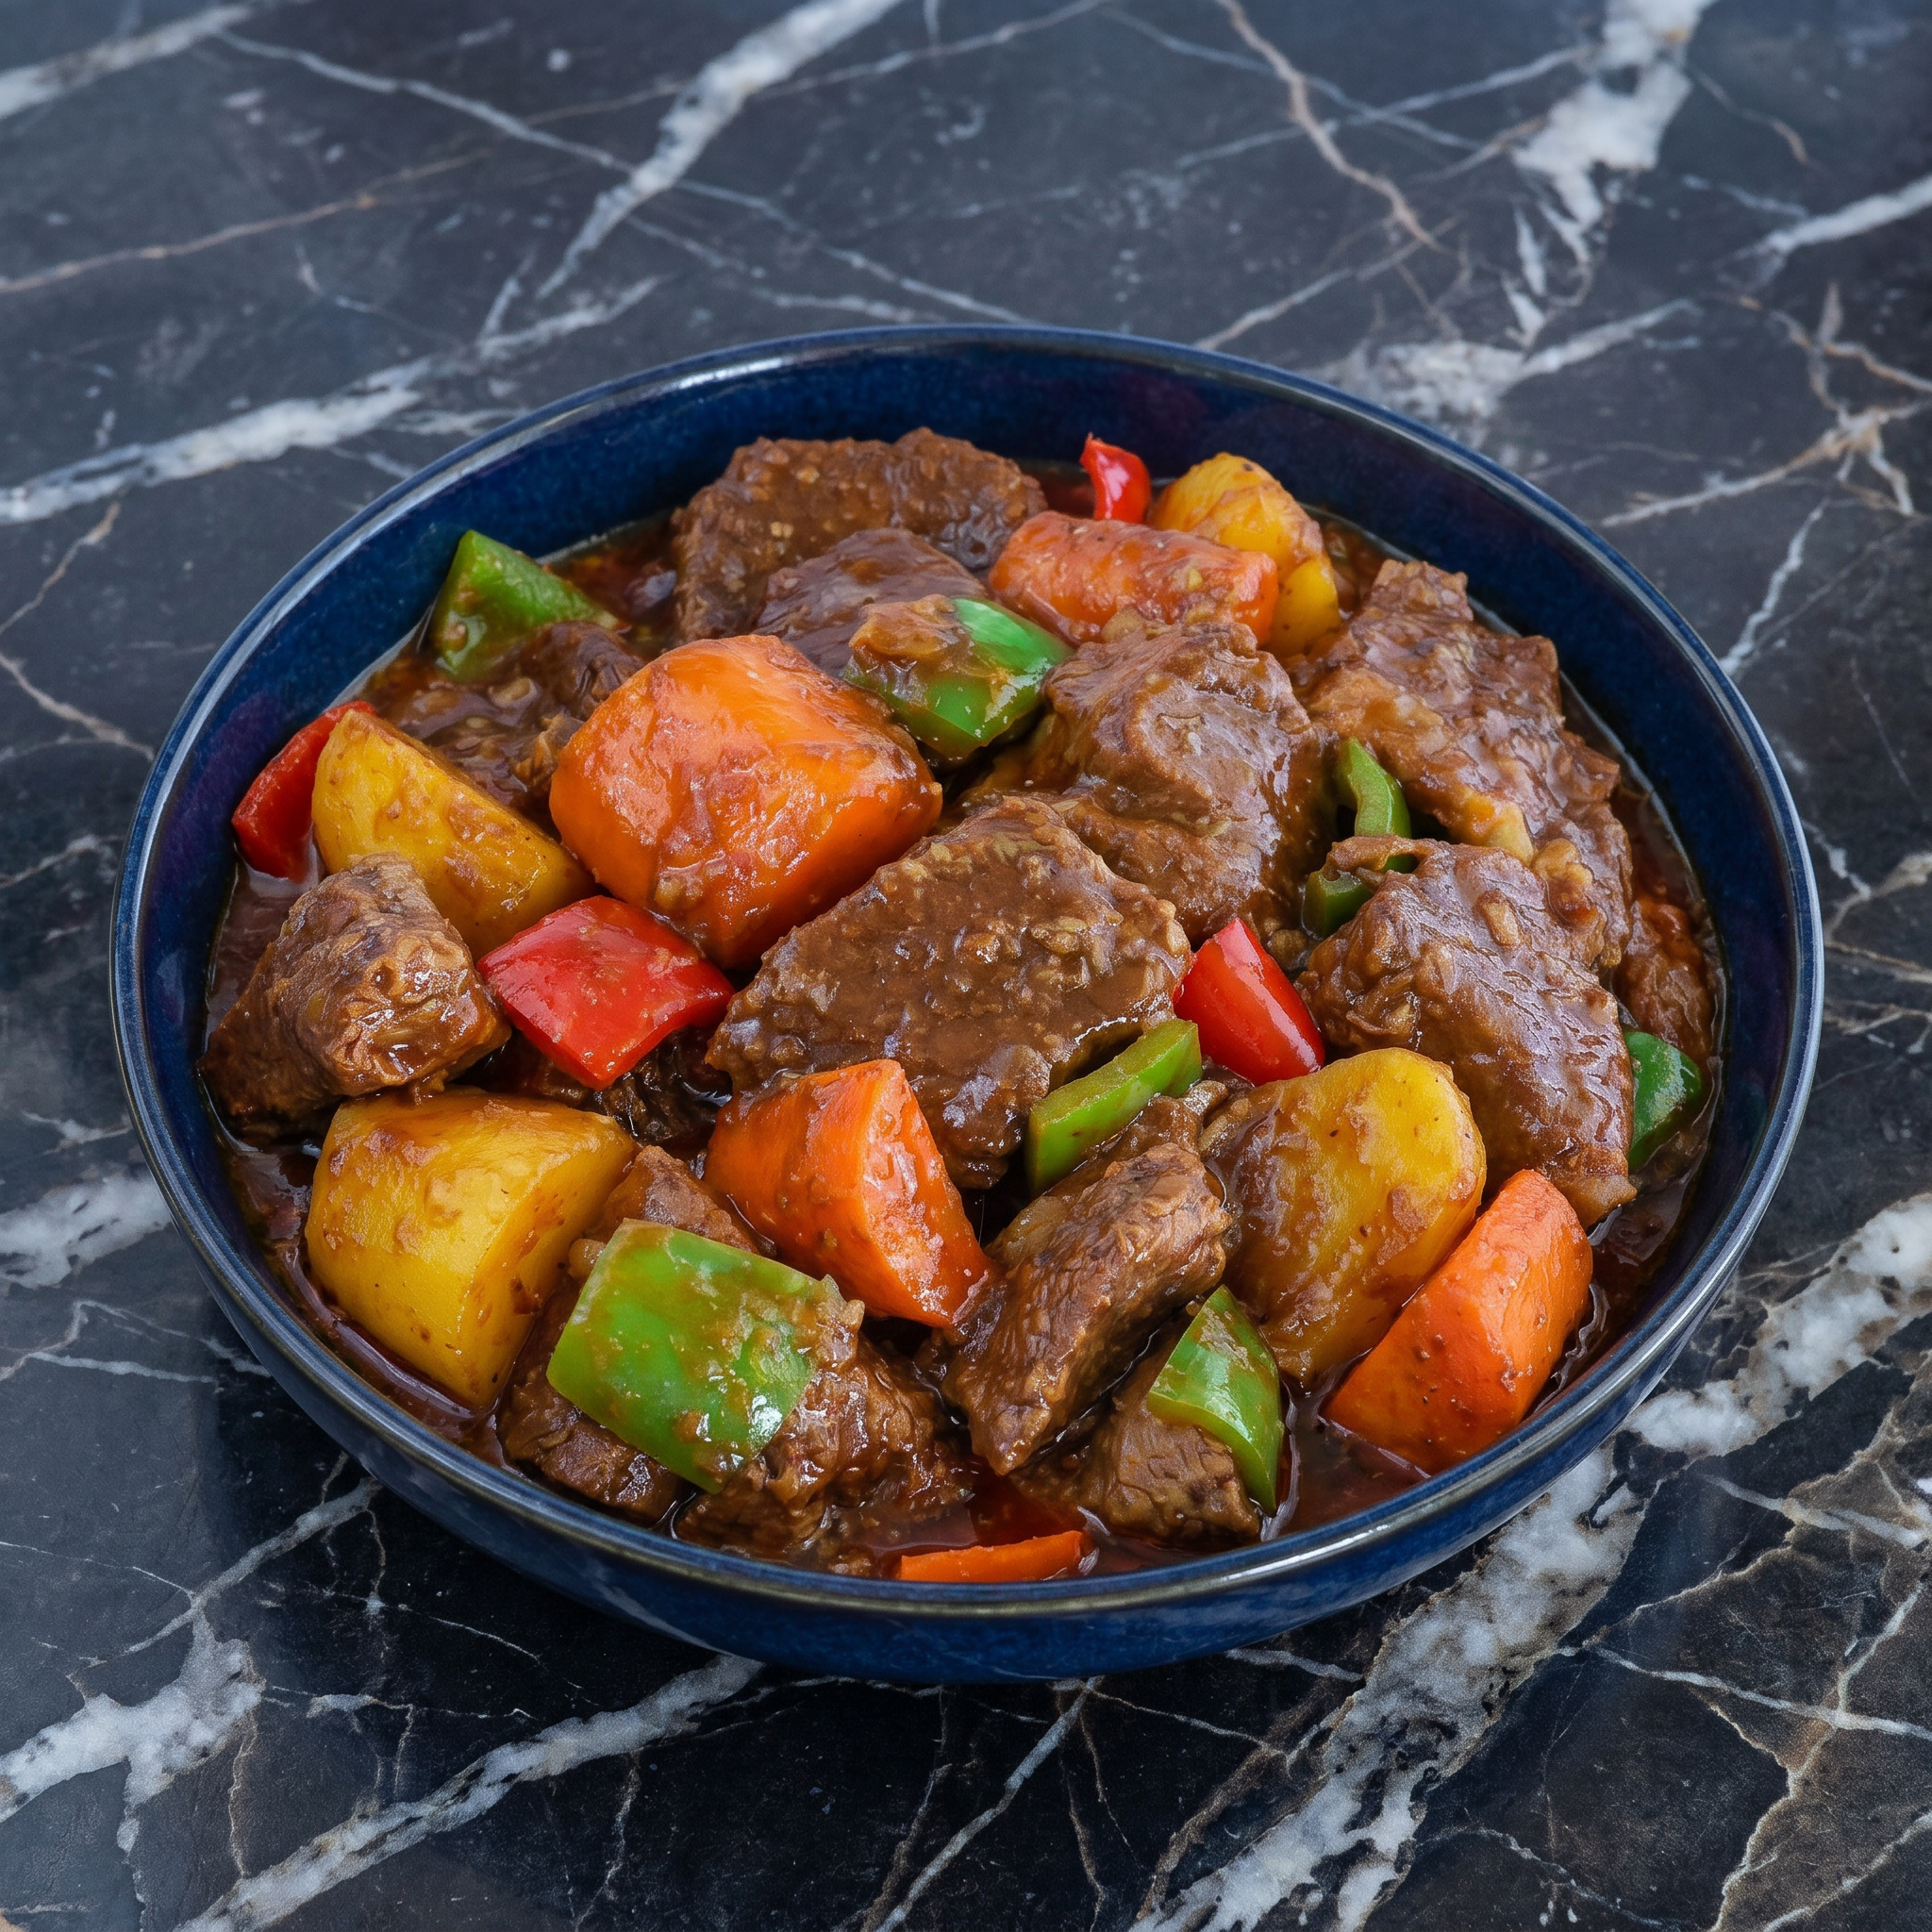
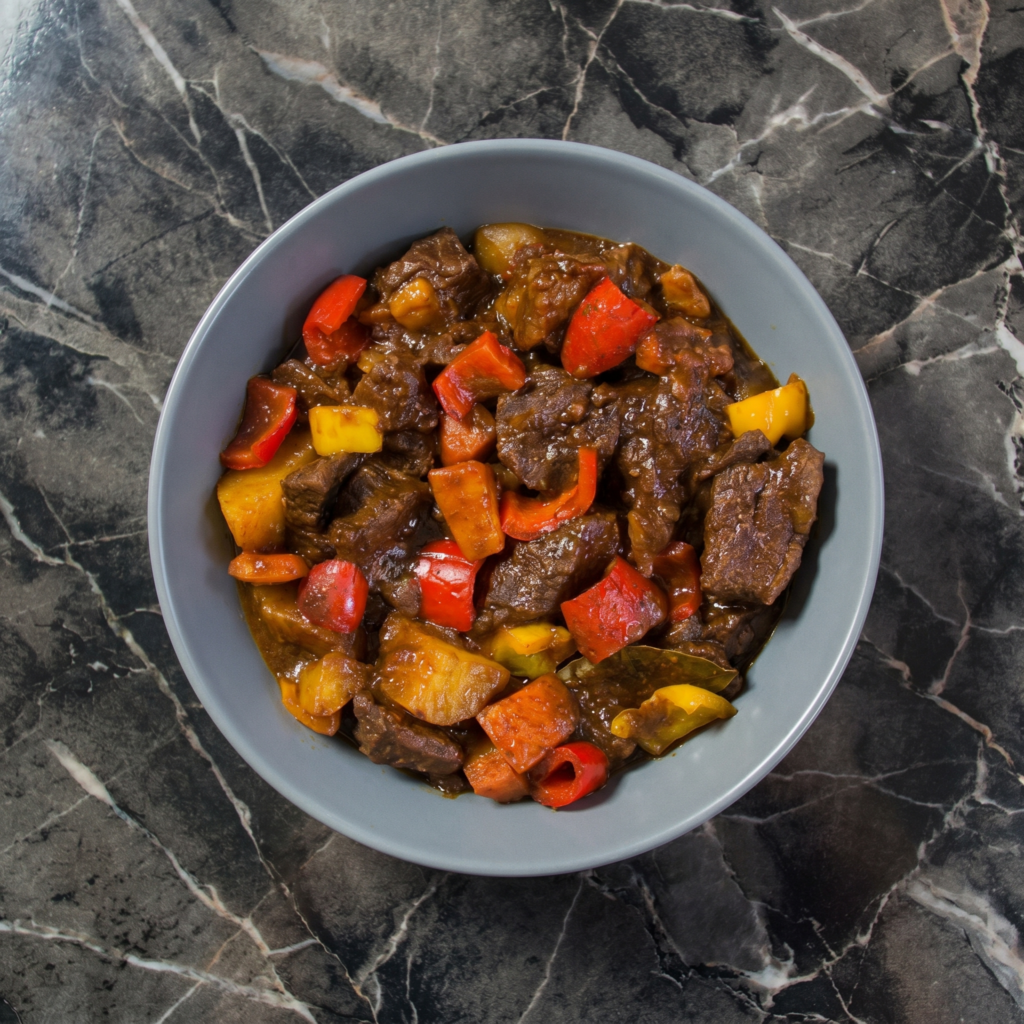
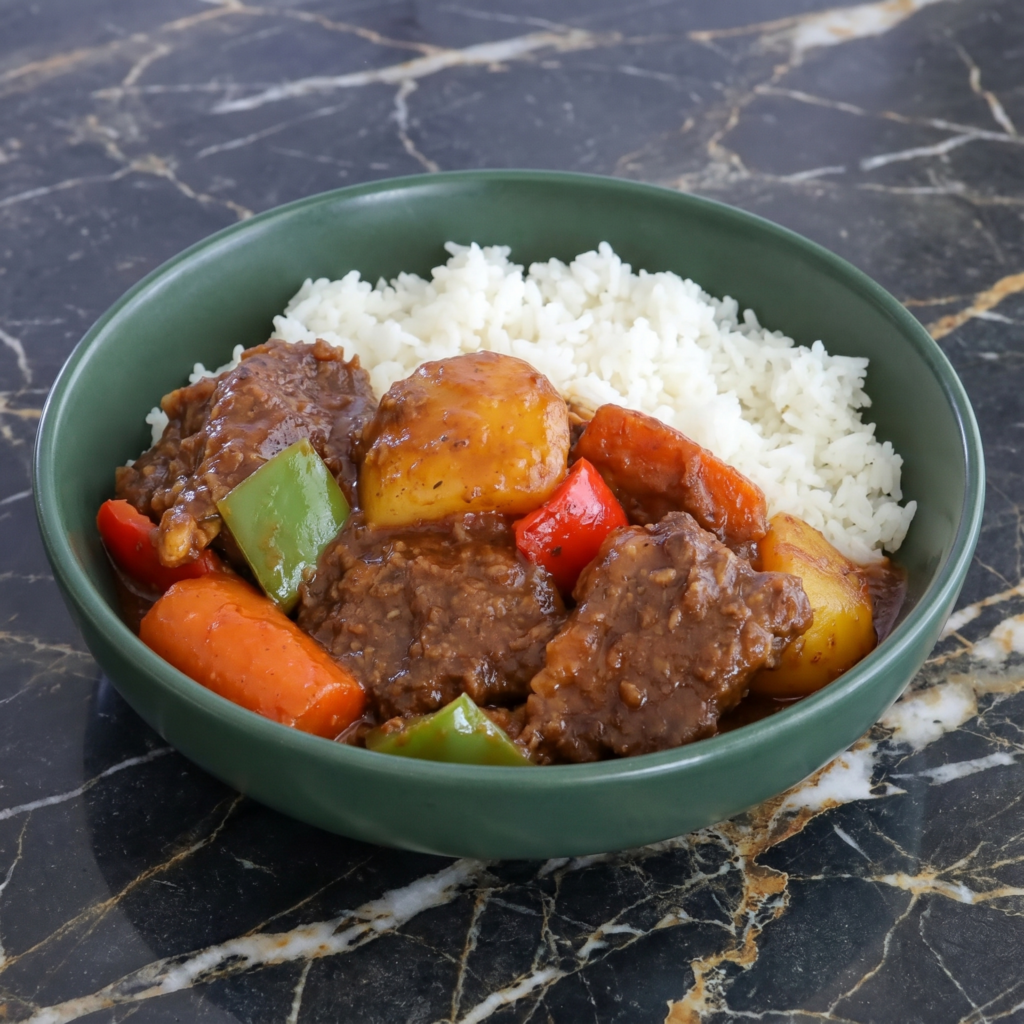
Imagine pot roast, but make it Filipino. That’s Mechado. Beef chuck simmered for hours in a tangy tomato sauce with potatoes, carrots, and bell peppers. It’s rich, hearty, and ridiculously good over rice.
The secret? A generous splash of lemon or calamansi. It cuts through the richness and wakes everything up. Make it on a Sunday. Thank yourself all week.
Ingredients
Serves 4-6.
2 lbs (900g) beef chuck, cut into 2-inch cubes
3 tbsp cooking oil
5 cloves garlic, minced
1 onion, chopped
2 cups tomato sauce
3 cups beef broth or water
3 tbsp soy sauce
2 potatoes, cubed
2 carrots, sliced
1 red bell pepper, sliced
2 tbsp lemon juice or calamansi juice
2 bay leaves
1 tsp black pepper
Step-by-Step Instructions
Step 1: Sear the Beef
Heat oil in a heavy pot over medium-high heat. Sear beef in batches until browned, 5-7 minutes per batch. Remove and set aside.
Step 2: Sauté Aromatics
In the same pot, sauté garlic and onion until soft, 2 minutes.
Step 3: Braise the Beef
Return beef to pot. Add tomato sauce, broth, soy sauce, bay leaves, and pepper. Bring to a boil.
Lower heat, cover, and simmer 1.5 to 2 hours until beef is fork-tender.
Step 4: Add Vegetables
Add potatoes, carrots, and bell peppers. Cook 15 minutes until tender.
Step 5: Finish with Citrus
Stir in lemon juice. Simmer 2 more minutes.
Serve hot over steamed rice.
Summary
Prep Time: 15 min | Cook Time: 2 hours | Total: 2 hr 15 min
Yield: 4-6 servings
Difficulty: Easy (needs time, not skill)
Storage Notes
Refrigerate up to 5 days. Freezes beautifully for 3 months. Like all stews, Mechado tastes better the next day. Reheat gently on stovetop. Add broth if too thick. Do not skip the lemon at the end—it’s magic.
Forget smoothie bowls. In Texas, breakfast means tacos. Warm tortillas stuffed with eggs, crispy potatoes, melty cheese, and whatever else you’ve got. It’s fast, cheap, and actually fills you up.
Ten minutes. One skillet. Zero regrets. Let’s go.
Ingredients
Makes 4 tacos (serves 2).
The Basics:
4 small corn or flour tortillas
4 large eggs
2 tablespoons milk (optional, for fluffier eggs)
½ cup shredded cheese (cheddar, Monterey Jack, or Oaxaca)
4 strips bacon OR ½ cup cooked chorizo
Salt and pepper to taste
Toppings (Go Crazy):
Salsa roja or verde
Pickled jalapeños
Chopped cilantro
Diced onion
Hot sauce
Sour cream or crema
Avocado slices
Step-by-Step Instructions
Step 1: Cook Your Meat
Cook bacon until crispy, then crumble. Or brown chorizo in a skillet, 5 minutes.
Drain excess grease, leaving a little for the eggs.
Step 2: Scramble the Eggs
Whisk eggs with milk, salt, and pepper.
Pour into the same skillet over medium-low heat.
Stir gently until soft curds form. Don’t overcook.
Step 3: Warm the Tortillas
Heat tortillas directly over a gas flame (10 seconds per side) or in a dry skillet.
Light, airy, deep-fried to golden perfection. Rolled in sugar. Stuffed with creamy pastry cream, warm Nutella, or tangy jam. They’re Italy’s gift to the world. And you can make them in your kitchen with no special equipment.
Ingredients
Makes 12-15 bomboloni.
For the Dough:
3½ cups (440g) bread flour or all-purpose flour
¼ cup (50g) sugar
2¼ teaspoons instant yeast (one packet)
½ teaspoon salt
3 large eggs, room temperature
½ cup (120ml) warm milk
¼ cup (55g) unsalted butter, softened
For Frying and Coating:
Oil for frying (vegetable or canola)
1 cup (200g) granulated sugar (for rolling)
Fillings (pick your favorite):
Nutella or chocolate hazelnut spread
Pastry cream (vanilla custard)
Raspberry or apricot jam
Step-by-Step Instructions
Step 1: Make the Dough
Mix flour, sugar, yeast, and salt. Add eggs and warm milk. Mix until shaggy.
Add softened butter one tablespoon at a time. Knead 8-10 minutes until smooth and elastic.
Cover and let rise 1-2 hours until doubled.
Step 2: Shape and Rise Again
Punch down dough. Roll or pat to ½-inch thickness.
Cut into 2-3 inch rounds (use a biscuit cutter or glass). Place on parchment.
Cover and rise for 45-60 minutes until puffy.
Step 3: Fry
Heat 2 inches of oil to 350°F (175°C).
Fry 2-3 bomboloni at a time, 1-2 minutes per side, until deep golden brown.
Drain on paper towels. While still warm, roll in sugar.
Step 4: Fill and Devour
Let cool slightly. Fill a piping bag with your chosen filling.
Poke a hole in each bombolone and pipe in filling until heavy.
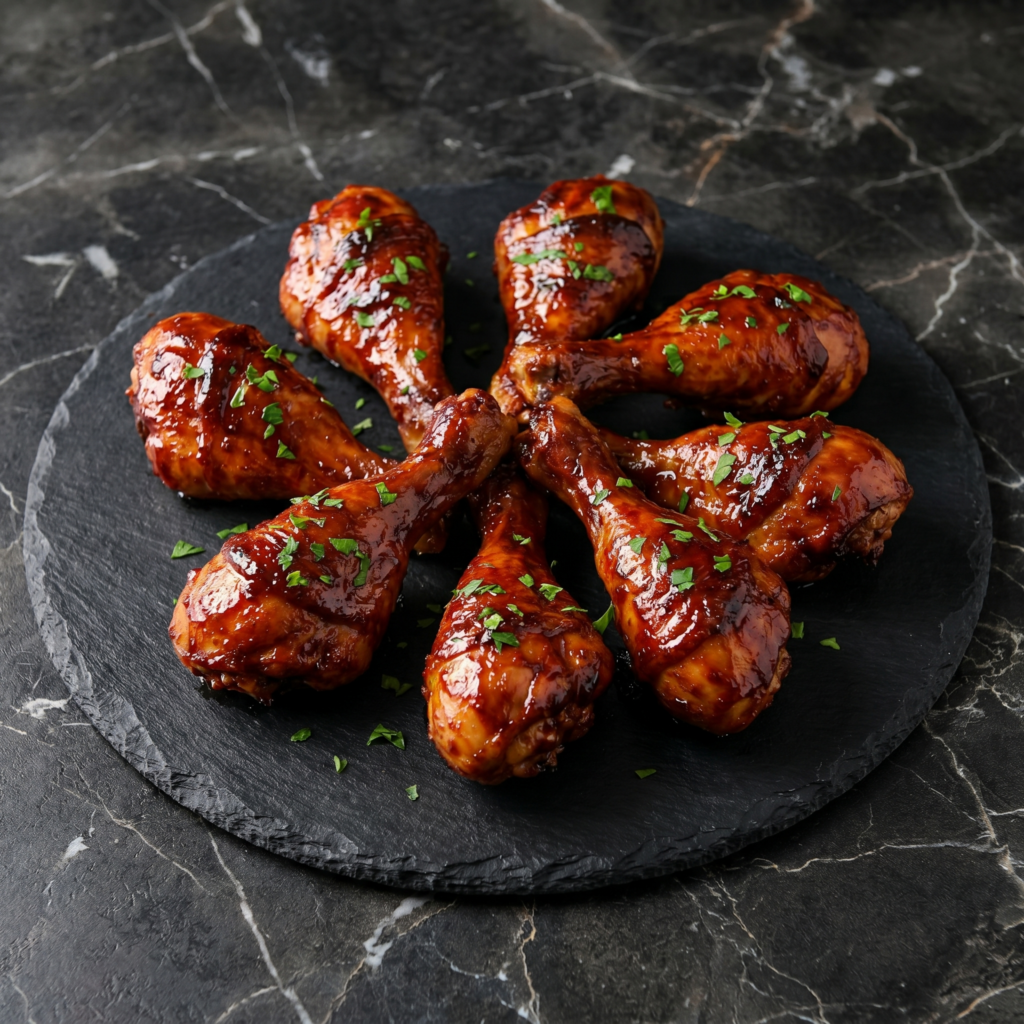
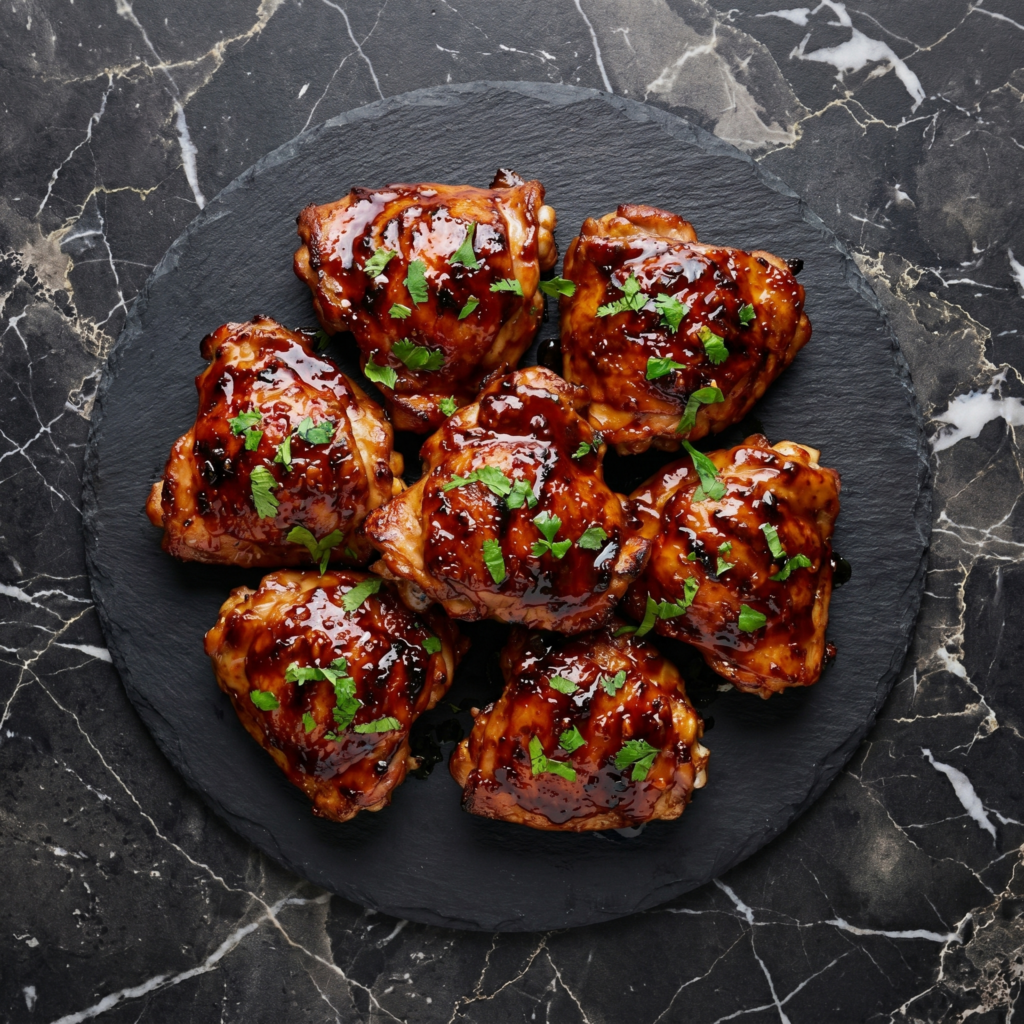
Forget boneless, skinless chicken breasts. Drumsticks are cheaper, juicier, and way more fun to eat. Smother them in BBQ sauce, bake or grill until sticky and caramelized, and watch them disappear.
Five ingredients. Zero dryness. Maximum flavor.
Ingredients
Serves 4 (8 drumsticks).
8 chicken drumsticks
1 tablespoon olive oil
1 teaspoon salt
½ teaspoon black pepper
1 teaspoon garlic powder
1 teaspoon smoked paprika (optional, but do it)
1 cup BBQ sauce (your favorite)
Step-by-Step Instructions
Option 1: Oven-Baked
Preheat oven to 400°F (200°C). Line a baking sheet with foil.
Pat drumsticks dry. Toss with oil, salt, pepper, garlic powder, paprika.
Arrange on sheet. Bake 25 minutes.
Brush with BBQ sauce. Bake 10 more minutes.
Flip. Brush again. Bake 5-10 minutes until sticky and internal temp hits 165°F.
Option 2: Grilled
Preheat grill to medium (350-400°F).
Season drumsticks. Grill 20-25 minutes, turning every 5 minutes.
Brush with BBQ sauce last 10 minutes. Flip a few times until caramelized.
Serve:
Rest 5 minutes. Serve with extra sauce on the side. Napkins required.
Fridge: Keeps 3-4 days. Reheat in oven at 375°F for 10-15 minutes (not microwave—rubbery skin is sad).
Freezer (cooked): Up to 3 months. Thaw overnight, reheat in oven.
Freezer (raw, seasoned): Freeze in a bag. Thaw overnight before cooking.
Pro Tip:
Pat the drumsticks DRY before seasoning. Wet skin = steamed chicken = flabby skin. Dry skin = crispy, sticky goodness. Also, sauce goes on at the END—too early and it burns.
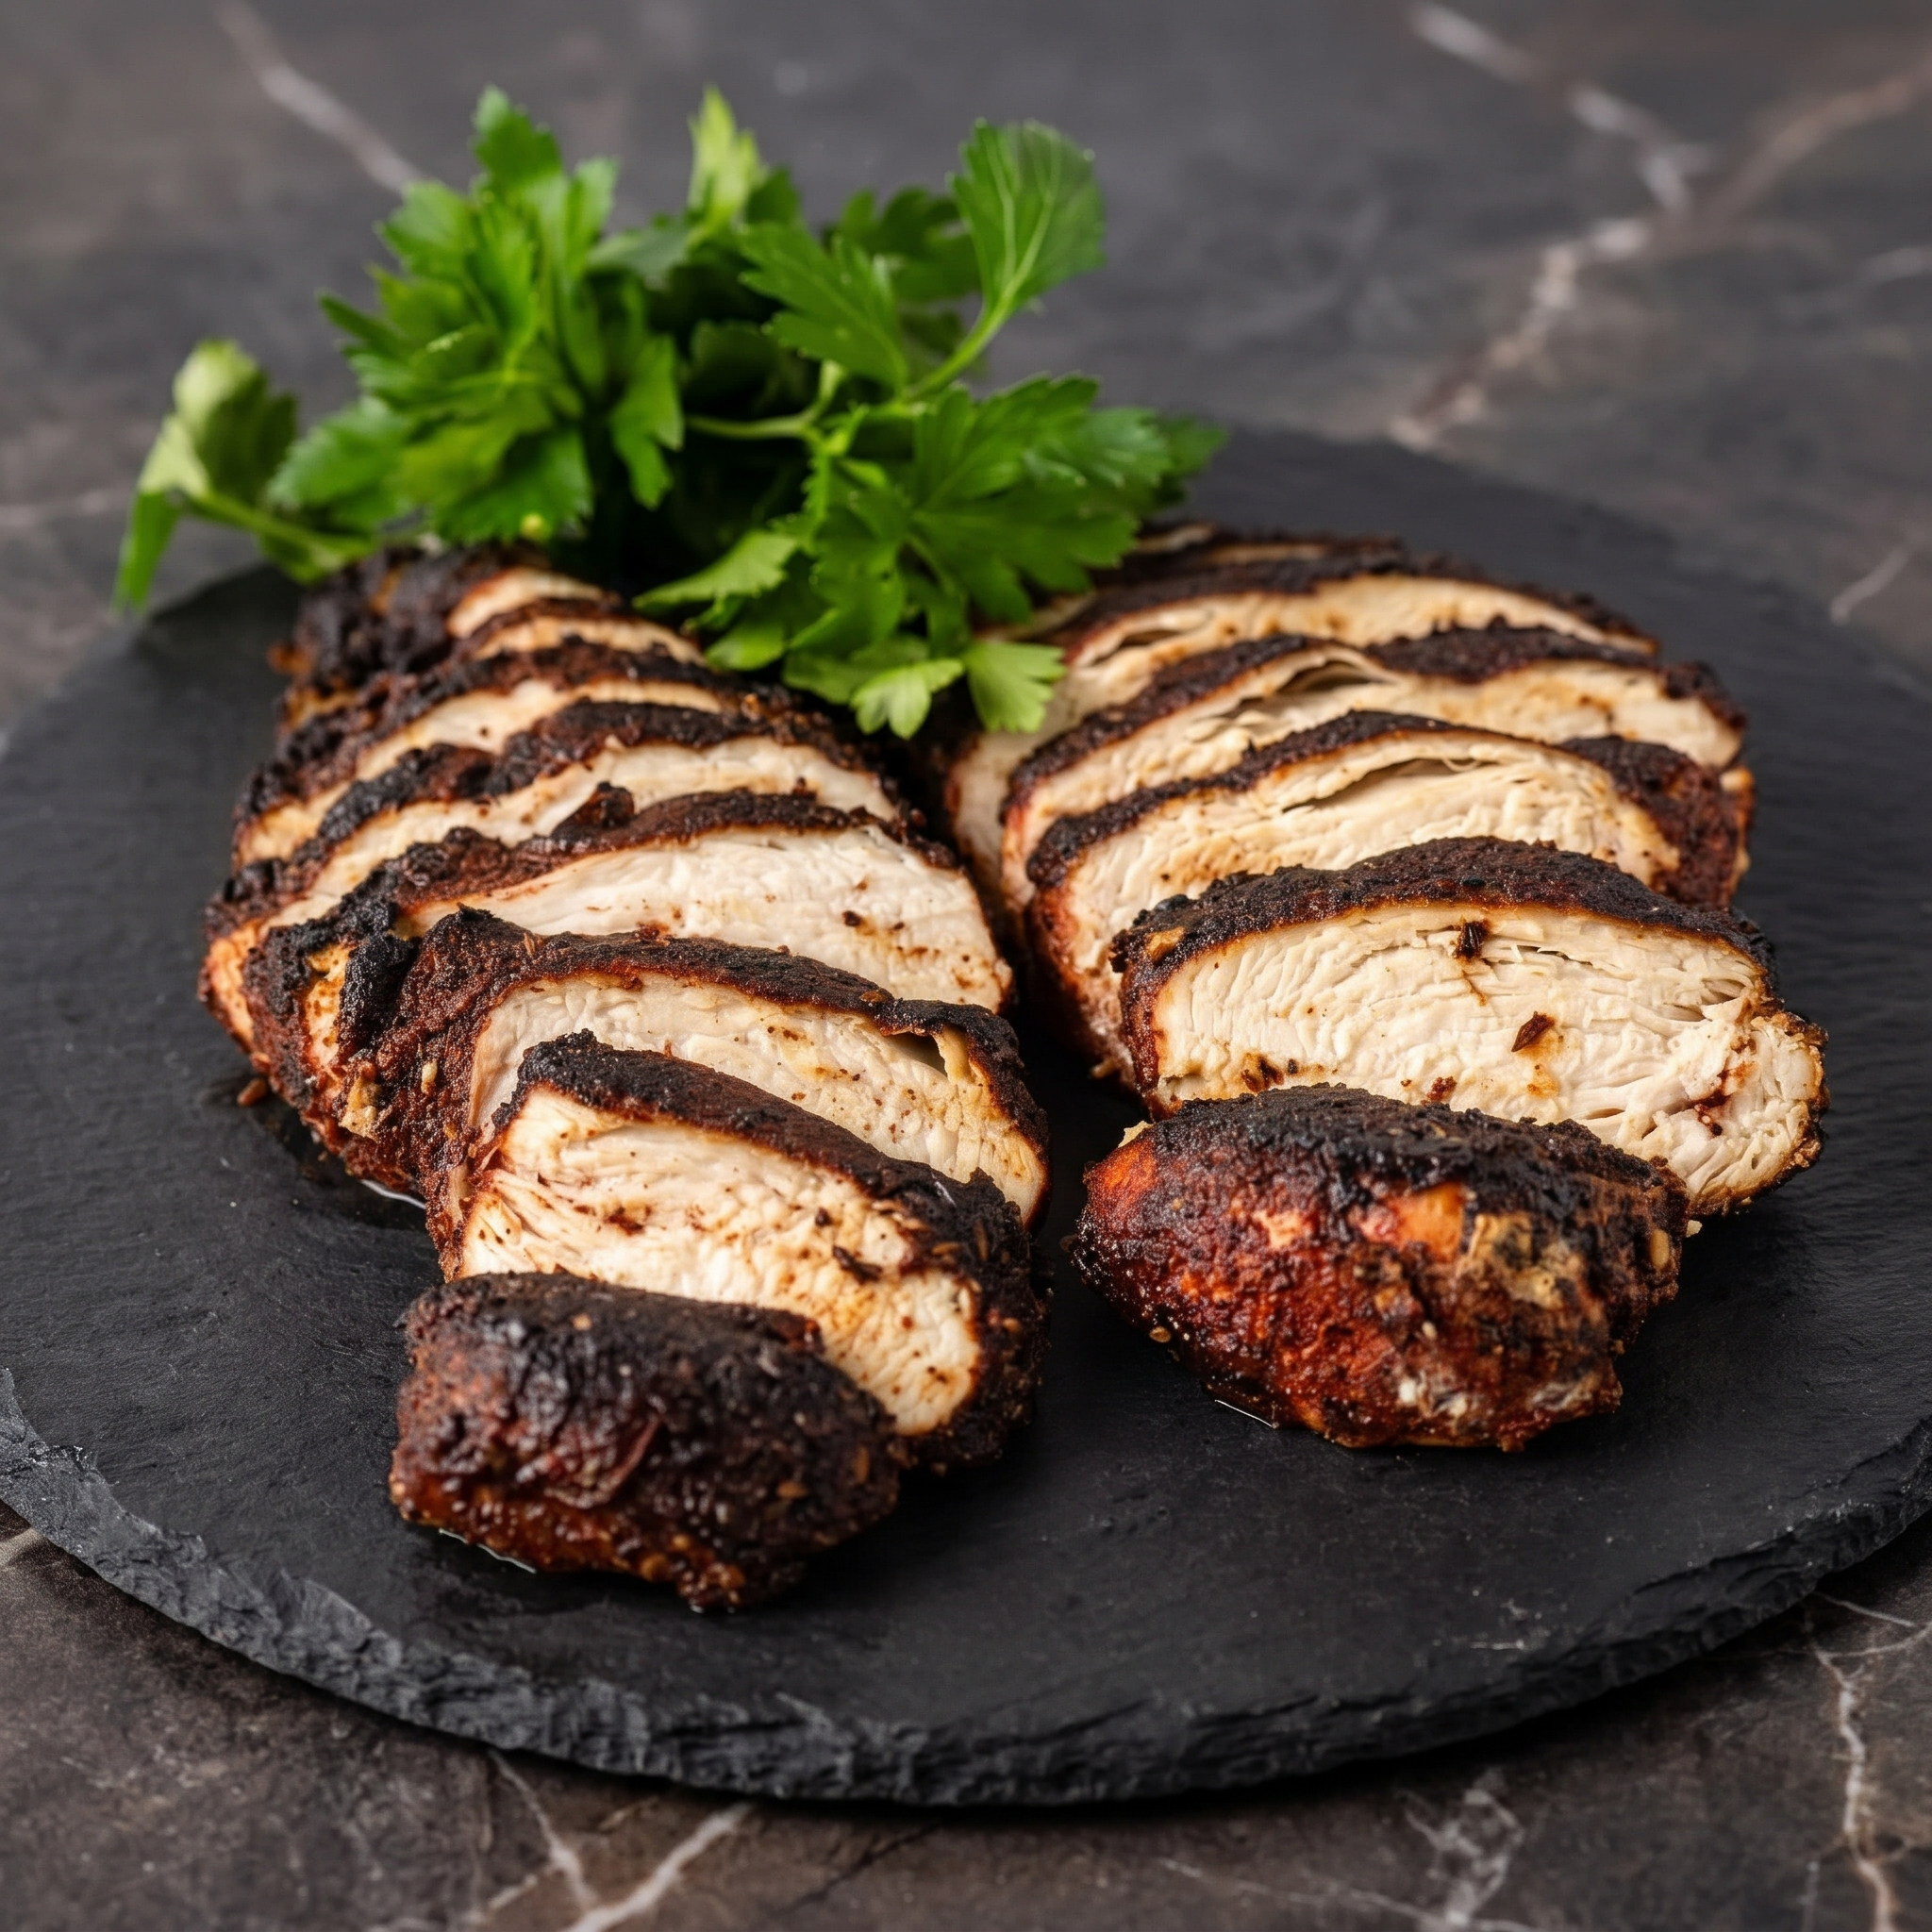
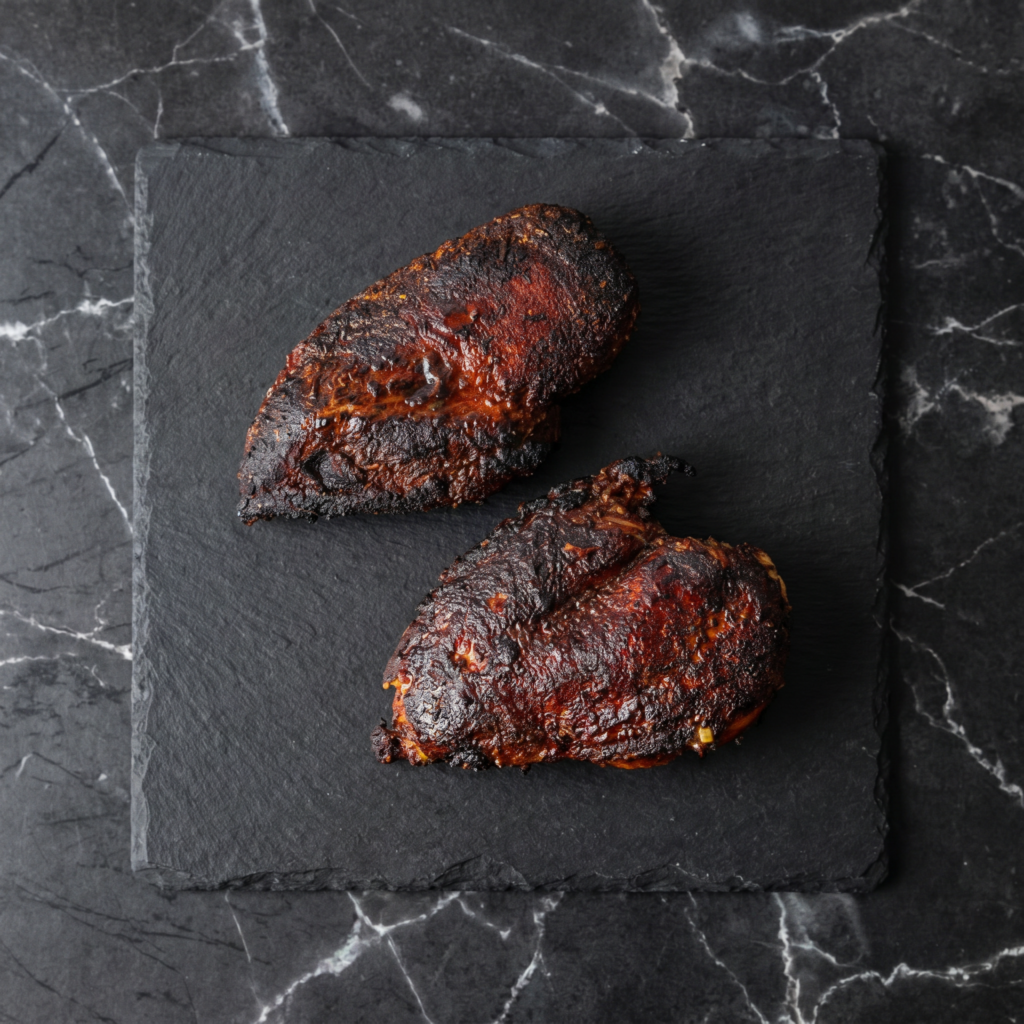
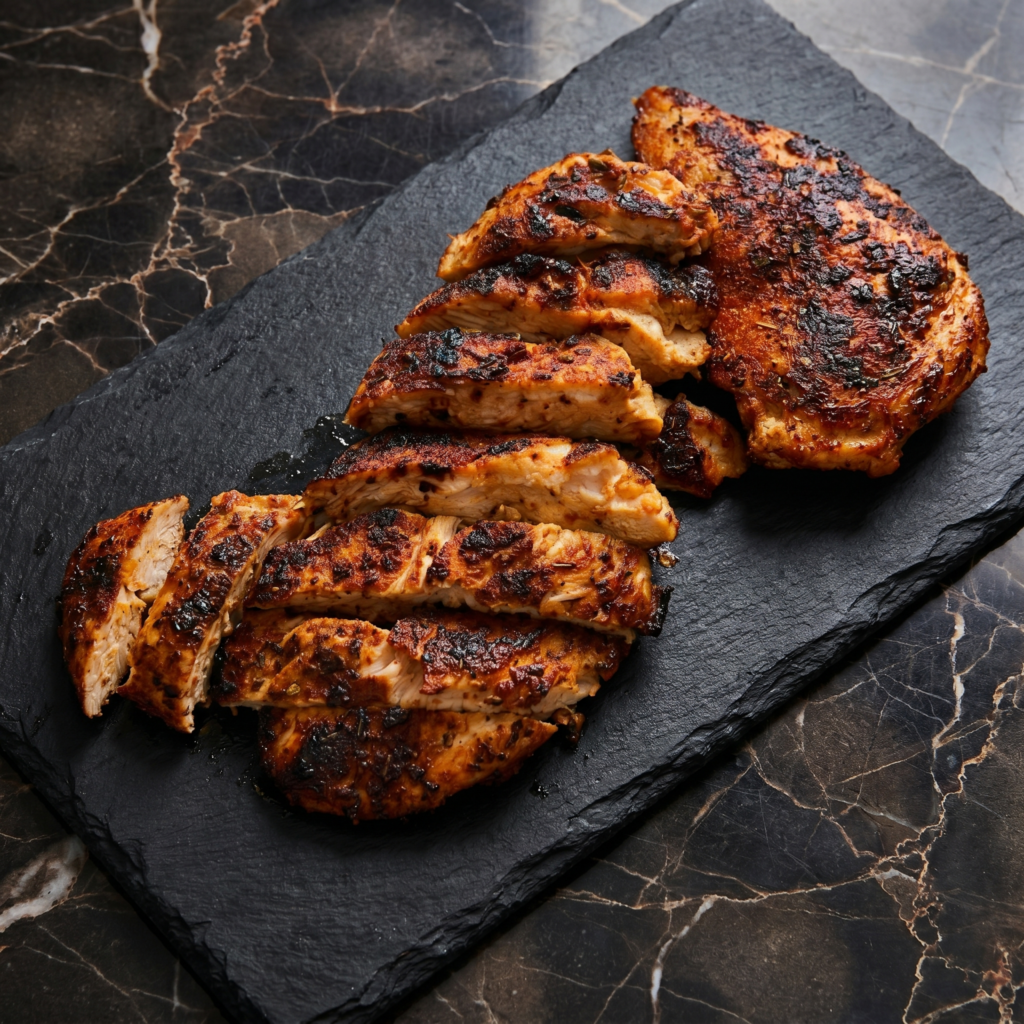
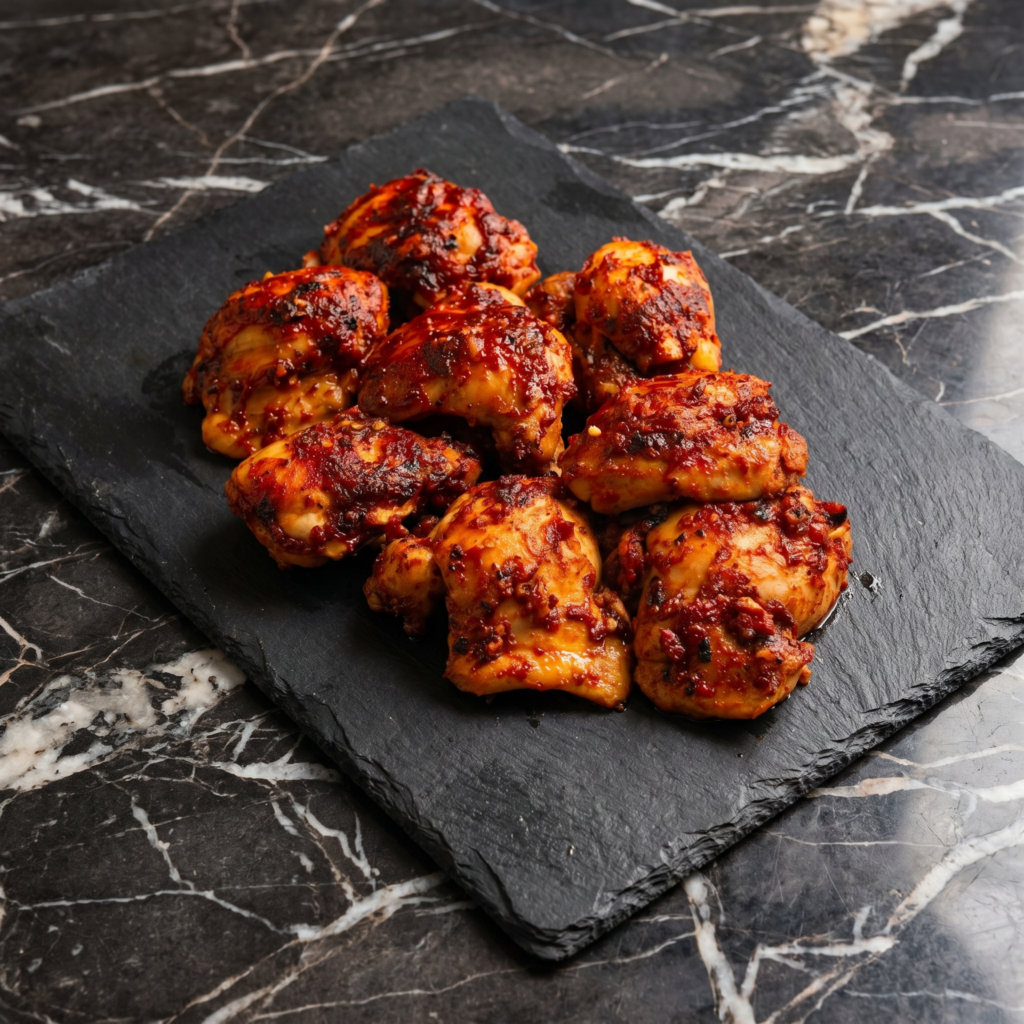
Blackened chicken is the dish that proves big flavor doesn’t require big effort. A bold, smoky Cajun spice blend. A screaming-hot skillet. A few minutes per side. That’s it. The spices create a dark, flavorful crust that’s not burnt—it’s blackened. There’s a difference, and it’s delicious.
This is weeknight cooking at its finest. The seasoning comes together from pantry staples. The chicken cooks in under 15 minutes. And the result? Juicy, tender chicken with a crust that crackles and a kick that lingers. Serve it over rice, tucked into sandwiches, or piled on salads. It’s the kind of recipe you’ll memorize and make on repeat.
Ingredients
Serves 4.
For the Chicken:
4 boneless, skinless chicken breasts (about 6 oz each)
2 tbsp olive oil or avocado oil (high smoke point)
2 tbsp butter (optional, for extra richness)
Lemon wedges, for serving
Fresh parsley, for garnish
For the Cajun Seasoning:
2 tbsp smoked paprika
1 tbsp garlic powder
1 tbsp onion powder
1 tbsp dried oregano
1 tbsp dried thyme
1 tsp cayenne pepper (adjust to heat preference)
1 tsp black pepper
1 tsp salt
½ tsp white pepper (optional, adds depth)
½ tsp red pepper flakes (optional, for extra heat)
Step-by-Step Instructions
Step 1: Make the Cajun Seasoning
In a small bowl, combine smoked paprika, garlic powder, onion powder, oregano, thyme, cayenne, black pepper, salt, white pepper, and red pepper flakes (if using).
Mix well. Store any extra in an airtight jar—it’s great on fish, shrimp, vegetables, and potatoes too.
Step 2: Prep the Chicken
Place chicken breasts between two sheets of plastic wrap or parchment paper.
Using a meat mallet or rolling pin, gently pound to an even ½-inch thickness. This ensures even cooking.
Pat chicken completely dry with paper towels. Moisture is the enemy of a good sear.
Step 3: Season the Chicken
Drizzle chicken with 1 tbsp olive oil and rub to coat.
Sprinkle Cajun seasoning generously over both sides of each chicken breast, pressing gently to adhere. You want a thick, even coating—that’s what creates the blackened crust.
Step 4: Heat the Skillet
Heat a large cast-iron skillet or heavy-bottomed pan over medium-high heat until it’s ripping hot—almost smoking. Cast iron is ideal because it holds heat evenly.
Add remaining 1 tbsp oil (and butter if using) to the pan.
Step 5: Sear the Chicken
Place chicken in the skillet in a single layer. Don’t crowd the pan—work in batches if needed.
Cook undisturbed for 4-5 minutes until the underside is deeply darkened and crispy. The spices should look blackened, not burnt.
Flip and cook another 4-5 minutes until chicken is cooked through (internal temp 165°F) and the second side is also blackened.
If the crust is dark but the chicken isn’t done, reduce heat to medium and cook until finished.
Step 6: Rest and Serve
Transfer chicken to a cutting board and let rest for 5 minutes. This allows juices to redistribute.
Slice if desired, or serve whole.
Garnish with fresh parsley and serve with lemon wedges for squeezing.
Take a bite. Crispy, spicy crust. Juicy, tender interior. This is Cajun cooking at its finest.
Store in an airtight container in the fridge for up to 4 days. Blackened chicken is delicious cold on salads or gently reheated.
Reheating:
Skillet (best): Reheat over medium heat for 2-3 minutes per side. Oven: 350°F for 8-10 minutes. Microwave: 60-90 seconds at reduced power—the crust will soften but flavor remains.
Make Ahead:
Mix the Cajun seasoning up to 3 months in advance. Season chicken up to 24 hours ahead and refrigerate. Cook just before serving for the crispiest crust.
Freezer-Friendly:
Freeze cooked chicken in an airtight container for up to 3 months. Thaw overnight in the fridge and reheat in a skillet or oven.
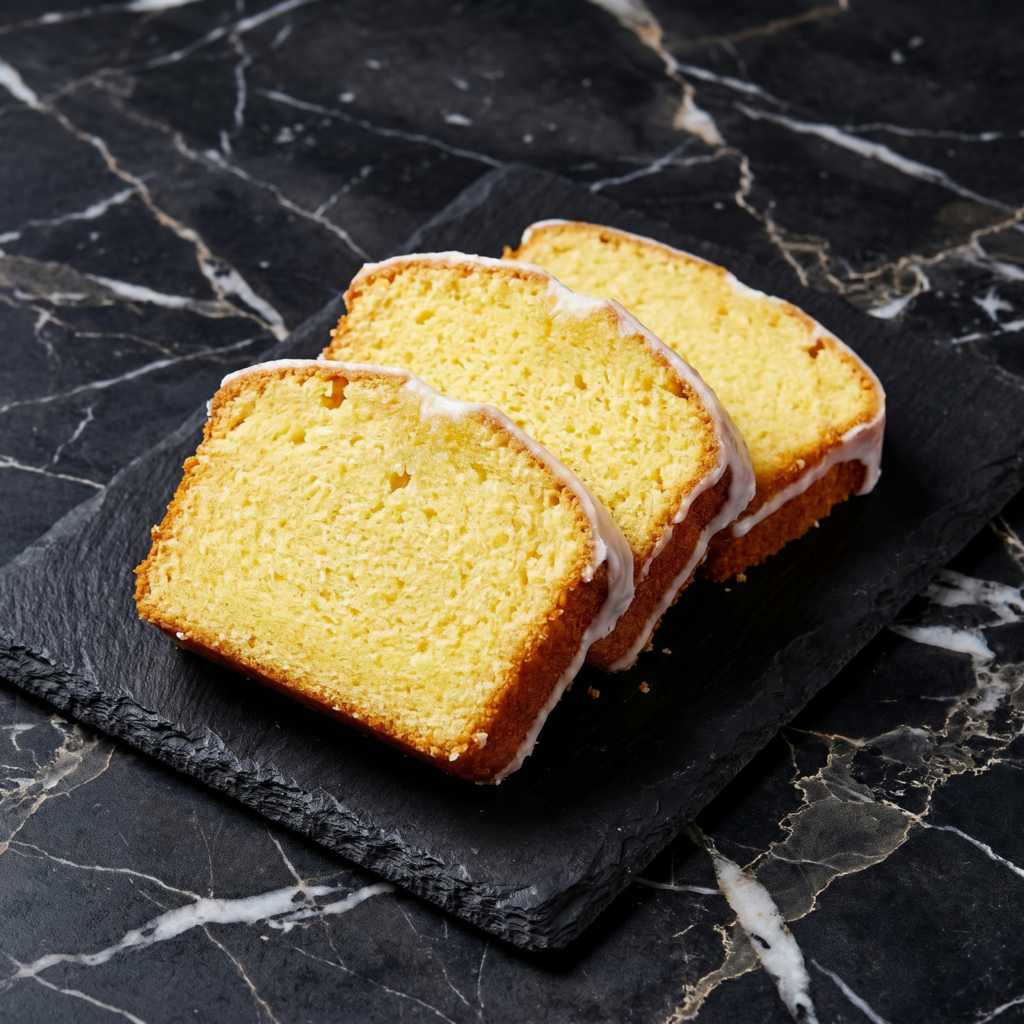
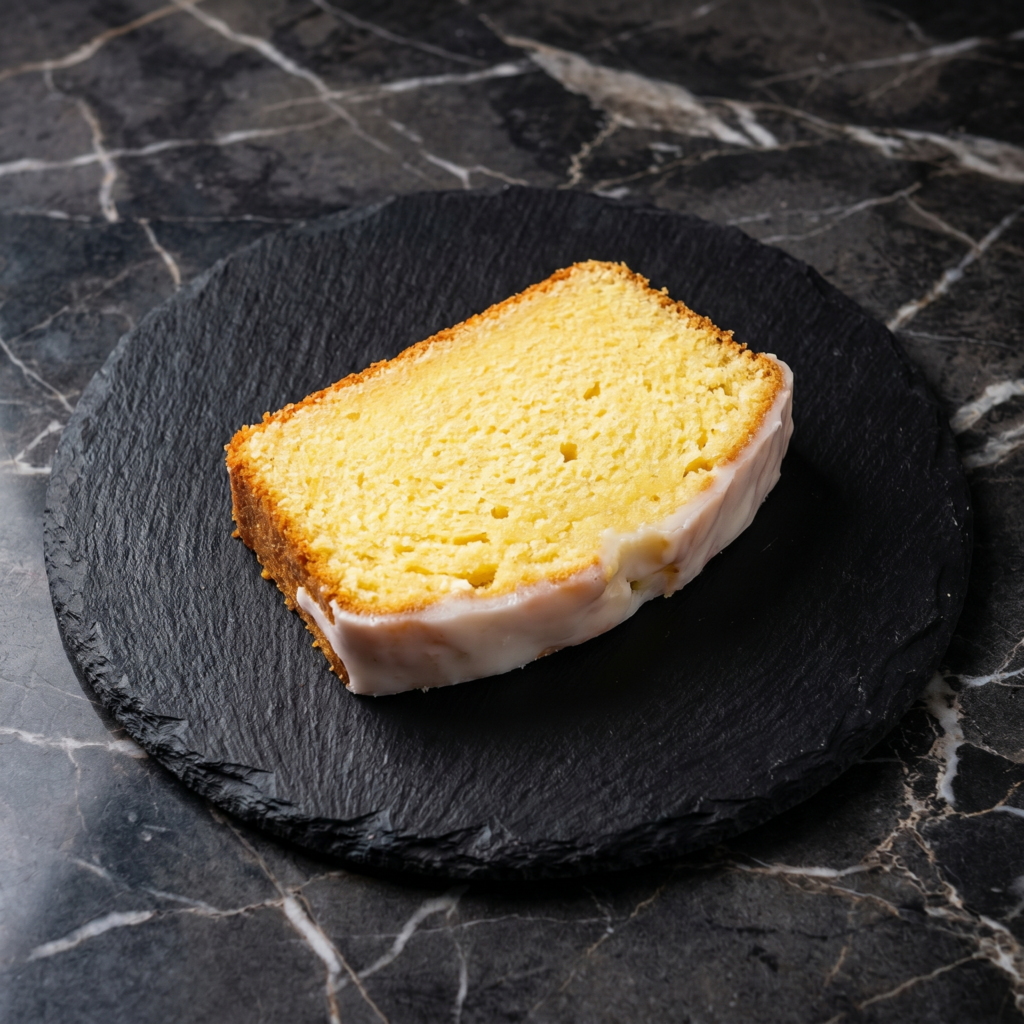
There’s something special about a classic pound cake. It’s dense without being heavy, buttery without being greasy, and satisfying in a way that lighter cakes just can’t match. Add bright, fresh lemon to that equation, and you have something truly extraordinary.
This lemon pound cake is everything you want it to be. The crumb is tight and tender, rich with butter and tangy with fresh lemon juice and zest. But the real magic happens when you pour the simple lemon glaze over the warm cake—it soaks into the top, creating a slightly crisp, incredibly flavorful crust that will have you coming back for slice after slice.
Whether you serve it with afternoon tea, bring it to a brunch, or just keep it on the counter for snacking, this cake disappears fast.
Ingredients
Makes one 9×5 inch loaf cake (8-10 servings).
For the Lemon Pound Cake:
1 ½ cups (190g) all-purpose flour
½ teaspoon baking powder
¼ teaspoon baking soda
½ teaspoon salt
1 cup (225g) unsalted butter, softened
1 cup (200g) granulated sugar
3 large eggs, at room temperature
2 tablespoons fresh lemon zest (about 2-3 lemons)
2 tablespoons fresh lemon juice
1 teaspoon vanilla extract
½ cup (120g) sour cream or plain Greek yogurt, at room temperature
For the Lemon Glaze:
1 ½ cups (180g) powdered sugar, sifted
2-3 tablespoons fresh lemon juice
1 tablespoon milk or cream (if needed for consistency)
1 teaspoon lemon zest (optional, for extra flavor)
Step-by-Step Instructions
1. Preheat and Prepare:
Preheat your oven to 325°F (160°C). Grease a 9×5 inch loaf pan thoroughly, then dust with flour, tapping out the excess. Alternatively, line with parchment paper, leaving overhang on the long sides for easy removal.
2. Combine Dry Ingredients:
In a medium bowl, whisk together the flour, baking powder, baking soda, and salt. Set aside.
3. Cream Butter and Sugar:
In a large bowl, beat the softened butter with an electric mixer on medium speed until creamy, about 1 minute.
Gradually add the sugar and continue beating until light and fluffy, about 3-5 minutes. Scrape down the sides and bottom of the bowl as needed. This step is crucial for a tender pound cake.
4. Add Eggs and Flavorings:
Add the eggs one at a time, beating well after each addition and scraping down the bowl as needed. The mixture should be smooth and glossy.
Beat in the lemon zest, lemon juice, and vanilla extract until combined.
5. Alternate Dry and Wet:
With the mixer on low speed, add half of the flour mixture, mixing until just combined.
Add all of the sour cream, mixing until just combined.
Add the remaining flour mixture and mix until just combined and no streaks of flour remain. Do not overmix. Scrape the bottom of the bowl with a spatula to ensure everything is incorporated.
6. Bake:
Pour the batter into the prepared loaf pan and spread it evenly. Tap the pan gently on the counter a few times to release any air bubbles.
Bake for 60-70 minutes, until a toothpick inserted into the center comes out clean or with a few moist crumbs.
If the top is browning too quickly, tent loosely with foil for the last 15-20 minutes of baking.
Let the cake cool in the pan for 15 minutes, then carefully turn it out onto a wire rack placed over a baking sheet (to catch glaze drips).
7. Make the Glaze:
While the cake cools slightly, make the glaze. In a small bowl, whisk together the sifted powdered sugar and 2 tablespoons of lemon juice until smooth. Add more lemon juice, a teaspoon at a time, until you reach a thick but pourable consistency. The glaze should be thick enough to coat the back of a spoon but still drizzle easily.
If the glaze becomes too thin, add more powdered sugar. Stir in the lemon zest if using.
8. Glaze the Cake:
While the cake is still warm (but not hot), pour the glaze slowly over the top, allowing it to drip down the sides. Use a spatula to spread it evenly if needed.
Let the cake cool completely on the wire rack. The glaze will set into a beautiful, slightly crisp shell.
9. Serve:
Slice and serve at room temperature. The flavor is even better the next day!
Store lemon pound cake tightly wrapped in plastic wrap or in an airtight container at room temperature for up to 4 days. The glaze will stay beautifully set. The flavor actually improves after a day!
Can You Freeze Pound Cake?
Absolutely! Pound cake freezes beautifully. For best results, freeze the unglazed cake. Wrap the cooled cake tightly in plastic wrap, then in foil, and place in a freezer bag. Freeze for up to 3 months. Thaw at room temperature, then prepare and add the glaze.
Freezing Glazed Cake:
You can freeze the glazed cake, but the glaze may lose some of its crispness. Freeze as directed above, and refresh in a 300°F oven for 5-10 minutes if desired.
Make-Ahead for Parties:
This cake is perfect for making ahead. Bake it a day before, store at room temperature, and glaze the day you plan to serve. The glaze is best when fresh.
Freezing Lemon Zest:
If you have extra lemons, zest them and freeze the zest in a small bag. It thaws instantly and is perfect for future baking.
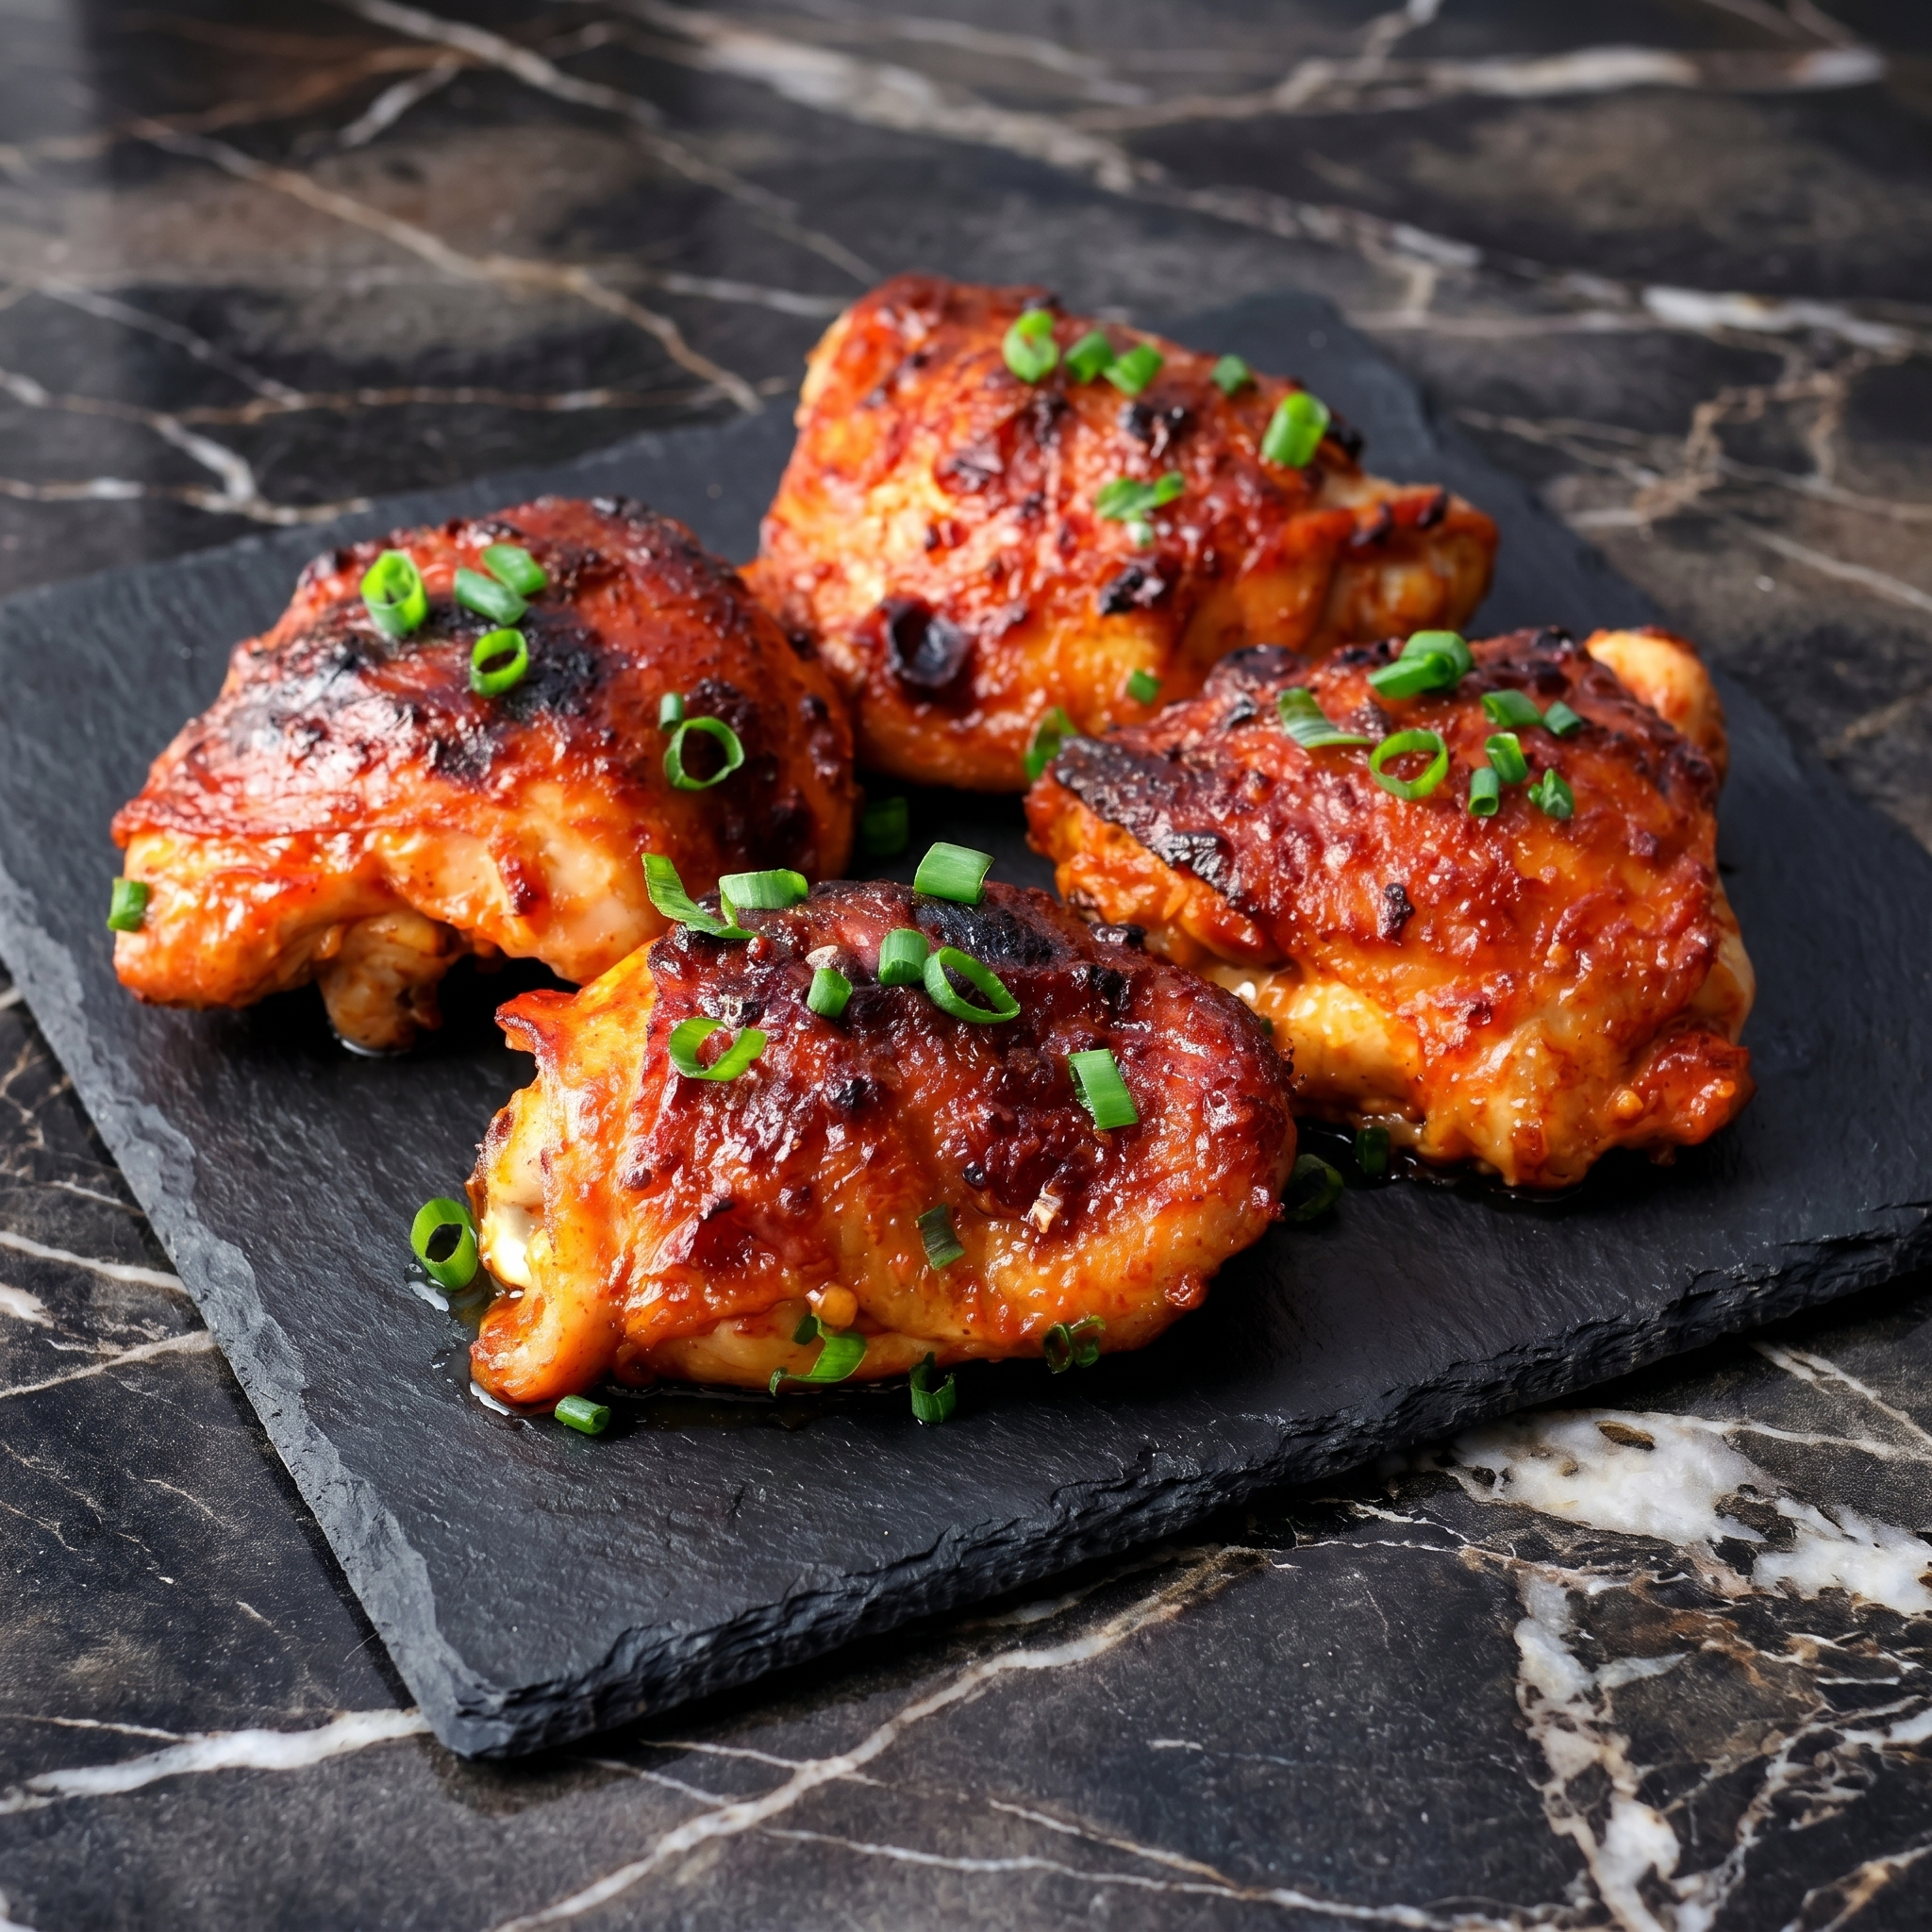
If you love meals that are big on flavor but low on cleanup, this Sheet-Pan Harissa Chicken & Sweet Potatoes is about to earn a permanent spot in your dinner rotation. Smoky, spicy harissa coats juicy chicken, while caramelized sweet potatoes and tender red onions roast alongside, soaking up every bit of bold, savory goodness.
It’s colorful, nourishing, and deeply satisfying—yet it all happens on one pan in under an hour. Let’s break it down step by step so you can make it perfectly every time.
Why You’ll Love This Recipe
One pan = easy cleanup
Bold North African–inspired flavors
Naturally gluten-free
Perfect for meal prep
Customizable heat level
Harissa paste brings smoky heat and complexity, while sweet potatoes add natural sweetness that balances the spice beautifully.
Line a large sheet pan with parchment paper or lightly grease it. Using a large pan ensures everything roasts instead of steams.
High heat is key for caramelization and crisp edges.
Step 2: Marinate the Chicken
In a bowl, combine harissa paste, olive oil, smoked paprika, cumin, salt, and black pepper.
Pat the chicken dry with paper towels. This helps the marinade adhere and encourages crisping.
Rub the harissa mixture evenly over the chicken, making sure it’s well coated on all sides. If time allows, let it marinate for 20–30 minutes at room temperature or refrigerate for up to 4 hours.
Even a short marinade infuses bold flavor.
Step 3: Prepare the Vegetables
In a separate bowl, toss the cubed sweet potatoes, red onion wedges, and bell pepper with olive oil, salt, and pepper.
Spread the vegetables in an even layer on the sheet pan.
Spacing is important—crowded vegetables will steam rather than roast.
Step 4: Add the Chicken to the Pan
Nestle the marinated chicken pieces among the vegetables, skin-side up if using skin-on.
Make sure the chicken is not overlapping the vegetables too heavily. Proper airflow ensures crisp skin and evenly roasted vegetables.
Step 5: Roast to Perfection
Place the sheet pan in the oven and roast for 35–45 minutes.
Halfway through cooking (around 20 minutes), toss the vegetables gently to promote even browning.
The chicken is done when:
Internal temperature reaches 165°F (74°C)
Skin is crisp and golden
Sweet potatoes are fork-tender
If needed, switch to broil for the last 2–3 minutes to crisp the chicken skin further.
Step 6: Brighten the Flavors
Remove the pan from the oven.
Squeeze fresh lemon juice over everything. The citrus brightens the smoky spice and balances the sweetness of the potatoes.
Let the dish rest for 5 minutes before serving.
Step 7: Garnish and Serve
Sprinkle freshly chopped cilantro or parsley over the top.
For a creamy contrast, serve with a dollop of plain Greek yogurt or a drizzle of yogurt mixed with lemon and a pinch of salt.
Serve directly from the pan for a rustic presentation, or plate individually with extra herbs on top.
Tips for the Best Results
Use bone-in thighs for extra flavor. They stay juicier and develop crispier skin.
Don’t skip high heat. 425°F ensures caramelization.
Cut vegetables evenly. Uniform pieces cook at the same rate.
Taste your harissa first. Some brands are spicier than others—adjust quantity accordingly.
Easy Variations
This recipe is highly adaptable:
Add zucchini or cherry tomatoes for extra color.
Swap sweet potatoes for carrots or butternut squash.
Use chicken breasts (reduce cook time slightly).
Add chickpeas for extra protein and texture.
Serve over couscous or quinoa for a heartier meal.
You can even add a drizzle of honey before roasting for a subtle sweet-spicy finish.
Storage and Meal Prep
Store leftovers in an airtight container in the refrigerator for up to 4 days.
Reheat in a 350°F oven for about 10–15 minutes to maintain crispness, or microwave for convenience.
This dish is excellent for meal prep—portion into containers with vegetables and chicken for easy lunches.
Final Thoughts
Sheet-Pan Harissa Chicken & Sweet Potatoes proves that bold, vibrant flavors don’t require complicated techniques. With just one pan and a handful of ingredients, you can create a meal that feels exciting, balanced, and deeply satisfying.
The smoky heat of harissa, the natural sweetness of roasted sweet potatoes, and the freshness of lemon and herbs come together in perfect harmony.
Preheat your oven, grab your sheet pan, and get ready for a colorful, flavor-packed dinner that’s as easy as it is impressive.