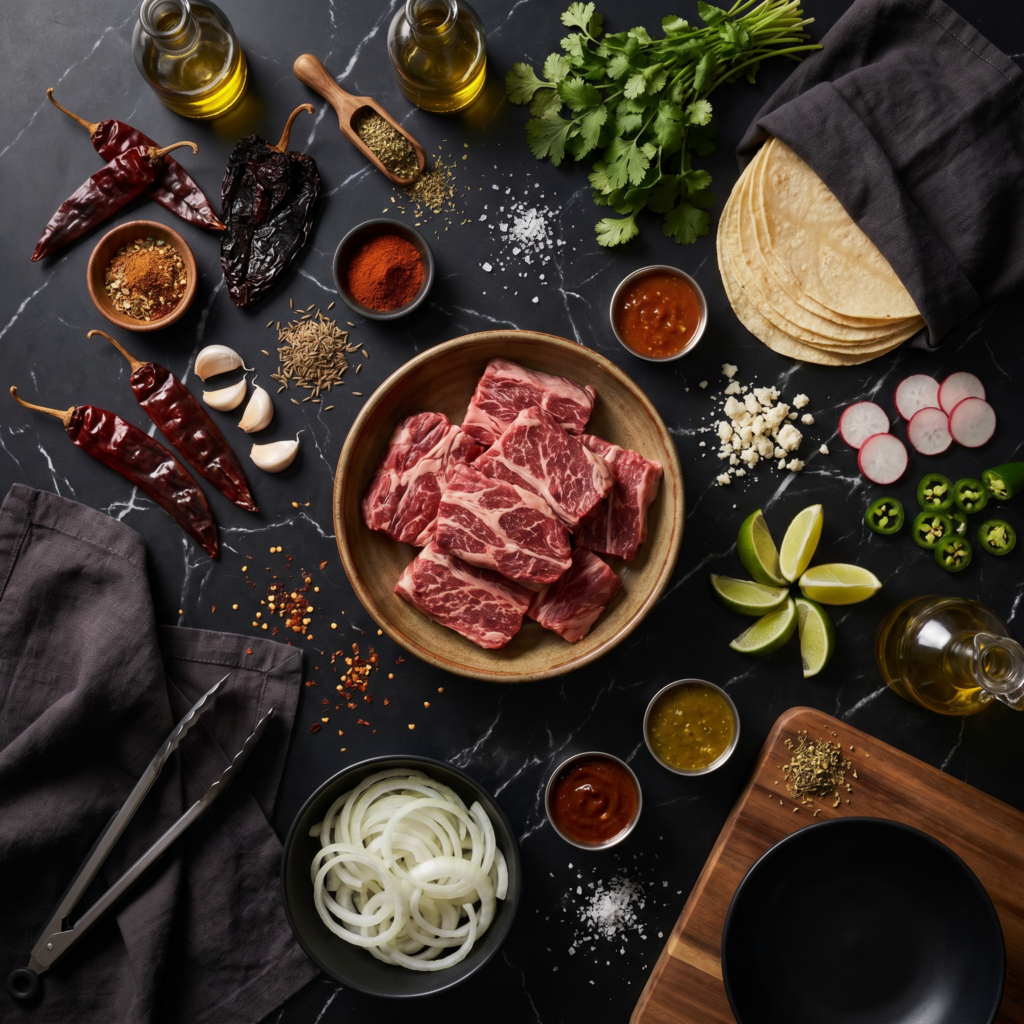
Barbacoa is beef that dreams of being pulled pork. Slow-cooked with chipotle, garlic, cumin, and cloves until it falls apart with a spoon. Stuff it into tortillas. Add onion and cilantro. This is taco heaven.
Ingredients
Serves 6-8 (makes about 20 tacos).
For the Barbacoa:
3 lbs (1.4kg) beef chuck roast, cut into large chunks
Fridge: 5 days. Freezer: 3 months (in its juices). Reheat in a skillet or microwave. Barbacoa gets even better the next day — flavors meld overnight. Make a double batch.
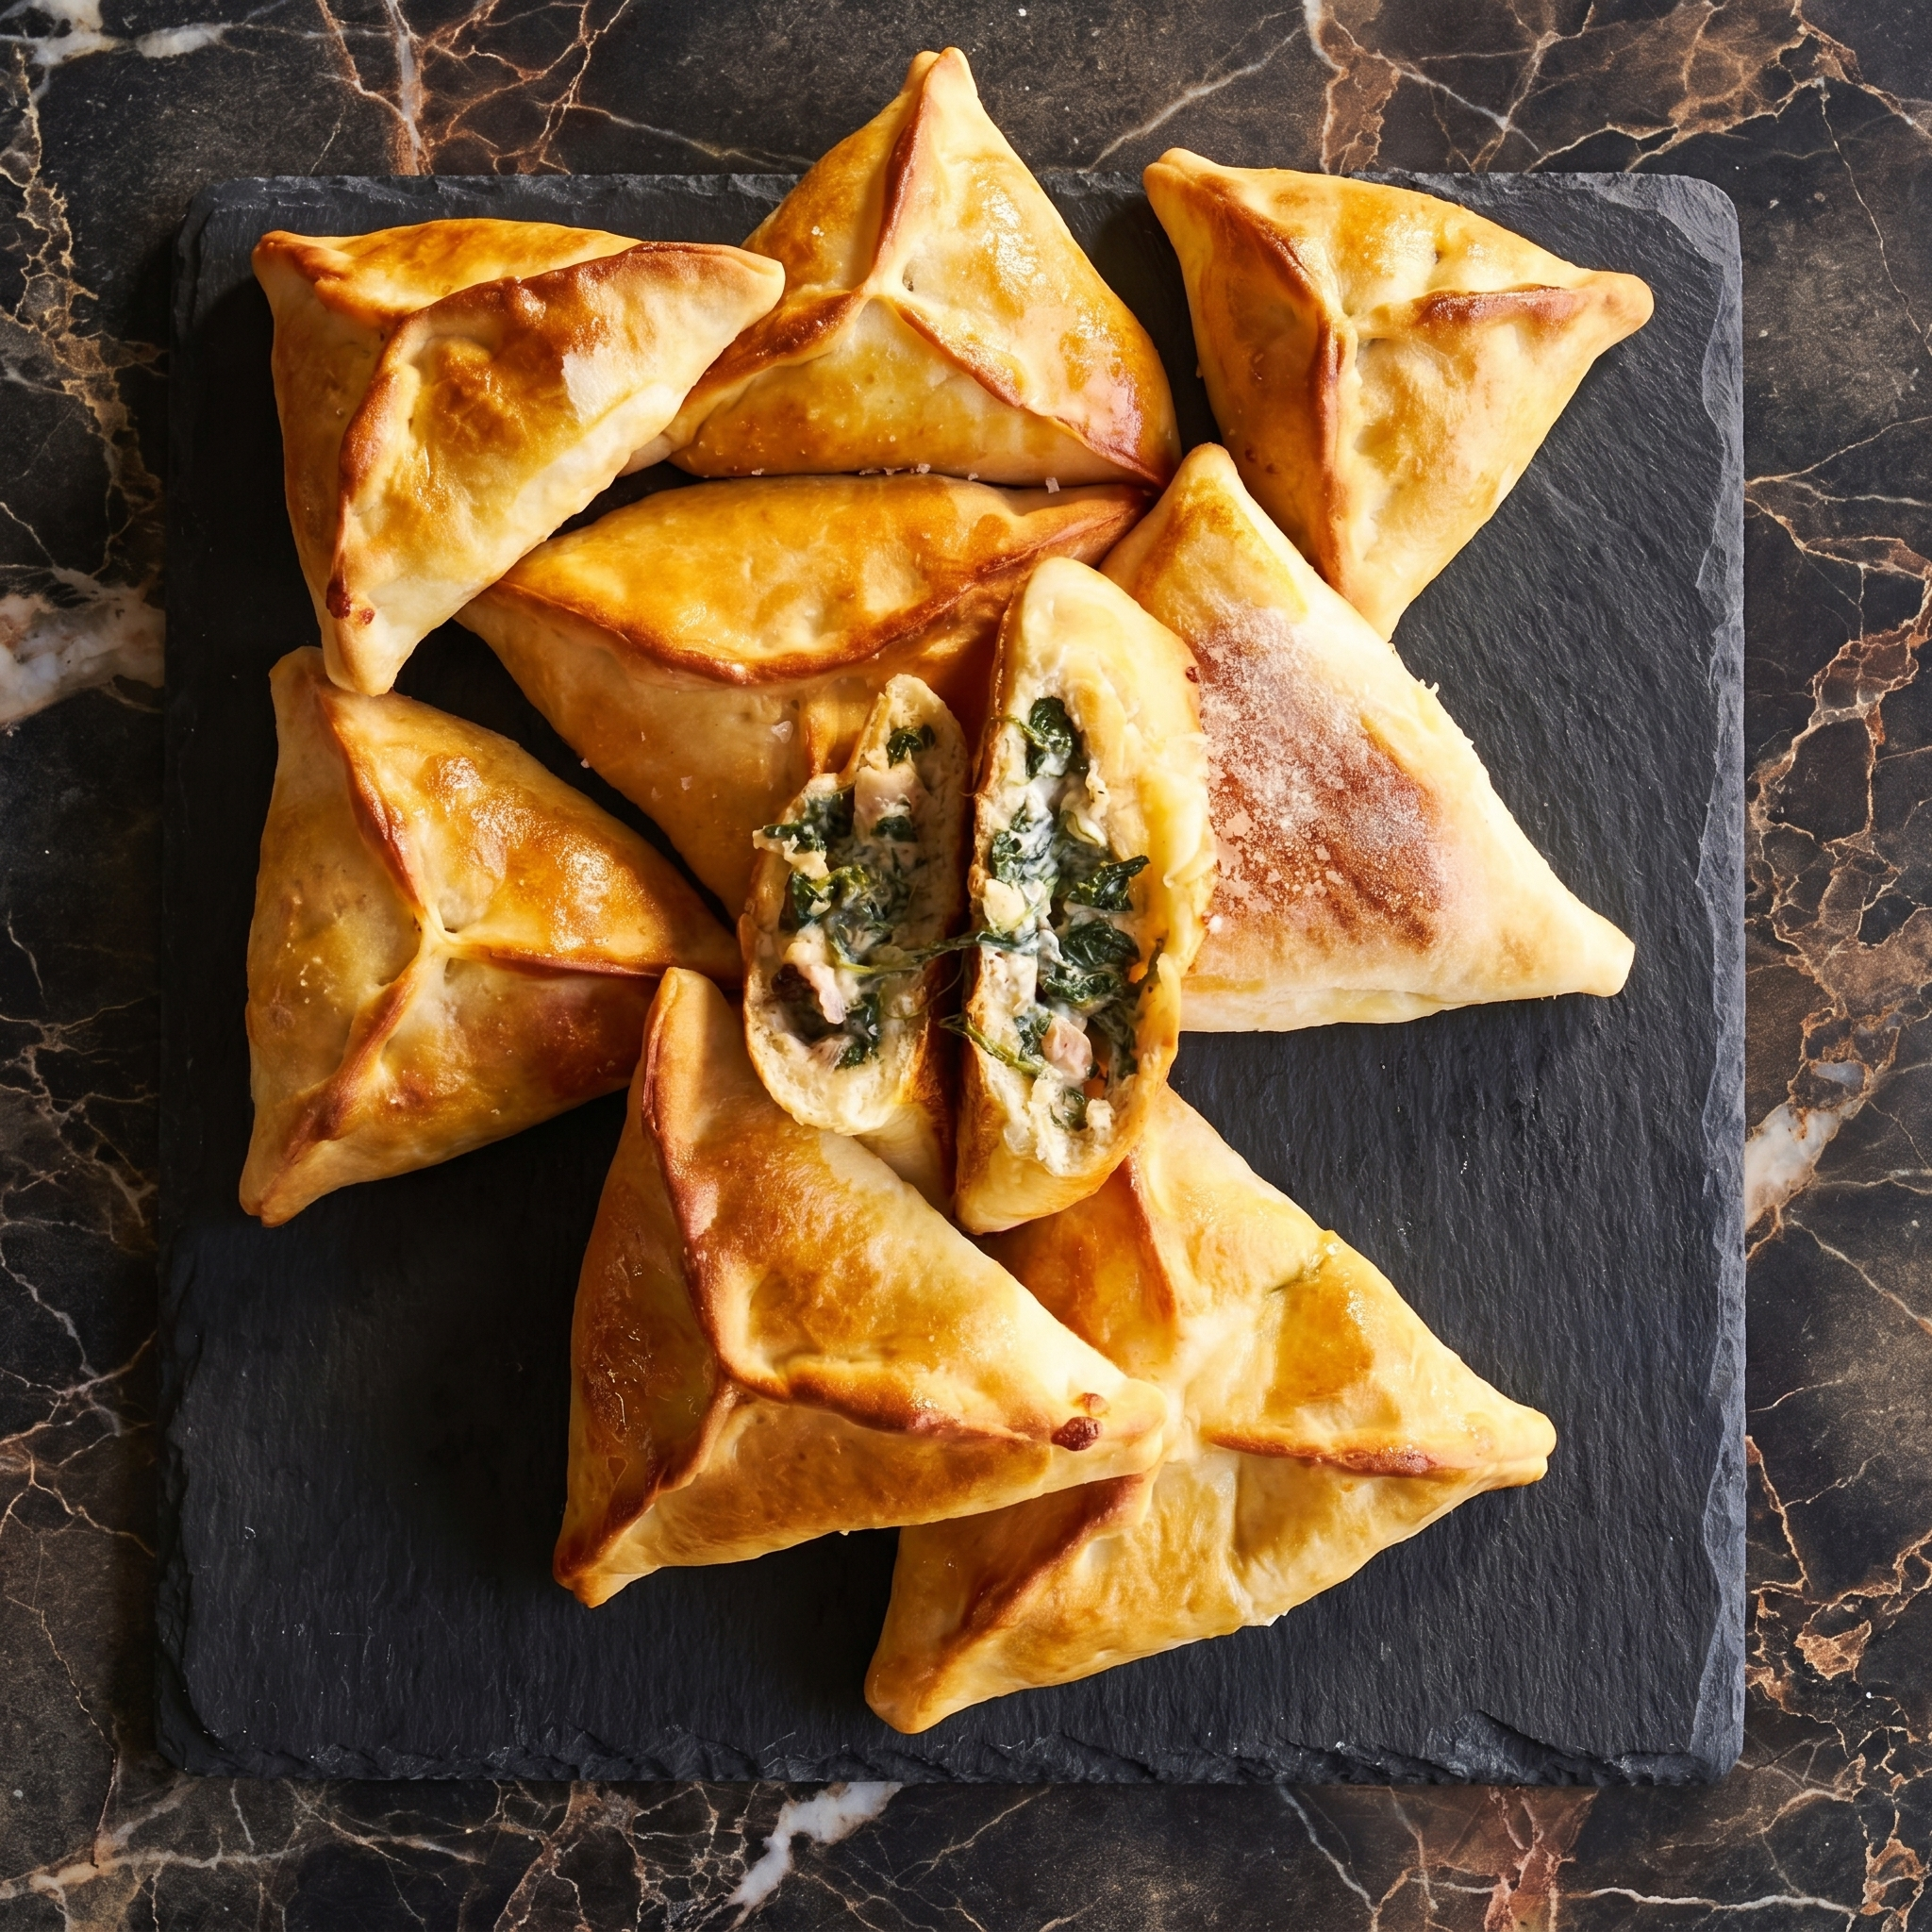
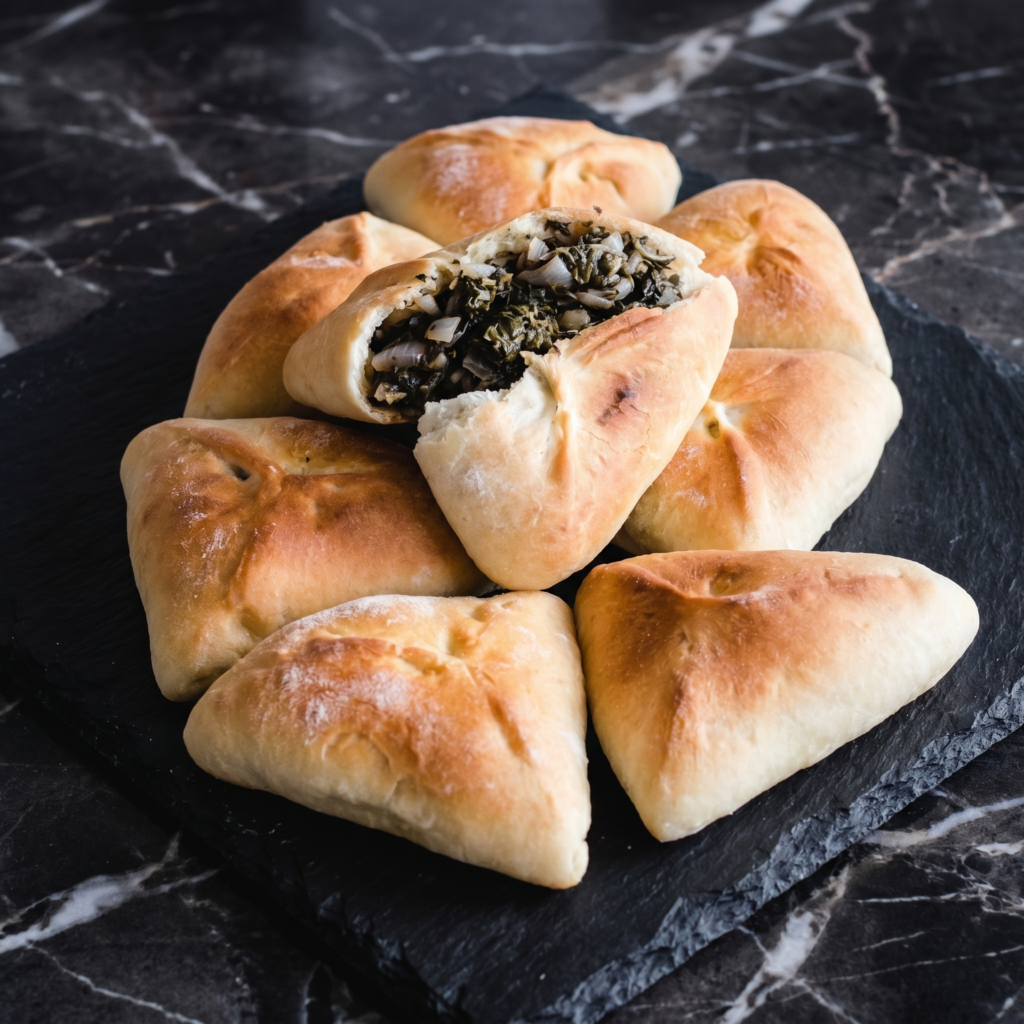
Meet the MVP of Lebanese baking: fatayer. These soft, triangular spinach pies are tangy, earthy, and impossible to stop eating. The filling is bright from lemon, warm from sumac, and the dough is pillowy perfection.
They’re wildly popular across the Middle East for good reason. Make a batch. Watch them vanish.
Ingredients
Makes 12 fatayer.
For the Dough:
3 cups (375g) all-purpose flour
1 tablespoon sugar
1 teaspoon salt
2 teaspoons instant yeast
¾ cup (180ml) warm water
¼ cup (60ml) olive oil
For the Filling:
10 oz (280g) fresh spinach, finely chopped
1 small onion, finely diced
¼ cup (60ml) lemon juice (fresh is best)
2 tablespoons sumac
2 tablespoons olive oil
½ teaspoon salt
Step-by-Step Instructions
Step 1: Make the Dough
Mix flour, sugar, salt, and yeast. Add warm water and olive oil.
Knead 8–10 minutes until smooth. Cover and let rise 1 hour.
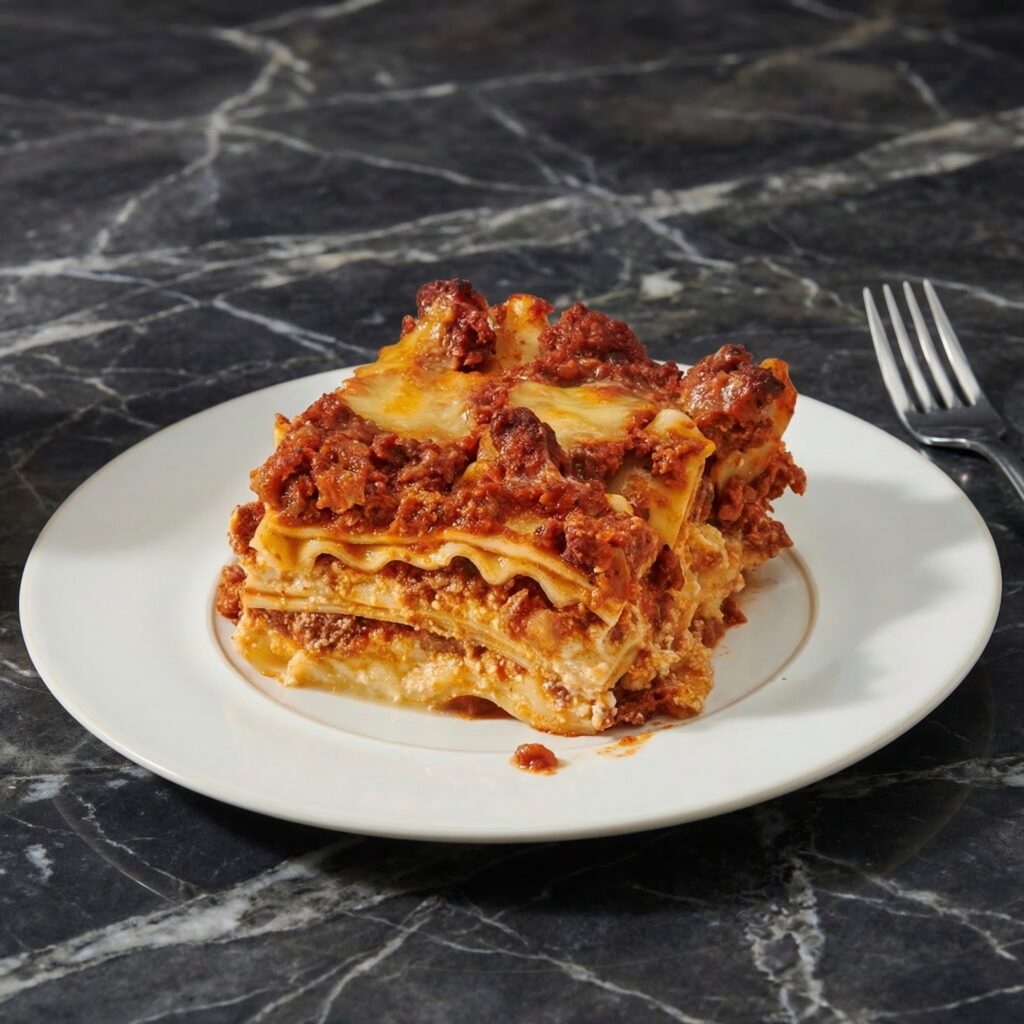
Few dishes capture the feeling of comfort and tradition quite like a classic homemade lasagna.
With layers of tender pasta, rich meat sauce, creamy cheese, and bubbling melted mozzarella, lasagna is the ultimate crowd-pleasing meal. It’s hearty, satisfying, and perfect for family dinners, holidays, or special gatherings.
Although lasagna may look complicated, it’s actually quite simple once you break the process into steps.
The key is building flavorful layers and allowing the dish to bake slowly so everything melds together beautifully. When done right, the result is a bubbling, golden masterpiece that fills the kitchen with irresistible aroma.
In this step-by-step guide, you’ll learn how to make delicious homemade lasagna from scratch, complete with tips for achieving perfect layers and rich flavor every time.
Why Lasagna Is So Loved
Lasagna is one of the most iconic Italian dishes, known for its comforting layers and deep flavor. What makes it special is the balance between three main elements: pasta, sauce, and cheese.
The pasta provides structure, the sauce delivers rich savory flavor, and the cheese adds creamy richness. When baked together, these ingredients transform into a dish that is far more than the sum of its parts.
Lasagna is also incredibly versatile. While the classic version uses meat sauce and ricotta, it can easily be adapted with vegetables, different cheeses, or even seafood.
Ingredients
To make a classic 9×13-inch pan of lasagna, you will need:
For the meat sauce:
1 pound ground beef
½ pound Italian sausage (optional but recommended)
1 small onion, diced
3 cloves garlic, minced
1 jar (24 ounces) marinara sauce
1 can (14 ounces) crushed tomatoes
1 teaspoon dried oregano
1 teaspoon dried basil
Salt and black pepper to taste
For the cheese mixture:
15 ounces ricotta cheese
1 large egg
½ cup grated Parmesan cheese
2 tablespoons chopped fresh parsley (optional)
Other ingredients:
12 lasagna noodles
2 cups shredded mozzarella cheese
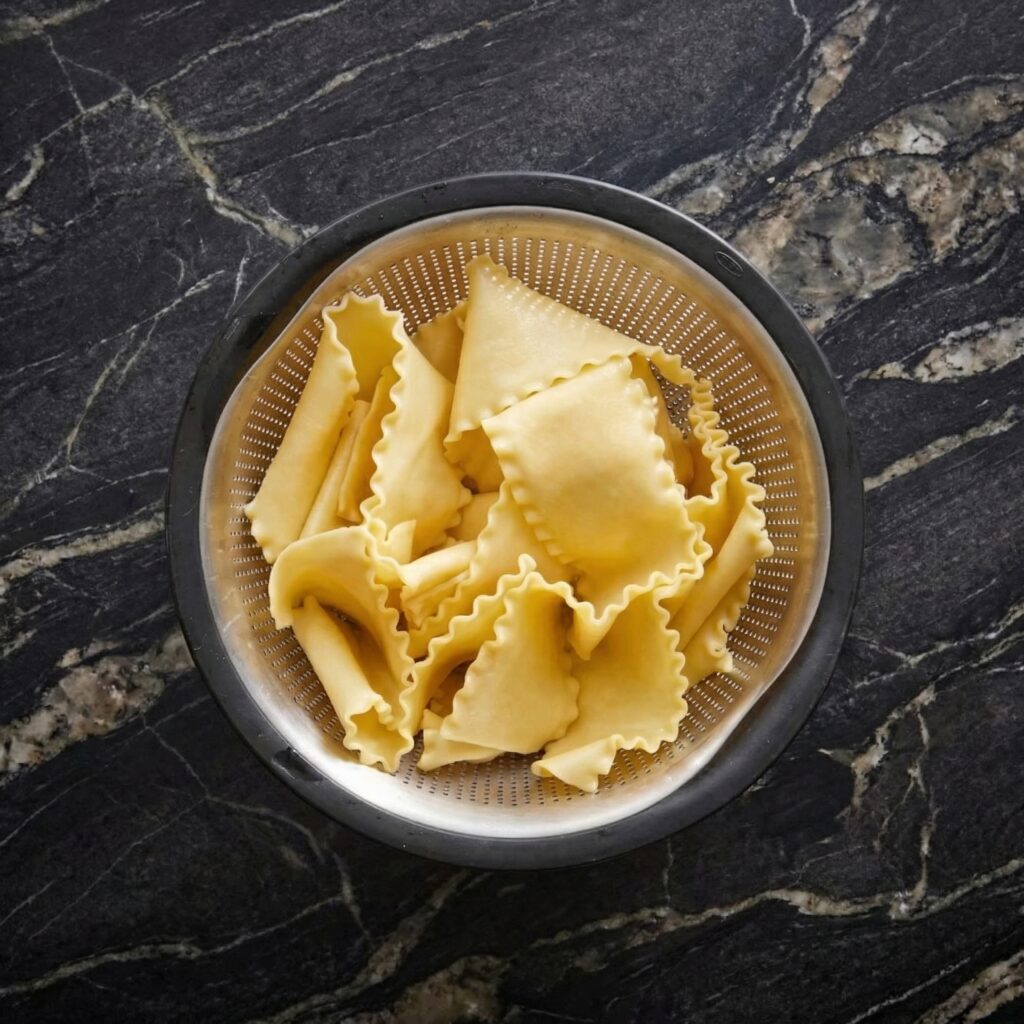
Step 1: Cook the Lasagna Noodles
Bring a large pot of salted water to a boil.
Add the lasagna noodles and cook them according to the package instructions until al dente. They should be tender but still firm enough to hold their shape.
Drain the noodles and lay them flat on a baking sheet or parchment paper to prevent sticking.
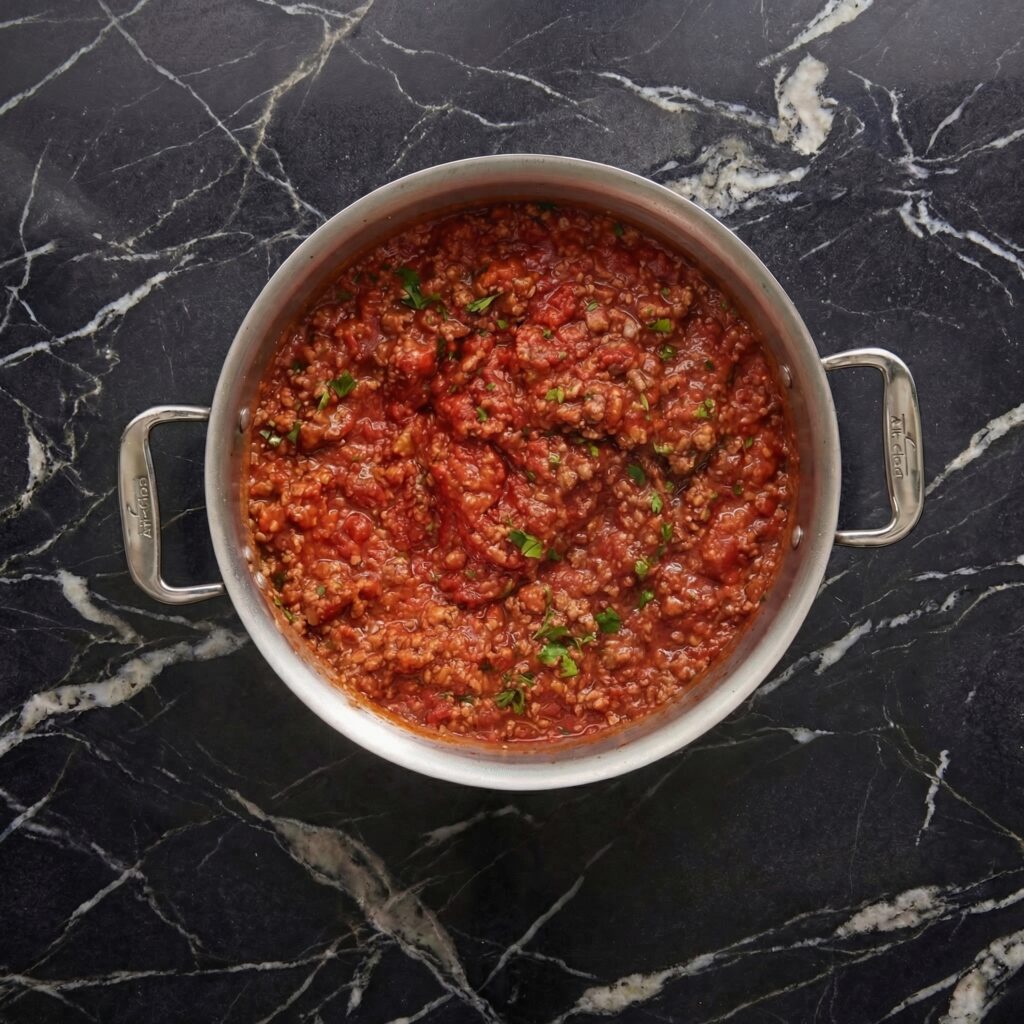
Step 2: Prepare the Meat Sauce
Heat a large skillet over medium heat.
Add the ground beef and Italian sausage, breaking them apart with a spoon as they cook. Cook until browned and no longer pink.
Add the diced onion and cook for about 3–4 minutes until softened. Then stir in the minced garlic and cook for another minute.
Step 3: Build the Sauce Flavor
Pour the marinara sauce and crushed tomatoes into the skillet with the cooked meat.
Add oregano, basil, salt, and black pepper. Stir everything together and let the sauce simmer for 10–15 minutes.
This simmering time allows the flavors to blend and develop a deeper, richer taste.
Step 4: Prepare the Ricotta Mixture
In a medium bowl, combine the ricotta cheese, egg, Parmesan cheese, and chopped parsley.
Mix until smooth and evenly combined.
This creamy mixture adds richness and helps create the signature layered texture of lasagna.
Step 5: Preheat the Oven
Preheat your oven to 375°F (190°C).
Lightly grease a 9×13-inch baking dish with cooking spray or a small amount of olive oil.
Step 6: Start the First Layer
Spread a thin layer of meat sauce across the bottom of the baking dish.
This prevents the noodles from sticking and helps distribute flavor throughout the dish.
Place three or four lasagna noodles on top of the sauce to create the first pasta layer.
Step 7: Add Cheese and Sauce
Spread about one-third of the ricotta mixture over the noodles.
Next, add a layer of meat sauce, spreading it evenly.
Sprinkle a handful of shredded mozzarella cheese over the sauce.
Step 8: Repeat the Layers
Repeat the layering process two more times.
Each layer should include noodles, ricotta mixture, meat sauce, and mozzarella cheese.
Try to spread each layer evenly so the lasagna cooks uniformly.
Step 9: Finish with Cheese
For the final layer, place the last noodles on top and cover them with the remaining meat sauce.
Finish by sprinkling the remaining mozzarella cheese across the surface.
This top layer of cheese will melt and turn golden during baking.
Step 10: Bake the Lasagna
Cover the baking dish with aluminum foil and place it in the oven.
Bake for 25 minutes, then remove the foil and bake for another 15–20 minutes until the cheese is melted and bubbly.
The top should be lightly golden and the edges should be gently bubbling.
Step 11: Let It Rest
Once baked, remove the lasagna from the oven and allow it to rest for 10–15 minutes.
This step is important because it helps the layers set, making the lasagna easier to slice and serve.
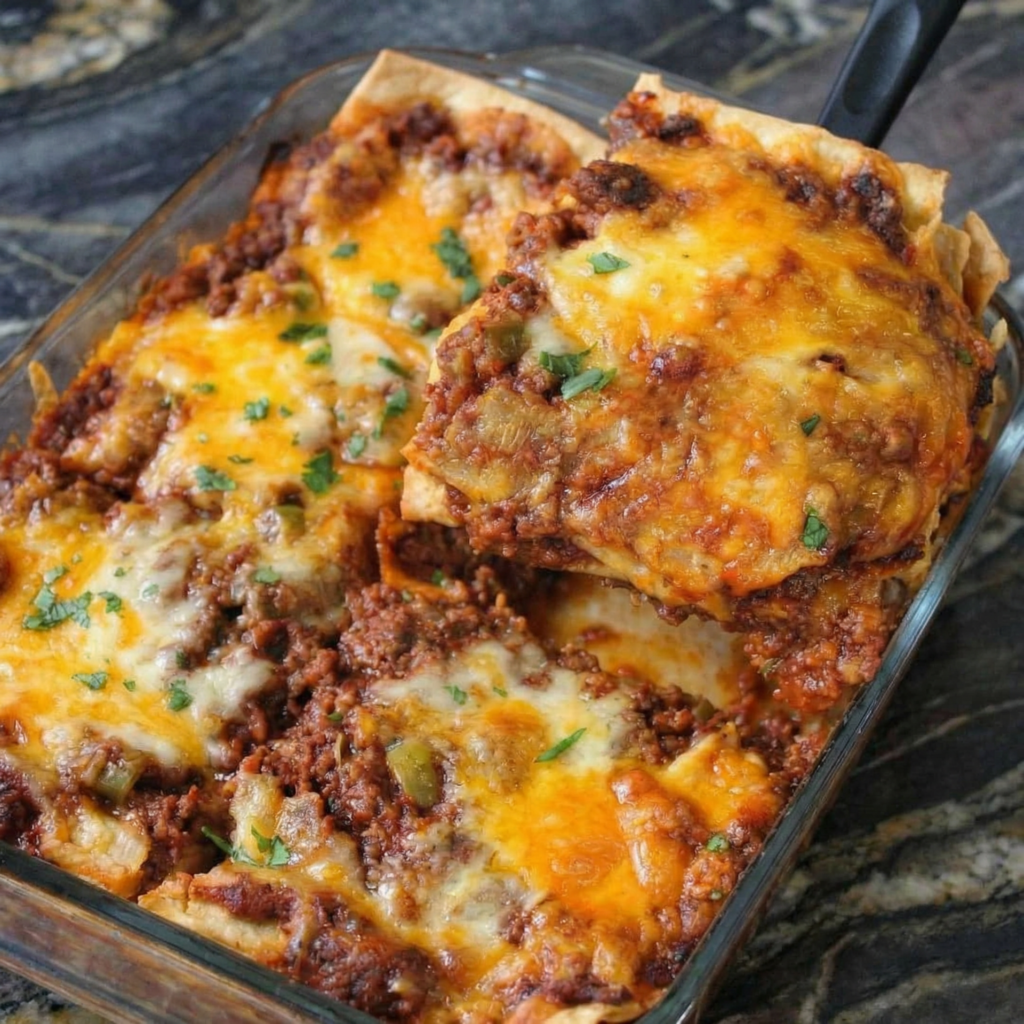
Step 12: Slice and Serve
Cut the lasagna into squares using a sharp knife or spatula.
Serve it warm and garnish with extra Parmesan cheese or fresh basil if desired.
Each slice should reveal beautiful layers of pasta, sauce, and melted cheese.
Tips for Perfect Lasagna
Don’t overcook the noodles. Slightly firm noodles hold up better during baking.
Let the sauce simmer. This step builds flavor and improves texture.
Allow resting time. Resting prevents the lasagna from falling apart when sliced.
Use good-quality cheese. Freshly grated cheese melts better and tastes richer.
Serving Suggestions
Lasagna pairs wonderfully with simple side dishes such as:
Garlic bread
Caesar salad
Roasted vegetables
A light green salad with vinaigrette
These sides balance the richness of the dish and create a complete meal.
Final Thoughts
Homemade lasagna is one of the most comforting and satisfying meals you can prepare. With its rich layers of pasta, savory meat sauce, and creamy cheese, it’s a dish that brings people together around the table.
While it takes a little time to assemble, the process is simple and the results are always worth it. Once you master this classic recipe, you’ll have a timeless dish that’s perfect for family dinners, celebrations, and leftovers that taste even better the next day.
Serve it hot, enjoy every cheesy bite, and experience the warmth of a truly classic comfort food.
If you’ve been anywhere near social media lately, you’ve seen it: the Dubai chocolate bar. That iconic combination of creamy pistachio, crispy kataifi pastry, and rich chocolate has taken the internet by storm, racking up over 127 million views on TikTok . And honestly? The hype is real.
But here’s the thing—as delicious as the original bar is, I couldn’t help but wonder: what if we gave it a fudgy foundation? Enter these Viral Dubai Chocolate Brownies. We’re starting with an ultra-rich, crackly-top brownie base, layering on that signature pistachio-kataifi filling, and sealing it all with a glossy chocolate topping. The result is a textural masterpiece: fudgy, creamy, crunchy, and silky all in one bite. Trust me, these are worth the buzz.
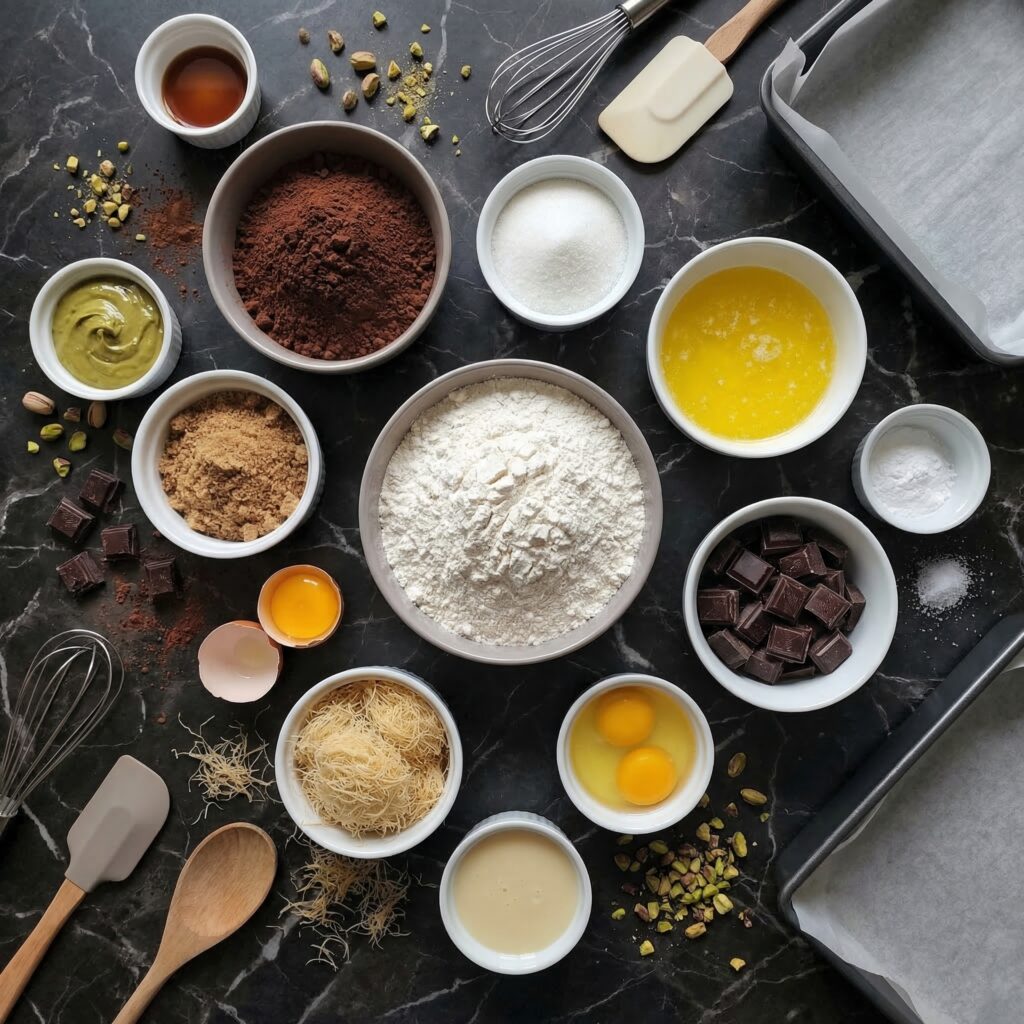
Ingredients
Yields 12-16 brownies (8×8 inch pan).
For the Fudgy Brownie Base:
½ cup (115g) unsalted butter
4 oz (115g) dark chocolate (70% cocoa), roughly chopped
⅔ cup (160g) pistachio cream (sweetened, spreadable kind)
1 tablespoon (15g) tahini
Pinch of salt
For the Chocolate Topping:
1½ cups (260g) semi-sweet chocolate chips or chopped chocolate
2 tablespoons coconut oil
Flaky sea salt, for sprinkling
Optional: extra pistachio cream for drizzling, crushed pistachios
Step-by-Step Instructions
1. Bake the Brownie Base:
Preheat your oven to 325°F (165°C). Line an 8×8 inch metal baking pan with parchment paper, leaving overhang on two sides for easy removal.
In a heatproof bowl over simmering water (double boiler method), melt together the butter and chopped dark chocolate. Stir until smooth. Remove from heat and whisk in the cocoa powder and espresso powder until fully combined. Set aside to cool slightly.
In a large bowl, beat the eggs, egg yolk, granulated sugar, powdered sugar, and vanilla extract with an electric mixer on high speed for 3-5 minutes. The mixture should become thick, pale, and fall in ribbons when the beater is lifted.
With the mixer on low, slowly stream in the warm chocolate mixture and mix until just combined.
Sift the flour, cornstarch, and salt over the batter. Gently fold with a rubber spatula until no streaks of flour remain. Do not overmix.
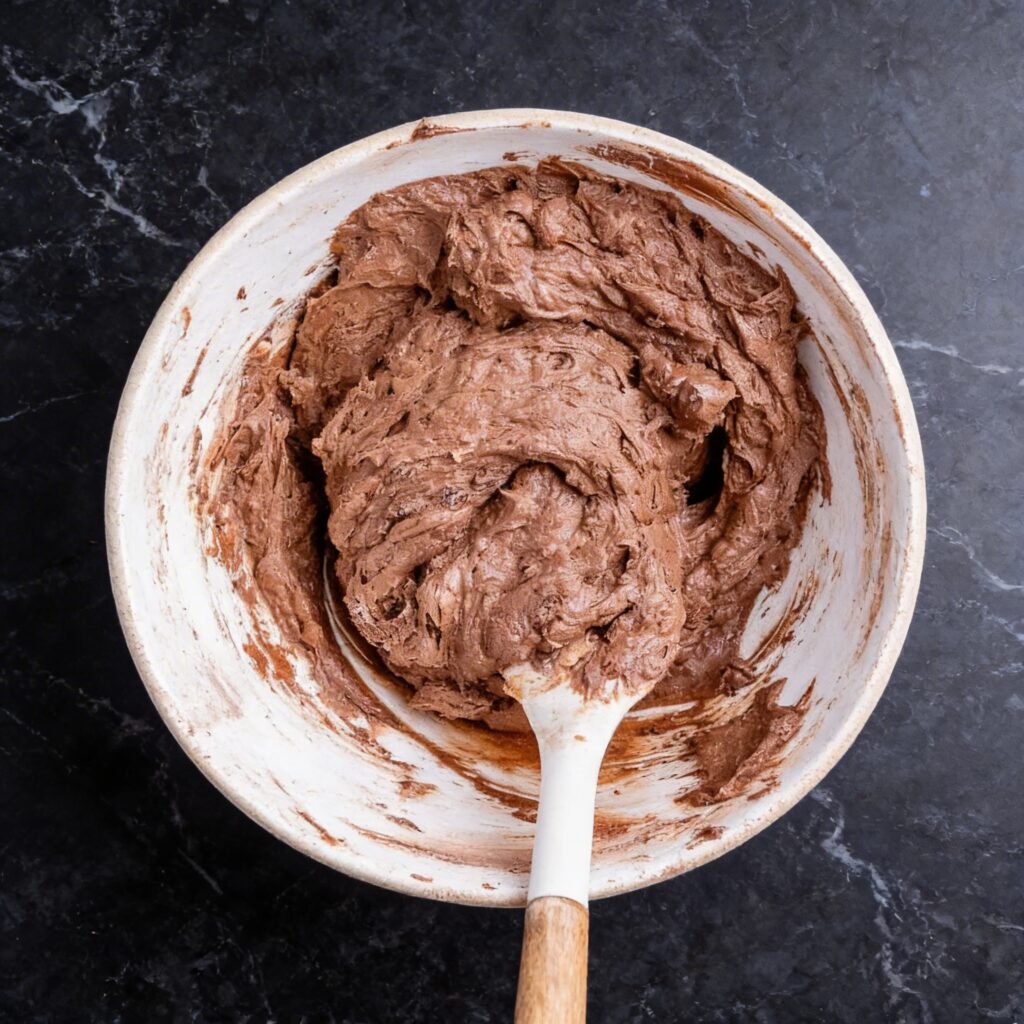
Pour the batter into the prepared pan and spread evenly. Bake for 20-25 minutes, until a toothpick inserted near the center comes out with a few moist crumbs but not wet batter.
Let the brownies cool completely in the pan on a wire rack. This is crucial—if the brownies are warm, the filling will melt into them.
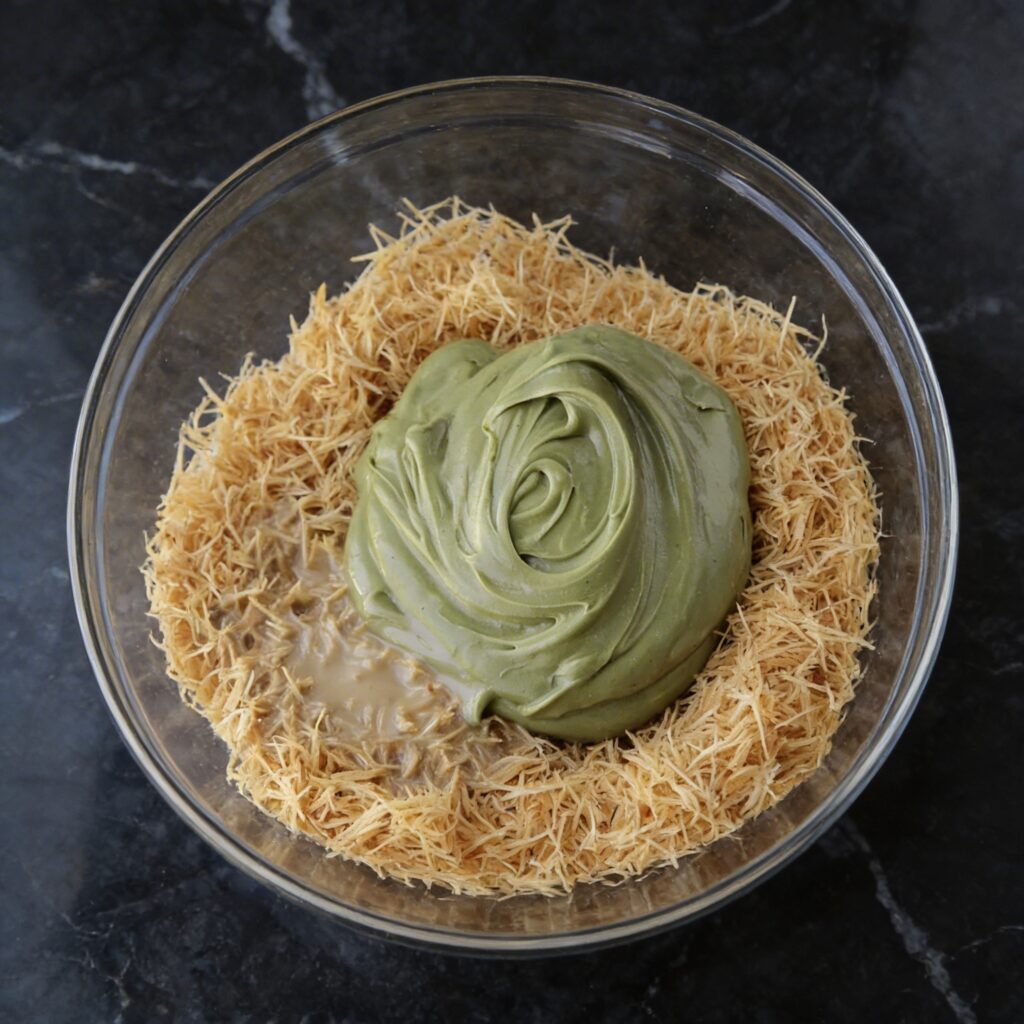
2. Make the Pistachio Kataifi Filling:
While the brownies cool, prepare the filling. Chop the kataifi pastry into small pieces (about ½ inch) so it’s easier to mix and eat.
In a large skillet over medium heat, melt the 3 tablespoons of butter. Add the chopped kataifi and toast, stirring constantly, for 8-10 minutes until it turns deep golden brown and smells nutty. Watch carefully—it goes from golden to burnt quickly!
Transfer the toasted kataifi to a medium bowl and let it cool slightly. Add the pistachio cream, tahini, and a pinch of salt. Stir until every strand is coated and the mixture is cohesive and spreadable.
3. Assemble the Layers:
Once the brownie base is completely cool, spread the pistachio kataifi mixture evenly over the top. Press it down firmly with the back of a spoon or by laying a piece of parchment paper on top and gently pressing with your hand.
In a small heatproof bowl, combine the semi-sweet chocolate chips and coconut oil. Melt gently over simmering water or in the microwave in 20-second bursts, stirring until smooth.
Pour the melted chocolate over the pistachio layer. Tilt the pan or use a spatula to spread it into an even, thin layer.
Sprinkle immediately with flaky sea salt. If desired, drizzle extra pistachio cream over the top and swirl gently with a toothpick for a decorative finish.
4. Chill and Slice:
Refrigerate the assembled brownies for at least 2 hours, or until the chocolate topping is completely set.
To slice, let the pan sit at room temperature for 10-15 minutes. Use the parchment overhang to lift the whole block onto a cutting board. For clean, Instagram-worthy edges, dip a sharp knife in hot water and wipe it dry between each cut.
Serve slightly chilled or at room temperature. Store leftovers in an airtight container in the refrigerator.
Store Dubai chocolate brownies in an airtight container in the refrigerator for up to one week. The layers actually set better over time, making them even more delicious the next day! For the best texture, let them sit at room temperature for 10-15 minutes before serving.
Can You Freeze Them?
Absolutely! These freeze beautifully. Wrap the whole slab or individual slices tightly in plastic wrap, then place in a freezer-safe container. Freeze for up to 3 months. Thaw overnight in the refrigerator.
Make-Ahead for Parties:
This is the perfect dessert to make a day ahead. The layers need time to set properly anyway, so prepare them the day before your event and simply slice before serving.
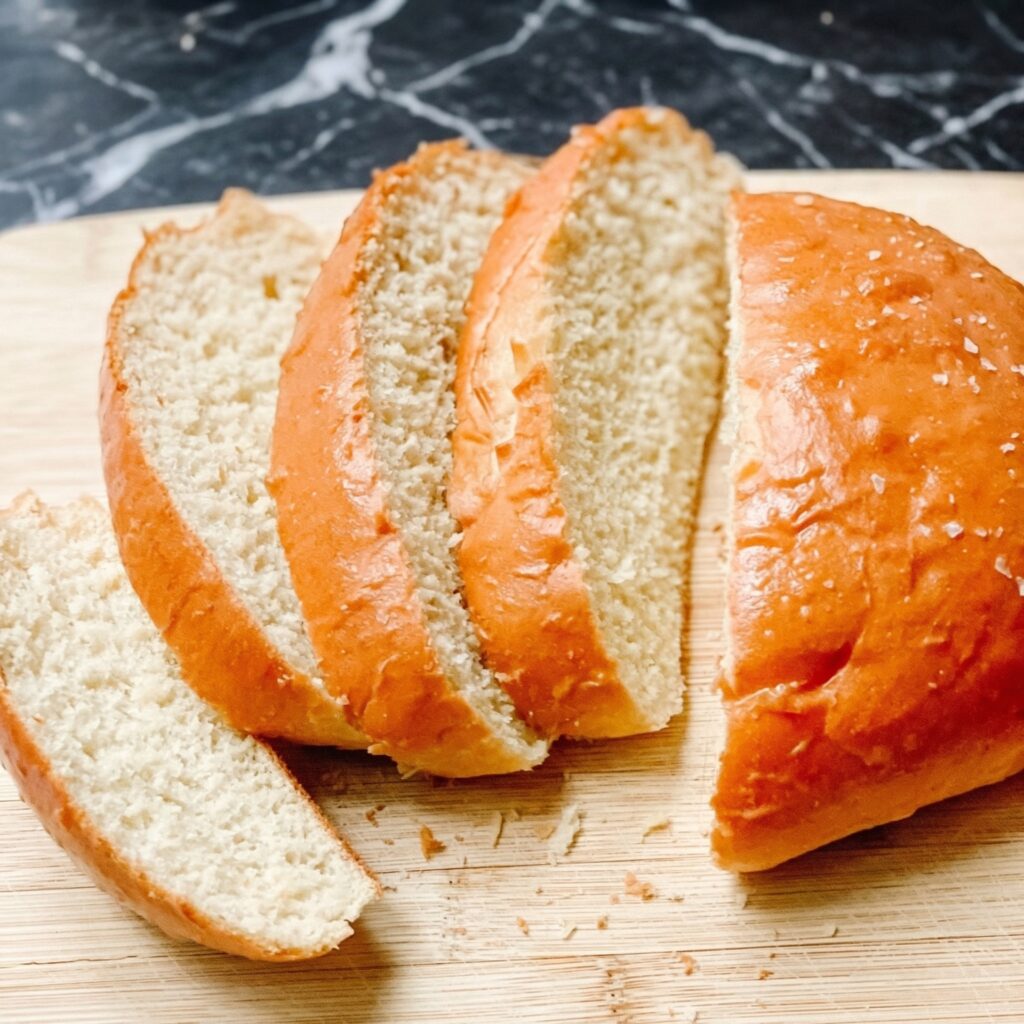
There are few things in life as comforting as the smell of freshly baked bread filling your kitchen. For years, I thought making bread from scratch required a mysterious set of skills, a million steps, and a lot of muscle power. Then I discovered no-knead peasant bread, and everything changed.
This recipe is pure magic. With just 4 simple ingredients and about 5 minutes of active work, you can create a loaf that looks and tastes like it came from a rustic French bakery. The crust is golden and buttery, the inside is soft and airy, and the flavor is pure, honest bread. Whether you’re a complete beginner or a seasoned baker looking for an easy weeknight loaf, this peasant bread will become your new obsession.
Ingredients
Makes 1 loaf (bakes in a 1.5 quart oven-safe dish or 9-inch round cake pan).
2 ¼ teaspoons (one ¼-ounce packet) active dry or instant yeast
2 cups (470ml) warm water (about 105-115°F)
For Finishing:
1-2 tablespoons melted butter (for brushing the top after baking)
Optional: Flaky sea salt, herbs, or garlic powder for topping
Step-by-Step Instructions
1. Mix the Dough:
In a large mixing bowl, whisk together the flour, salt, sugar, and yeast until well combined.
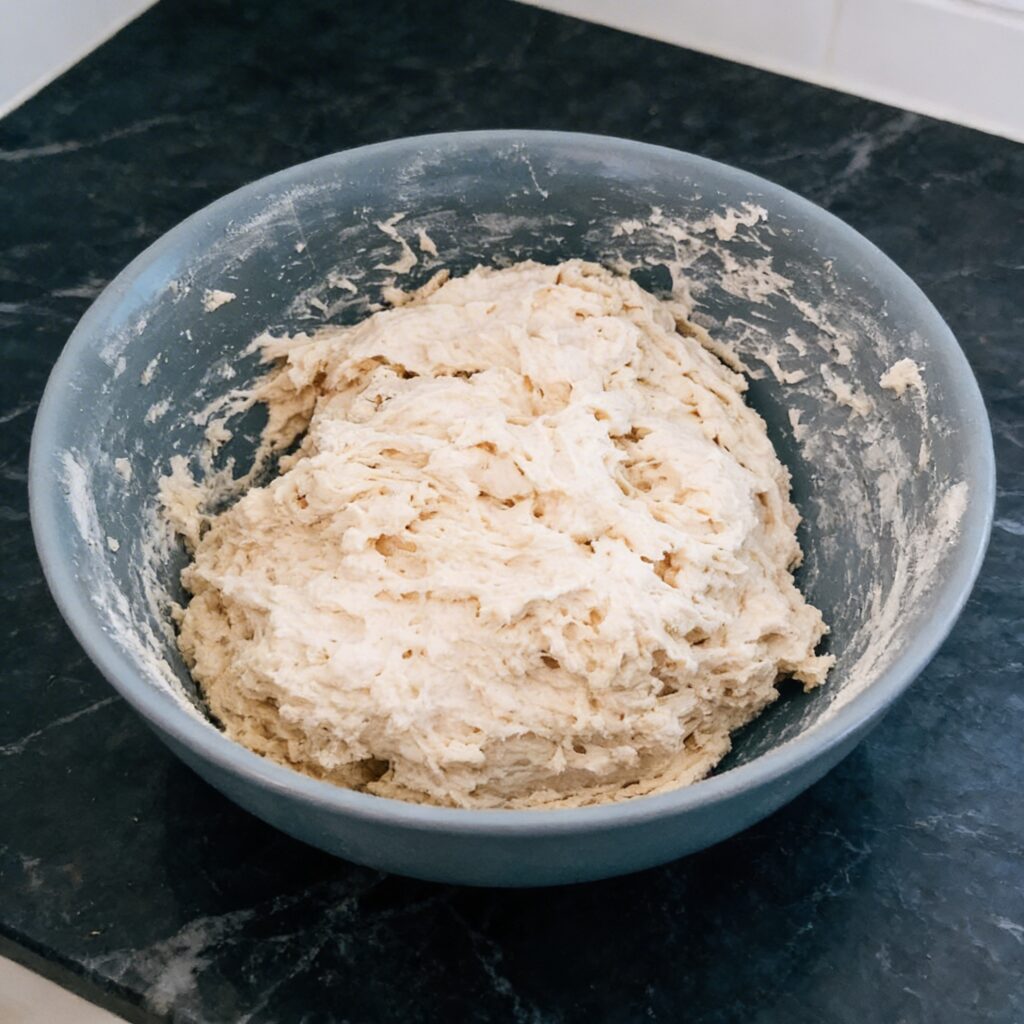
Pour in the warm water and stir with a wooden spoon or a rubber spatula until a shaggy, sticky dough forms. There should be no dry patches of flour remaining. The dough will look rough and messy—this is exactly what you want!
Scrape down the sides of the bowl and cover tightly with plastic wrap or a clean kitchen towel.
2. First Rise (Let Time Do the Work):
Let the dough sit at room temperature for 1.5 to 2 hours. It should double in size and become bubbly and dotted with fermentation bubbles on the surface.
If you’re not ready to bake, you can refrigerate the dough at this point for up to 24 hours. Just punch it down, cover, and pop it in the fridge.
3. Second Rise in the Pan:
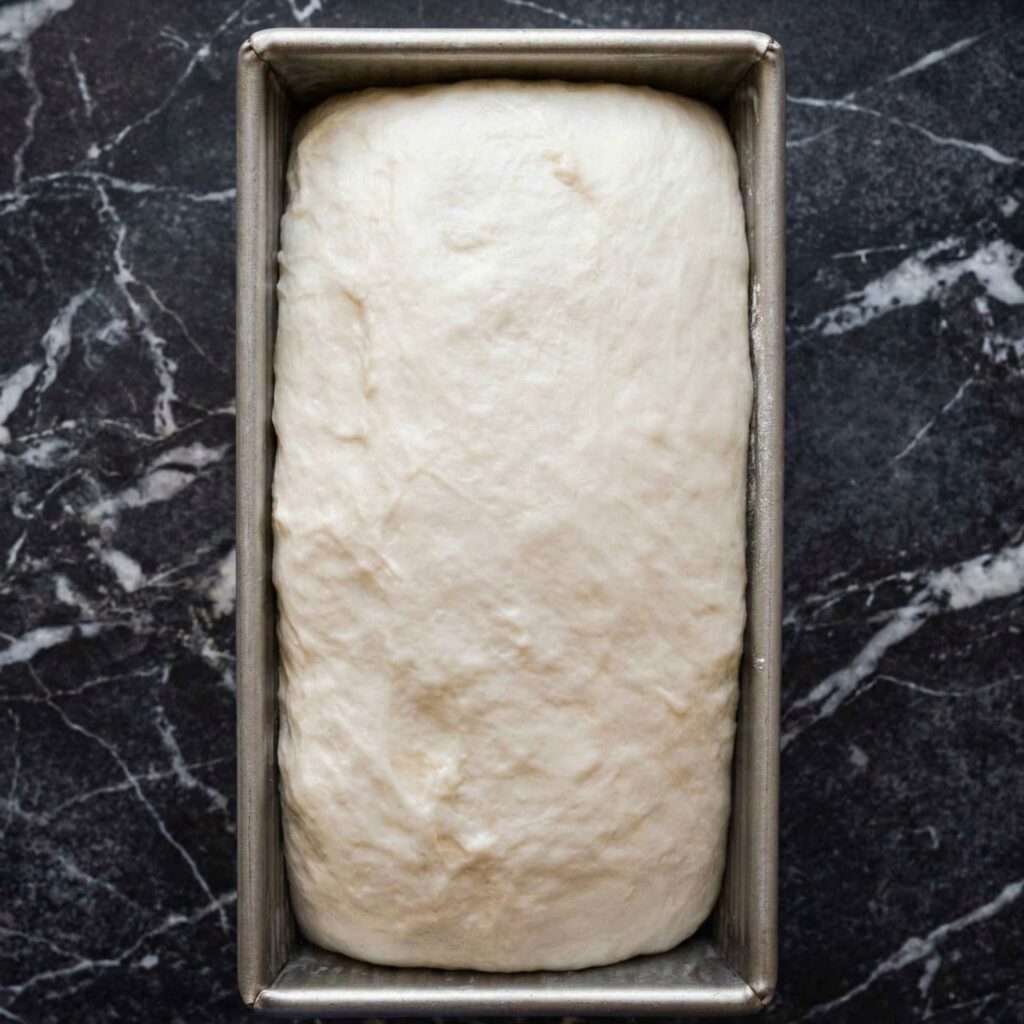
Generously butter a 1.5-quart oven-safe baking dish (like a Pyrex casserole dish) or a 9-inch round cake pan. You can also use a standard loaf pan, but the shape will be different.
Using a spatula or your lightly floured hands, scrape the dough out of the bowl and gently fold it over on itself a few times to deflate it slightly.
Transfer the dough to the prepared pan. It will be very soft and sticky. Don’t worry about shaping it perfectly—just plop it in.
Cover the pan loosely with oiled plastic wrap or a kitchen towel and let it rise for another 30-60 minutes, until the dough has risen noticeably and looks puffy. It should just about reach the top of the pan.
4. Preheat and Bake:
About 20 minutes before the second rise is complete, preheat your oven to 425°F (220°C). Position a rack in the middle.
If desired, you can brush the top of the dough very gently with a little water or oil and sprinkle with flaky salt, herbs, or everything bagel seasoning.
Bake for 30-35 minutes, until the top is deeply golden brown and the loaf sounds hollow when tapped.
If the top is browning too quickly, tent loosely with foil for the last 10 minutes.
5. The Butter Bath (Optional but Essential!):
As soon as the bread comes out of the oven, brush the top generously with melted butter. This creates a soft, flavorful crust that’s absolutely irresistible.
Let the bread cool in the pan for 10 minutes, then carefully turn it out onto a wire rack to cool completely. I know it’s tempting, but try to wait at least 30 minutes before slicing so the interior sets properly!
Baker’s Tips for Perfect Peasant Bread
Water Temperature Matters: The water should feel like warm bath water (105-115°F). Too hot will kill the yeast; too cold won’t activate it properly. If you’re using instant yeast, you can use slightly cooler water since it doesn’t need to “bloom.”
Don’t Skip the Butter: Brushing the hot loaf with melted butter is the secret to that soft, glossy, flavorful crust. It takes the bread from good to unforgettable.
Use a Food Scale for Best Results: Flour can vary wildly in volume depending on how you scoop it. For consistent results, weigh your flour: 500 grams is the sweet spot.
The Dough is Supposed to Be Sticky: Don’t be tempted to add more flour! A wet, sticky dough is what creates the open, airy crumb structure. Resist the urge.
Oven-Safe Dish: Make sure your baking dish is oven-safe up to 425°F. Glass, ceramic, and stoneware all work beautifully. Metal pans work too but may brown the crust faster.
Store peasant bread wrapped tightly in plastic wrap or in an airtight container at room temperature for up to 3 days. The crust will soften slightly, but it’s still delicious.
Can You Freeze It?
Absolutely! This bread freezes beautifully. Let the loaf cool completely, then wrap tightly in plastic wrap and place in a freezer bag. Freeze for up to 3 months. Thaw at room temperature and refresh in a 350°F oven for 5-10 minutes to crisp up the crust.
Make-Ahead Option:
The dough can be refrigerated after the first rise for up to 24 hours. When you’re ready to bake, simply proceed with the second rise in the pan—it may take a little longer since the dough is cold.
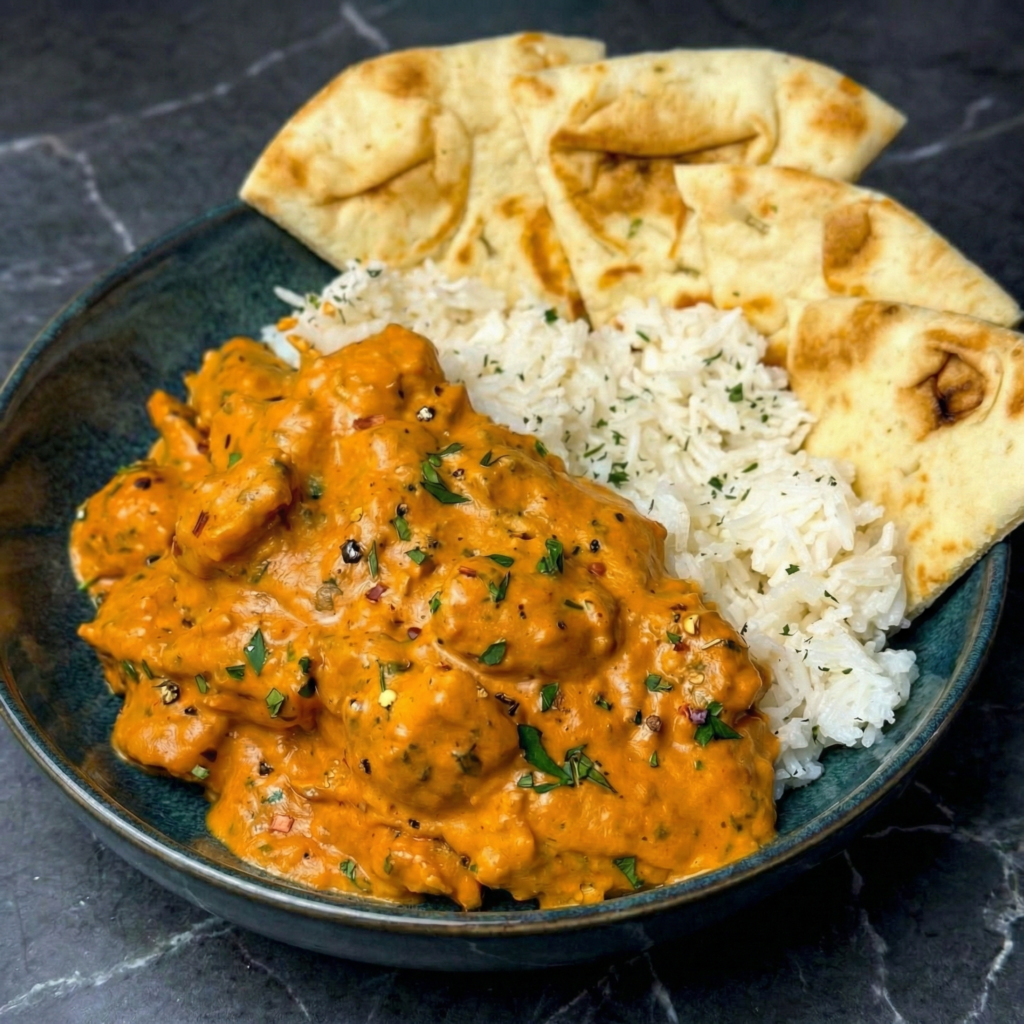
Few dishes capture the essence of Indian cuisine quite like Butter Chicken. Rich, creamy, and lightly spiced, it’s a crowd-pleaser that transforms simple ingredients into a luxurious meal.
Perfect over rice, with naan, or even paired with roasted vegetables, Butter Chicken offers a comforting combination of tender chicken, buttery tomato sauce, and aromatic spices. Making it at home is easier than you think, and the flavors are far more vibrant than most store-bought versions.
This step-by-step guide will help you craft restaurant-quality Butter Chicken from scratch.
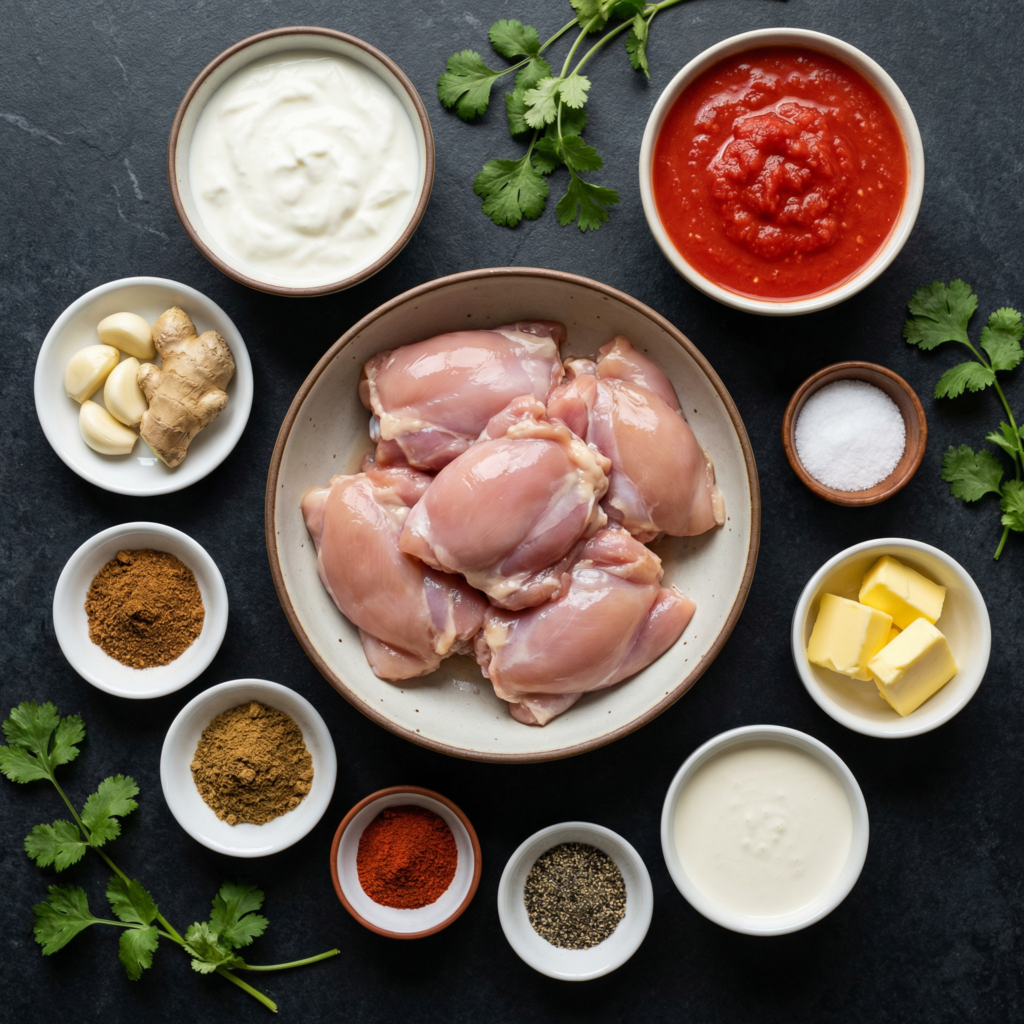
Ingredients
For the chicken marinade:
1 ½ pounds boneless, skinless chicken thighs or breasts, cut into bite-sized pieces
¾ cup plain yogurt
1 tablespoon lemon juice
2 teaspoons garam masala
1 teaspoon turmeric
1 teaspoon ground cumin
1 teaspoon chili powder or paprika
1 teaspoon salt
2 cloves garlic, minced
1-inch piece of ginger, grated
For the sauce:
3 tablespoons unsalted butter
1 tablespoon vegetable oil
1 medium onion, finely chopped
3 cloves garlic, minced
1-inch piece ginger, grated
1 ½ teaspoons garam masala
1 teaspoon ground cumin
1 teaspoon ground coriander
½ teaspoon chili powder (adjust to taste)
1 (14-ounce) can crushed tomatoes
1 cup heavy cream or coconut cream
Salt to taste
Fresh cilantro, chopped, for garnish
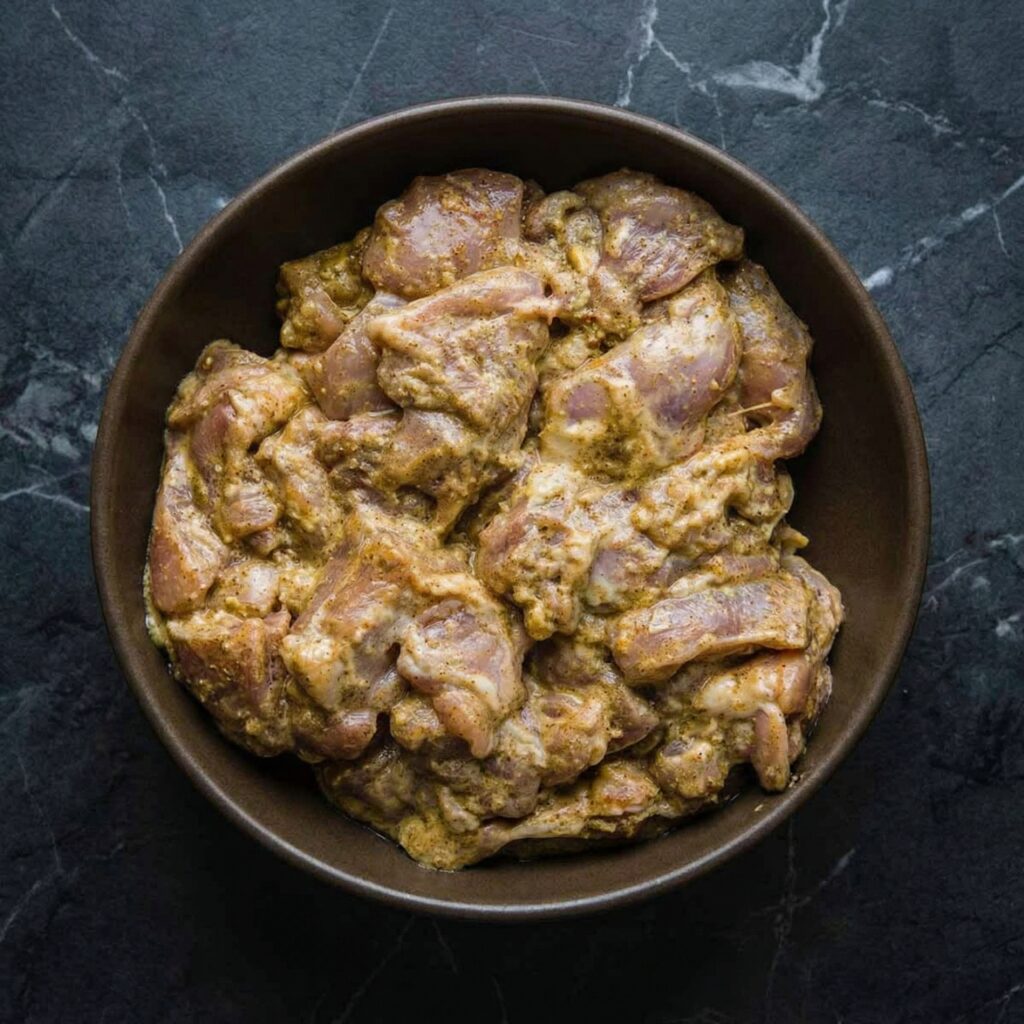
Step 1: Marinate the Chicken
Combine yogurt, lemon juice, garlic, ginger, garam masala, turmeric, cumin, chili powder, and salt in a bowl.
Add the chicken pieces and stir until evenly coated. Cover and refrigerate for at least 1 hour, ideally 4–6 hours, or overnight for maximum flavor.
The yogurt tenderizes the chicken while the spices infuse it with deep flavor, setting the foundation for an irresistible dish.
Step 2: Cook the Chicken
Heat a large skillet or sauté pan over medium-high heat. Add 1 tablespoon of butter and 1 tablespoon of oil.
Remove the chicken from the marinade, letting excess drip off, and sear in batches. Cook for 2–3 minutes per side until lightly golden and just cooked through. The chicken will finish cooking in the sauce, so don’t overcook. Transfer the chicken to a plate and set aside.
Step 3: Build the Sauce
In the same pan, add the remaining 2 tablespoons of butter. Sauté the onions over medium heat for 5–6 minutes until softened and slightly caramelized.
Add garlic and ginger, cooking for 30 seconds until fragrant. Stir in garam masala, cumin, coriander, and chili powder. Toast the spices gently for about 1 minute to release their aroma.
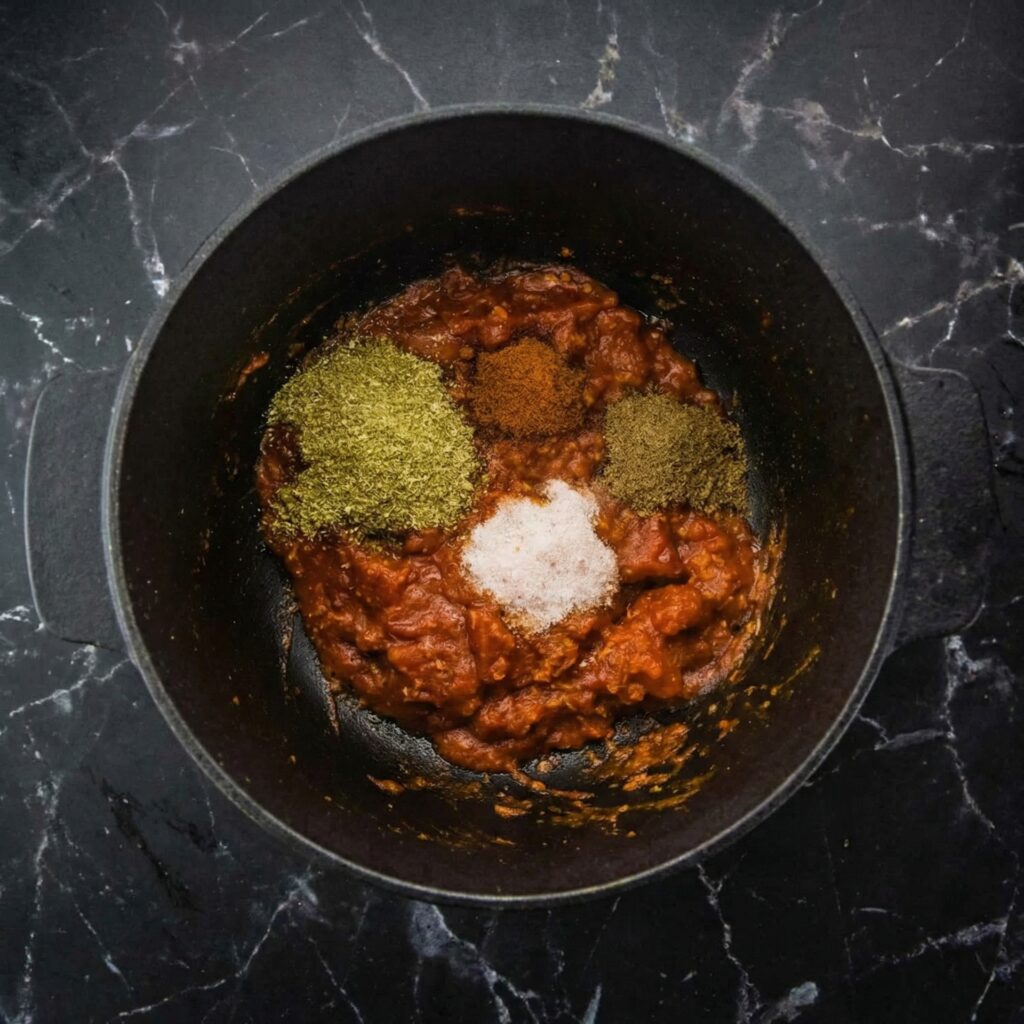
Step 4: Add the Tomatoes
Pour in the crushed tomatoes, stirring to combine with the spices. Simmer over low-medium heat for 10–12 minutes until the sauce thickens slightly and deepens in color.
This step allows the acidity of the tomatoes to mellow and the spices to fully infuse, creating a rich, balanced base.
Step 5: Incorporate the Cream
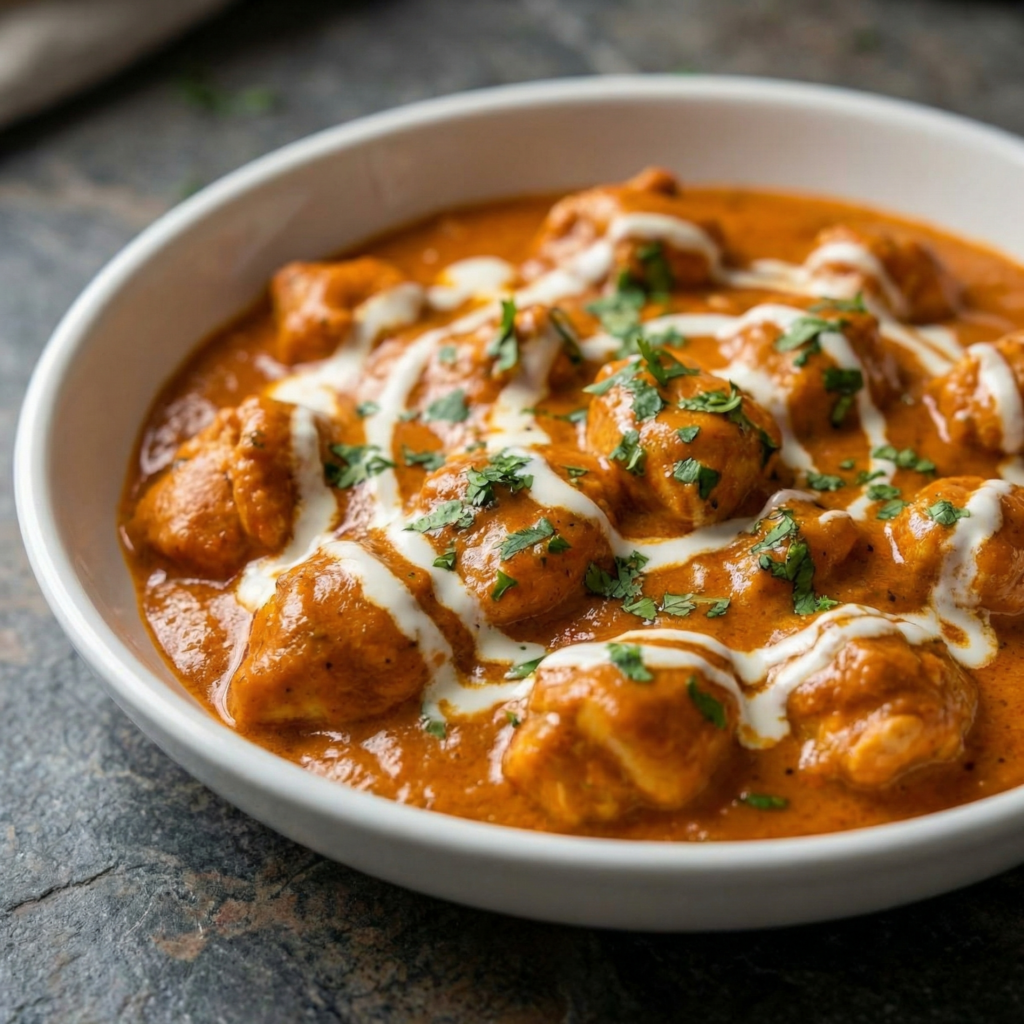
Reduce heat to low and slowly stir in the cream. Mix until fully incorporated, creating a silky, luxurious sauce. Taste and adjust salt and spice as needed.
Cream balances the heat and acidity, producing the signature smoothness that Butter Chicken is known for.
Step 6: Return Chicken to the Sauce
Add the cooked chicken pieces back into the pan. Stir gently to coat with the sauce. Simmer for 5–7 minutes to let the chicken absorb the flavors and ensure it’s heated through.
For added richness, stir in an extra tablespoon of butter just before serving.
Step 7: Garnish and Serve
Sprinkle freshly chopped cilantro over the top and add a drizzle of cream if desired. Serve immediately with basmati rice, naan bread, or steamed vegetables.
The contrast of the tender chicken and creamy, spiced sauce is simply irresistible.
Tips for Perfect Butter Chicken
Marinate overnight: The longer the chicken marinates, the more tender and flavorful it becomes.
Use chicken thighs: Thighs remain juicier than breasts and absorb the sauce beautifully.
Balance spices: Adjust chili and garam masala to taste. Start mild and build heat gradually.
Cream alternatives: Coconut cream can be used for a dairy-free version while adding subtle sweetness.
Avoid overcooking chicken: It will continue cooking in the sauce; overcooked chicken becomes dry.
Why This Recipe Works
The magic of Butter Chicken lies in layering flavors: tender, marinated chicken, aromatic spices, a rich tomato base, and cream for silkiness. Each element enhances the others, creating a harmonious balance of heat, sweetness, and umami.
This technique is also versatile. You can double the sauce for a larger batch, add roasted vegetables, or even make a lighter version using yogurt instead of cream.
Meal Prep and Storage
Butter Chicken stores well in the refrigerator for up to 3 days. Allow the sauce and chicken to cool completely before transferring to an airtight container. Reheat gently over medium-low heat, stirring occasionally.
For freezing, portion into meal-sized containers and store for up to 2 months. Thaw overnight in the refrigerator and reheat carefully to preserve texture and flavor.
Optional Variations
Smoky Butter Chicken: Add 1 teaspoon smoked paprika or finish with a splash of smoked chili oil.
Nutty Twist: Stir in 1–2 tablespoons of ground cashews or almond butter to enrich the sauce.
Vegetable Butter Chicken: Include cauliflower, bell peppers, or peas for a veggie-packed meal.
Final Thoughts
Homemade Butter Chicken proves that complex, restaurant-quality flavors can be achieved in a simple, approachable way. With marinated chicken, rich tomato cream sauce, and aromatic spices, this dish delivers comfort, elegance, and warmth in every bite.
Perfect for weeknight dinners, special occasions, or cozy weekend meals, it’s destined to become a staple in your culinary repertoire.
The tender chicken, luscious sauce, and fresh garnish come together to create a meal that’s deeply satisfying and unforgettable—proof that comfort food can also be sophisticated.