Author: user

  • Banh Xeo (Vietnamese Sizzling Crepes Worth the Hype)

    Banh Xeo (Vietnamese Sizzling Crepes Worth the Hype)

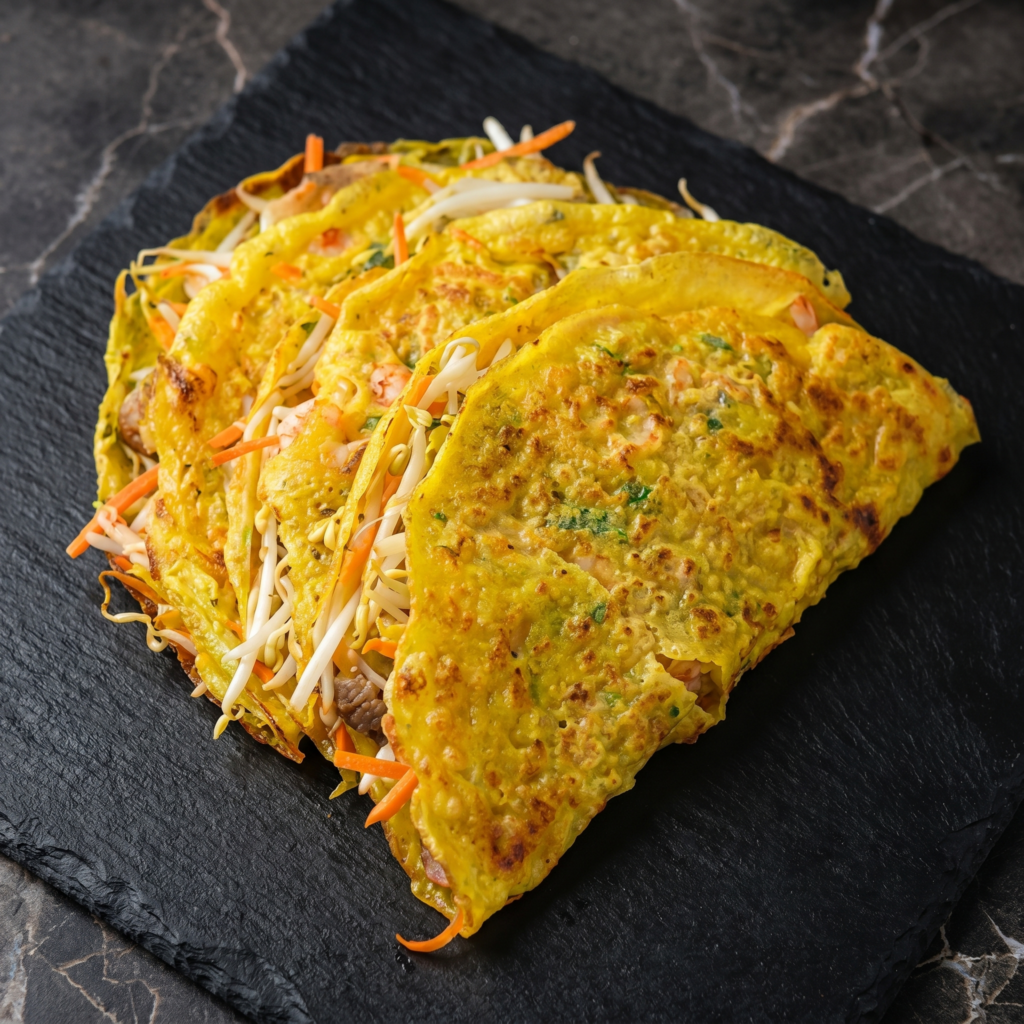
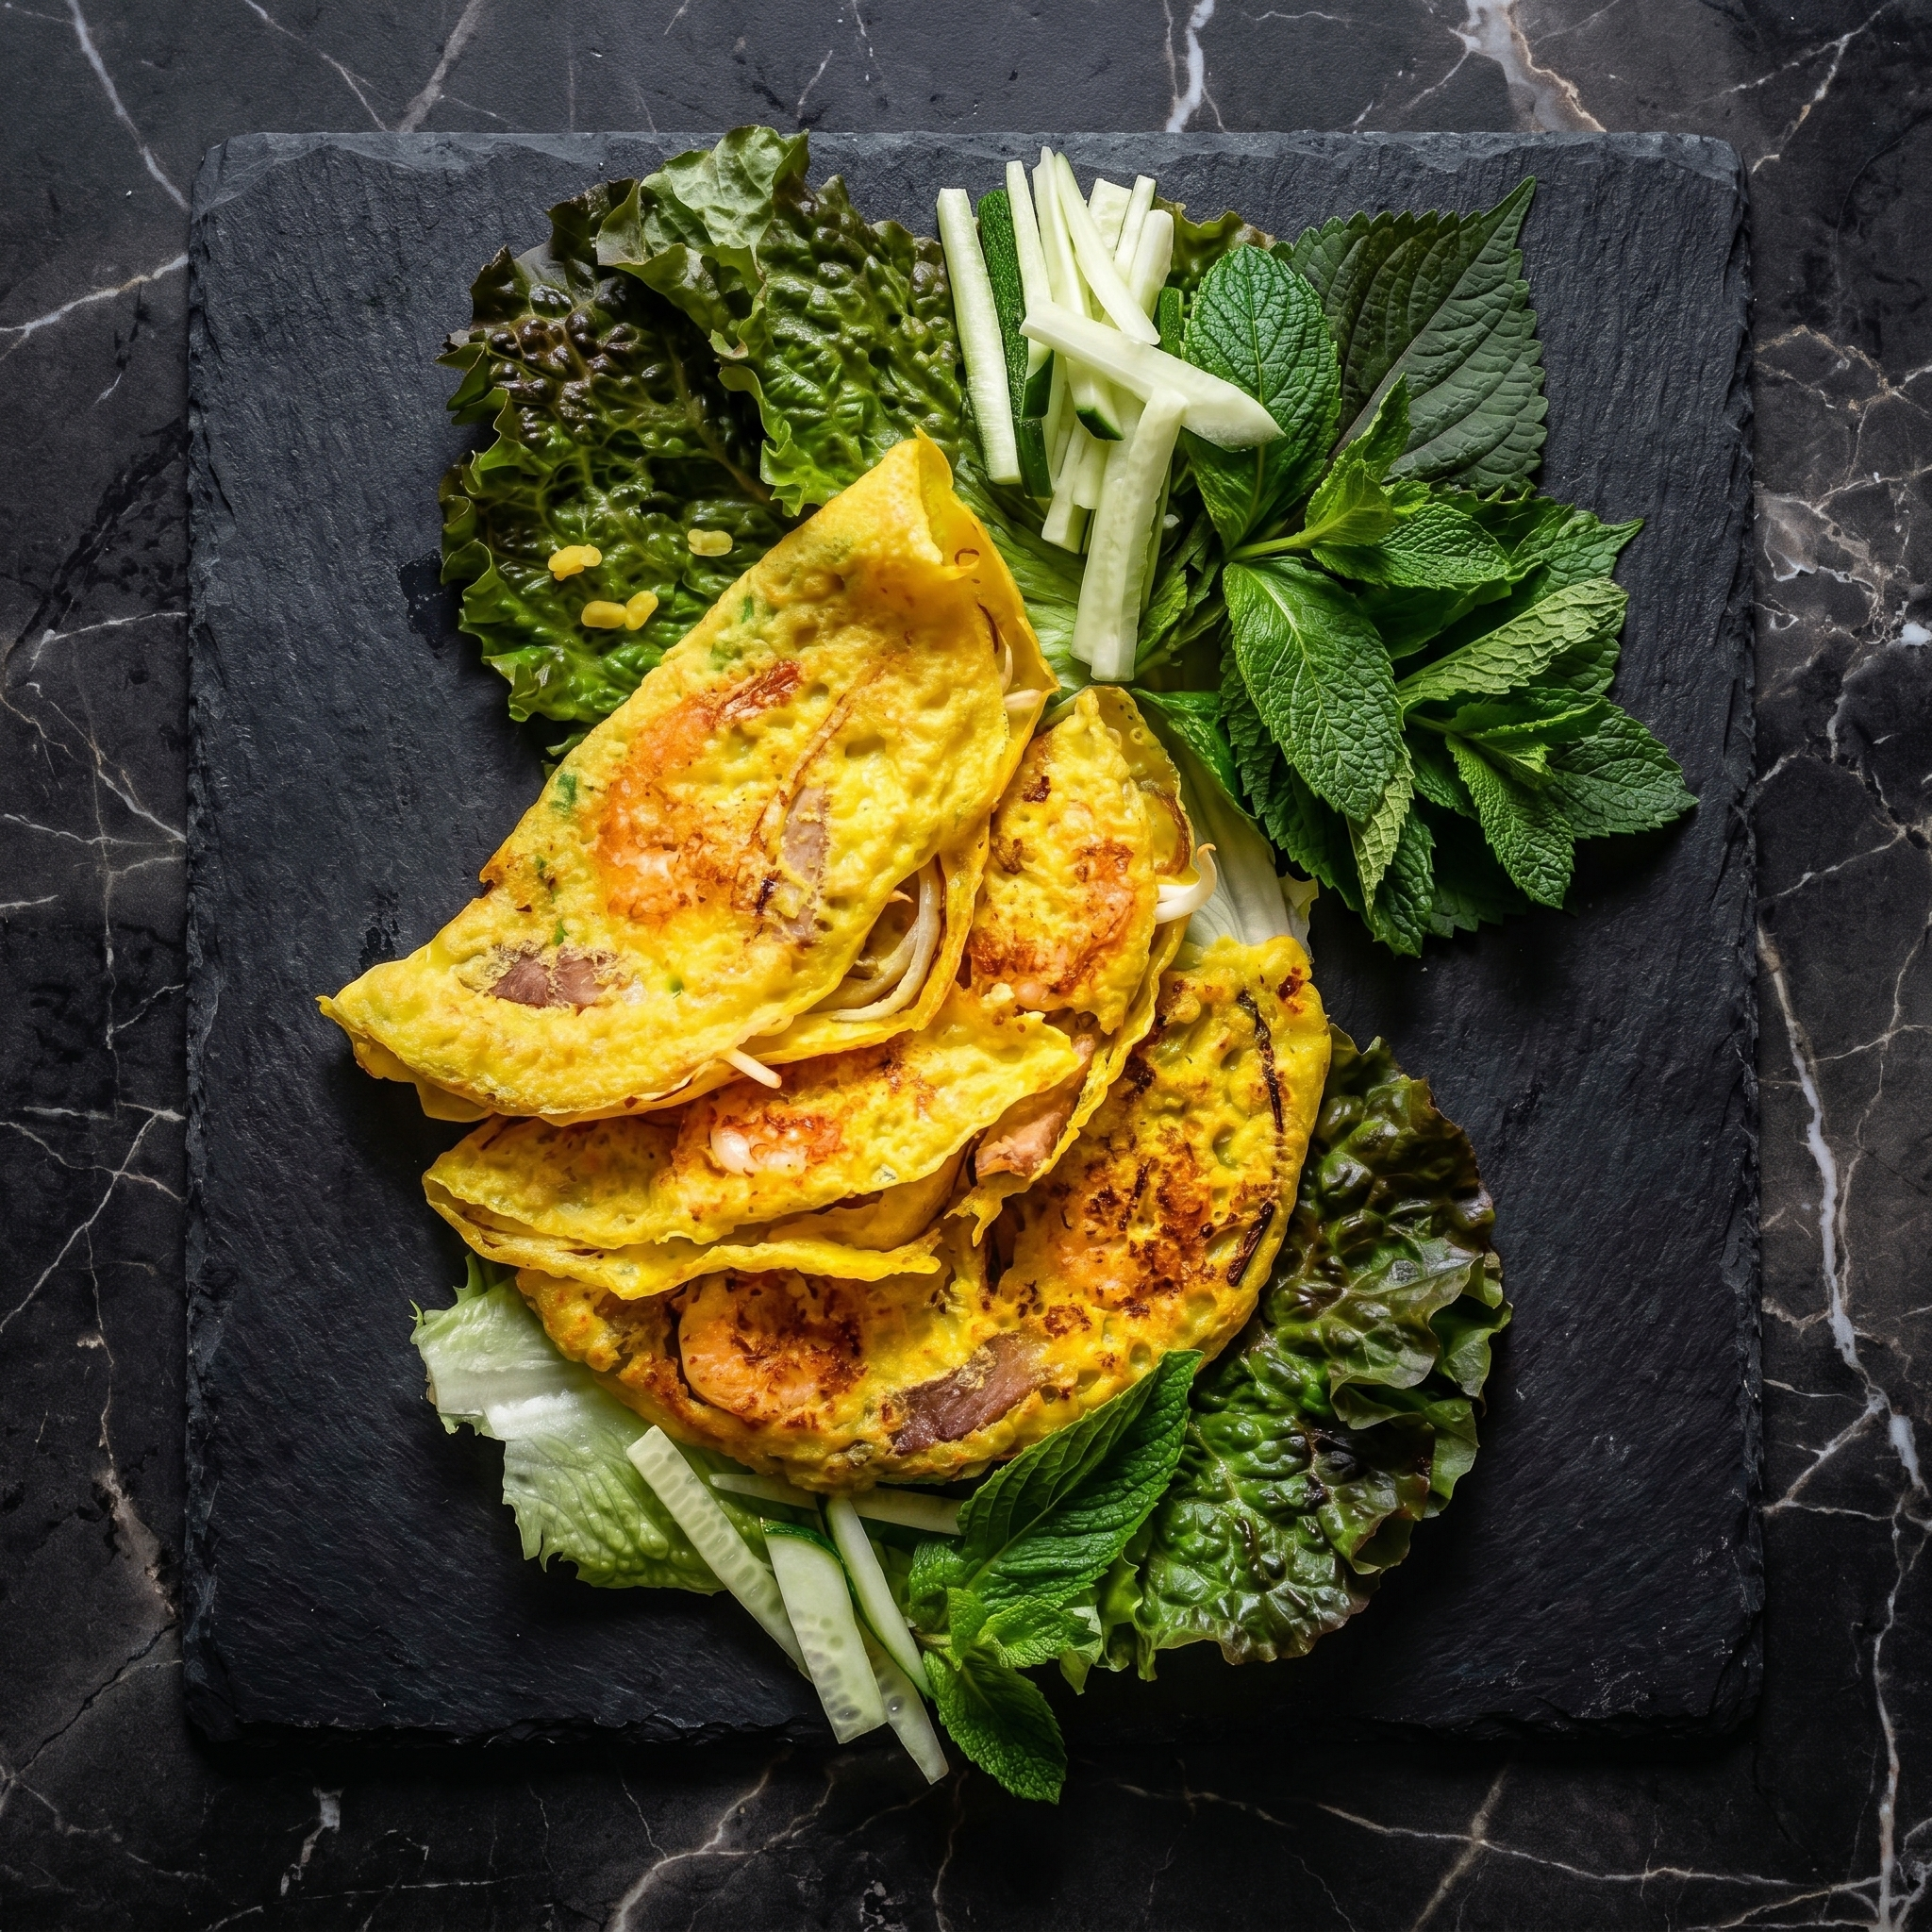
    Banh Xeo translates to “sizzling cake.” One listen to that batter hit a hot pan, and you get it. Crispy, lacy edges. A golden, turmeric-stained center. Packed with shrimp, pork, and bean sprouts. Then you wrap it in lettuce, add herbs, and dunk. Chaos. Delicious chaos.

    Ingredients

    Serves 4. Makes 6–8 crepes.

    For the Batter:

    • 1 cup (120g) rice flour
    • ¼ cup (30g) cornstarch
    • 1 tsp turmeric powder
    • ½ tsp salt
    • 1 can (14 oz / 400ml) coconut milk
    • 1 cup (240ml) water
    • 2 green onions, thinly sliced

    For the Filling:

    • ½ lb (225g) shrimp, peeled and halved lengthwise
    • ½ lb (225g) pork belly or shoulder, thinly sliced
    • 1 onion, thinly sliced
    • 2 cups bean sprouts
    • Oil for frying

    For Wrapping & Dipping:

    • Butter lettuce or mustard leaves
    • Fresh herbs: mint, cilantro, Thai basil
    • Nuoc cham (fish sauce + lime + sugar + garlic + chili)

    Step-by-Step Instructions

    Step 1: Make Batter

    1. Whisk rice flour, cornstarch, turmeric, and salt. Add coconut milk and water. Whisk until smooth. Stir in green onions. Let rest 30 minutes.

    Step 2: Prep Dipping Sauce

    1. Mix ¼ cup fish sauce + ¼ cup water + 2 tbsp sugar + 2 tbsp lime juice + minced garlic + sliced chili.

    Step 3: Sizzle

    1. Heat a nonstick pan or cast iron skillet over medium-high heat. Add a drizzle of oil.
    2. Add a few slices of pork and 3–4 shrimp. Cook 1 minute.
    3. Add a few onion slices. Pour ⅓ cup of batter into the pan, tilting to spread thin.

    Step 4: Add Sprouts

    1. Scatter a handful of bean sprouts over half the crepe. Cover and cook 2–3 minutes until edges are crisp and golden.

    Step 5: Fold & Serve

    1. Fold the crepe in half. Slide onto a plate. Repeat with remaining batter.

    Step 6: Wrap & Eat

    1. Tear off a lettuce leaf. Add a piece of crepe. Top with herbs. Roll, dip, devour.

    Summary

    Prep Time: 20 min + rest | Cook Time: 20 min | Total: 40 min + rest

    Yield: 6–8 crepes | Difficulty: Medium (technique)

    Storage Notes

    Don’t. Banh Xeo is a fresh-eating sport. Leftover crepes go soggy. Make only what you’ll eat. Prep batter and fillings ahead, then cook to order. That’s the way.

  • English Scones (Flaky, Buttery, and Ready for Clotted Cream)

    English Scones (Flaky, Buttery, and Ready for Clotted Cream)

    Let’s settle this: scones are not biscuits. They’re not rock-hard doorstops either. A proper English scone is crisp on the outside, feathery inside, and begging for jam and clotted cream. No egg wash. No fuss. Just butter, flour, and a light hand.

    Ingredients

    Makes 8 scones.

    • 2 cups (250g) all-purpose flour
    • 1 tbsp baking powder
    • ¼ cup (50g) granulated sugar
    • ½ tsp salt
    • ½ cup (115g) cold unsalted butter, cubed
    • ½ cup (120ml) cold milk (plus more for brushing)
    • 1 large egg
    • ½ cup (75g) currants or raisins (optional)

    To Serve:

    • Clotted cream (or mascarpone + whipped cream mix)
    • Strawberry jam

    Step-by-Step Instructions

    Step 1: Preheat & Prep

    1. Preheat oven to 400°F (200°C). Line a baking sheet with parchment.

    Step 2: Mix Dry

    1. Whisk flour, baking powder, sugar, and salt. Cut in cold butter until mixture looks like coarse crumbs.

    Step 3: Add Wet

    1. Whisk milk and egg together. Pour into dry mixture. Stir gently until just combined (don’t overmix). Fold in currants if using.

    Step 4: Shape

    1. Turn dough onto a floured surface. Pat into a 1-inch thick round (don’t roll—it compresses).
    2. Cut into 8 wedges OR use a 2-inch round cutter (press straight down—no twisting).

    Step 5: Bake

    1. Place scones on baking sheet. Brush tops with milk.
    2. Bake 12–15 minutes until golden brown.

    Step 6: Serve

    1. Cool slightly. Split open. Slather with jam, then clotted cream (or cream then jam—choose your war).

    Summary

    Prep Time: 15 min | Bake Time: 15 min | Total: 30 min

    Yield: 8 scones | Difficulty: Easy

    Storage Notes

    Best day-of. Freeze unbaked scones on a tray, then bake from frozen (add 3–4 minutes). Baked scones freeze well for 2 months. Reheat in oven at 350°F for 5 minutes. Never microwave.

  • Sourdough Rye Bread (Dark, Tangy, and Deliciously Dense)

    Sourdough Rye Bread (Dark, Tangy, and Deliciously Dense)

    Real rye bread is sour. Not that supermarket stuff. This sourdough rye delivers tang, depth, and that signature chewy crumb. Caraway seeds optional but encouraged. Perfect for pastrami, butter, or just tearing apart with your hands. Let’s bake.

    Ingredients

    Makes 1 medium loaf.

    • 150g active sourdough starter (bubbly, fed 4–6 hours ago)
    • 300g warm water (about 80°F / 27°C)
    • 200g rye flour (dark or light)
    • 250g bread flour
    • 10g salt (about 2 tsp)
    • 1 tbsp caraway seeds (optional but classic)
    • 1 tbsp molasses or dark honey (optional, for deeper color)

    Step-by-Step Instructions

    Step 1: Mix

    1. Whisk starter and water together. Add flours, salt, caraway seeds, and molasses. Mix into a shaggy dough. It will be stickier than regular sourdough (rye does that). Cover and rest 30 minutes.

    Step 2: Stretch & Fold

    1. Over 2 hours, do 3 sets of stretch-and-folds (every 40 minutes). Rye dough is delicate—handle gently.

    Step 3: Bulk Ferment

    1. Cover and let rise at room temperature for 4–6 hours. Look for bubbles, not double volume (rye rises less).

    Step 4: Shape

    1. Turn dough onto a floured surface. Shape into a round or oval. Place seam-side up into a floured proofing basket.

    Step 5: Cold Proof

    1. Cover and refrigerate 8–16 hours.

    Step 6: Bake

    1. Preheat oven to 475°F (245°C) with a Dutch oven inside for 30 minutes.
    2. Turn dough onto parchment. Score the top. Lower into hot Dutch oven.
    3. Cover and bake 20 minutes. Remove lid, lower heat to 425°F (220°C), bake 20–25 minutes more.
    4. Cool completely (at least 2 hours) before slicing—rye needs time to set.

    Summary

    Prep Time: 20 min active | Ferment + Proof: 12–22 hours | Bake: 45 min

    Yield: 1 medium loaf | Difficulty: Medium (sticky dough)

    Storage Notes

    Counter (cut side down): 4–5 days (rye stays moist longer). Freezer: 3 months. Rye also toasts beautifully. Never refrigerate.

  • Southern Fried Chicken (Extra Craggy, Extra Juicy, Extra Everything)

    Southern Fried Chicken (Extra Craggy, Extra Juicy, Extra Everything)

    Southern fried chicken should be a verb. It demands attention. The crackle. The peppery, shattery crust giving way to impossibly juicy meat. This recipe delivers that. Buttermilk brine does the heavy lifting. Double dredge does the rest. Let’s fry.

    Ingredients

    Serves 4–6.

    For the Brine:

    • 2 cups buttermilk
    • 1 tbsp hot sauce (optional)
    • 1 tsp salt
    • 1 tsp black pepper
    • 8 chicken pieces (drumsticks, thighs, breasts)

    For the Dredge:

    • 2 cups all-purpose flour
    • 1 tbsp paprika
    • 1 tbsp garlic powder
    • 1 tbsp onion powder
    • 1 tsp cayenne pepper
    • 1 tsp salt
    • 1 tsp black pepper

    For Frying:

    • Vegetable oil or peanut oil (enough for 1½ inches deep)

    Step-by-Step Instructions

    Step 1: Brine

    1. Whisk buttermilk, hot sauce, salt, and pepper. Add chicken. Refrigerate 4–24 hours (longer = juicier).

    Step 2: Prep Dredge

    1. Mix all dredge ingredients in a large bowl.

    Step 3: Double Dredge

    1. Remove chicken from brine. Let excess drip off.
    2. Dredge in flour mixture. Dip back in buttermilk. Dredge again (this = craggy crust).

    Step 4: Heat Oil

    1. Heat oil in a cast iron skillet to 325°F (160°C).

    Step 5: Fry

    1. Fry chicken in batches, skin-side down first. Don’t crowd.
    2. Drumsticks/thighs: 12–15 minutes. Breasts: 10–12 minutes. Flip halfway.
    3. Internal temp should hit 165°F (74°C). Drain on a wire rack (not paper towels).

    Step 6: Serve

    1. Let rest 5 minutes. Then get loud with it.

    Summary

    Prep Time: 15 min + brine | Cook Time: 30 min | Total: 45 min + brine

    Yield: 4–6 servings | Difficulty: Medium (frying)

    Storage Notes

    Fridge: 4 days. Reheat: Air fryer at 375°F for 6–8 minutes or oven at 400°F for 15 minutes. Never microwave (crust dies). Cold fried chicken for breakfast? Also acceptable.

  • Chicken Lo Mein (Faster Than Delivery, Twice as Good)

    Chicken Lo Mein (Faster Than Delivery, Twice as Good)

    Lo mein is supposed to be fast. By the time you’ve waited for delivery, this is already in your belly. Tender chicken, snappy noodles, crisp bell peppers, and a savory sauce that coats every single strand. One pan. Twenty minutes. Let’s go.

    Ingredients

    Serves 4.

    For the Sauce:

    • ¼ cup soy sauce
    • 2 tbsp oyster sauce
    • 1 tbsp dark soy sauce (or regular)
    • 1 tbsp sesame oil
    • 1 tbsp brown sugar
    • 2 cloves garlic, minced
    • 1 tsp ginger, grated
    • ½ cup chicken broth or water
    • 1 tbsp cornstarch

    For the Stir Fry:

    • 8 oz (225g) lo mein noodles or spaghetti
    • 1 lb (450g) chicken breast, thinly sliced
    • 2 tbsp vegetable oil
    • 1 bell pepper, sliced
    • 1 carrot, julienned
    • 2 cups shredded cabbage
    • 2 green onions, chopped

    Step-by-Step Instructions

    Step 1: Cook Noodles

    1. Boil noodles according to package directions. Drain, rinse with cold water, set aside.

    Step 2: Mix Sauce

    1. Whisk all sauce ingredients together in a bowl.

    Step 3: Cook Chicken

    1. Heat 1 tbsp oil in a wok or large pan over high heat. Add chicken and cook until browned and cooked through (3–4 minutes). Remove and set aside.

    Step 4: Stir Fry Veggies

    1. Add remaining oil. Toss in bell pepper, carrot, and cabbage. Stir fry 2 minutes.

    Step 5: Bring It Together

    1. Return chicken to pan. Add noodles. Pour sauce over everything.
    2. Toss vigorously for 1–2 minutes until sauce thickens and coats everything.

    Step 6: Serve

    1. Top with green onions. Eat immediately. Delivery who?

    Summary

    Prep Time: 10 min | Cook Time: 10 min | Total: 20 min

    Yield: 4 servings | Difficulty: Easy

    Storage Notes

    Fridge: 3 days. Reheat: In a hot wok or pan with a splash of water (microwave will make noodles mushy). Best eaten fresh, but leftovers are still solid.

  • Pork Egg Rolls (So Crispy, You’ll Hear Them Across the Room)

    Pork Egg Rolls (So Crispy, You’ll Hear Them Across the Room)

    An egg roll should crackle when you bite it. Not that sad, limp takeout version. This homemade pork egg roll delivers maximum crunch, a juicy savory filling, and that unmistakable fried glory. Worth the oil. Worth the mess. Absolutely worth it.

    Ingredients

    Makes 12 egg rolls.

    • 12 egg roll wrappers
    • 1 lb (450g) ground pork
    • 2 cups shredded green cabbage
    • 1 carrot, shredded
    • 2 cloves garlic, minced
    • 1 tbsp ginger, grated
    • 2 green onions, chopped
    • 2 tbsp soy sauce
    • 1 tbsp oyster sauce (optional)
    • 1 tsp sesame oil
    • Oil for frying (vegetable or canola)

    For Dipping:

    • Sweet chili sauce, duck sauce, or soy + vinegar

    Step-by-Step Instructions

    Step 1: Cook Filling

    1. In a skillet, cook ground pork over medium-high heat until browned. Drain excess fat.
    2. Add garlic, ginger, cabbage, and carrot. Cook 2–3 minutes until cabbage wilts.
    3. Stir in soy sauce, oyster sauce, sesame oil, and green onions. Cook 1 more minute. Cool completely (hot filling steams wrappers).

    Step 2: Assemble

    1. Place an egg roll wrapper like a diamond. Add 3 tablespoons filling in a log across the center.
    2. Fold bottom corner over filling. Fold in sides. Roll tightly. Wet top corner with water to seal.

    Step 3: Fry

    1. Heat 1½ inches of oil to 350°F (175°C).
    2. Fry egg rolls 2–3 at a time, 2–3 minutes per side, until deep golden brown and crispy.
    3. Drain on a wire rack (not paper towels—paper towels make them soggy).

    Step 4: Serve

    1. Serve hot with dipping sauce. Listen to that crunch.

    Summary

    Prep Time: 20 min | Cook Time: 15 min | Total: 35 min

    Yield: 12 egg rolls | Difficulty: Medium (frying)

    Storage Notes

    Make ahead: Assemble uncooked egg rolls, freeze on a tray, then bag. Fry from frozen (add 2 minutes). Leftovers: Reheat in air fryer at 375°F for 5 minutes or oven at 400°F for 8 minutes. Never microwave (soggy sadness).

  • Ricotta Cannolis (Crispy Shells, Silky Filling, Pure Sicilian Bliss)

    Ricotta Cannolis (Crispy Shells, Silky Filling, Pure Sicilian Bliss)

    Cannolis are Italy’s greatest hit. Crunchy, bubbly shells. Silky, sweet ricotta filling. Tiny chocolate chips playing hide-and-seek. Yes, you can make them at home. No, you don’t need metal tubes. Let’s do this.

    Ingredients

    Makes 10–12 medium cannolis.

    For the Shells:

    • 2 cups (250g) all-purpose flour
    • 2 tbsp sugar
    • ¼ tsp salt
    • 2 tbsp cold butter, cubed
    • 1 egg yolk
    • ½ cup (120ml) white wine (or Marsala)
    • Oil for frying (vegetable or canola)

    For the Filling:

    • 2 cups (450g) whole milk ricotta cheese, drained overnight
    • ½ cup (60g) powdered sugar
    • 1 tsp vanilla extract
    • ¼ tsp cinnamon
    • ⅓ cup mini chocolate chips
    • Optional: chopped pistachios for ends

    Step-by-Step Instructions

    Step 1: Drain Ricotta

    1. Place ricotta in a cheesecloth-lined strainer over a bowl. Refrigerate overnight (or at least 4 hours). This prevents soggy filling.

    Step 2: Make Dough

    1. Mix flour, sugar, and salt. Cut in butter until crumbly. Add egg yolk and wine. Knead until smooth. Wrap and rest 30 minutes.

    Step 3: Roll & Cut

    1. Roll dough paper-thin (1/16 inch). Cut into 4-inch circles or ovals.

    Step 4: Shape & Fry

    1. Wrap dough around a metal tube (or rolled foil/cannoli forms). Seal edge with egg white.
    2. Heat oil to 350°F (175°C). Fry 1–2 minutes until golden. Cool on rack, then slide off tube.

    Step 5: Make Filling

    1. Mix drained ricotta, powdered sugar, vanilla, and cinnamon until smooth. Fold in chocolate chips.

    Step 6: Fill & Serve

    1. Pipe filling into shells just before serving (soggy shells = sad cannolis). Dip ends in pistachios if desired. Dust with powdered sugar. Devour.

    Summary

    Prep Time: 40 min + draining | Cook Time: 15 min | Total: 1 hour + overnight

    Yield: 10–12 cannolis | Difficulty: Medium

    Storage Notes

    Shells: 1 week in an airtight container. Filling: 2 days in fridge. NEVER fill ahead (soggy tragedy). Fill right before serving. Unfilled shells also freeze beautifully for 3 months.